Butter Cookies Tin Style
A blue cookie tin on the kitchen table always takes me straight back to Christmas. Butter Cookies Tin Style brings that same rich buttery smell and crisp little bite without needing anything fancy. The first time I tried making them at home was for a holiday get-together and I left the first tray in the oven for almost five minutes too long. The edges were darker than I’d planned. But they still vanished before dinner. That’s when I realized these cookies were easier to get right than their neat little shapes made them seem.
Since then I’ve made them for Christmas gifts and quiet December afternoons when the house needed something sweet. This easy butter cookies tin style recipe uses a few basic ingredients and doesn’t need a long dough rest. The smell alone is worth turning on the oven. And if you enjoy that deep butter flavor in homemade cookies then you’ll probably love our Butter Pecan Cookies too. They’re a lovely change when you want something with a little crunch from toasted nuts. What I like most is how these cookies seem so delicate but aren’t hard to make once you know what the dough should feel like.
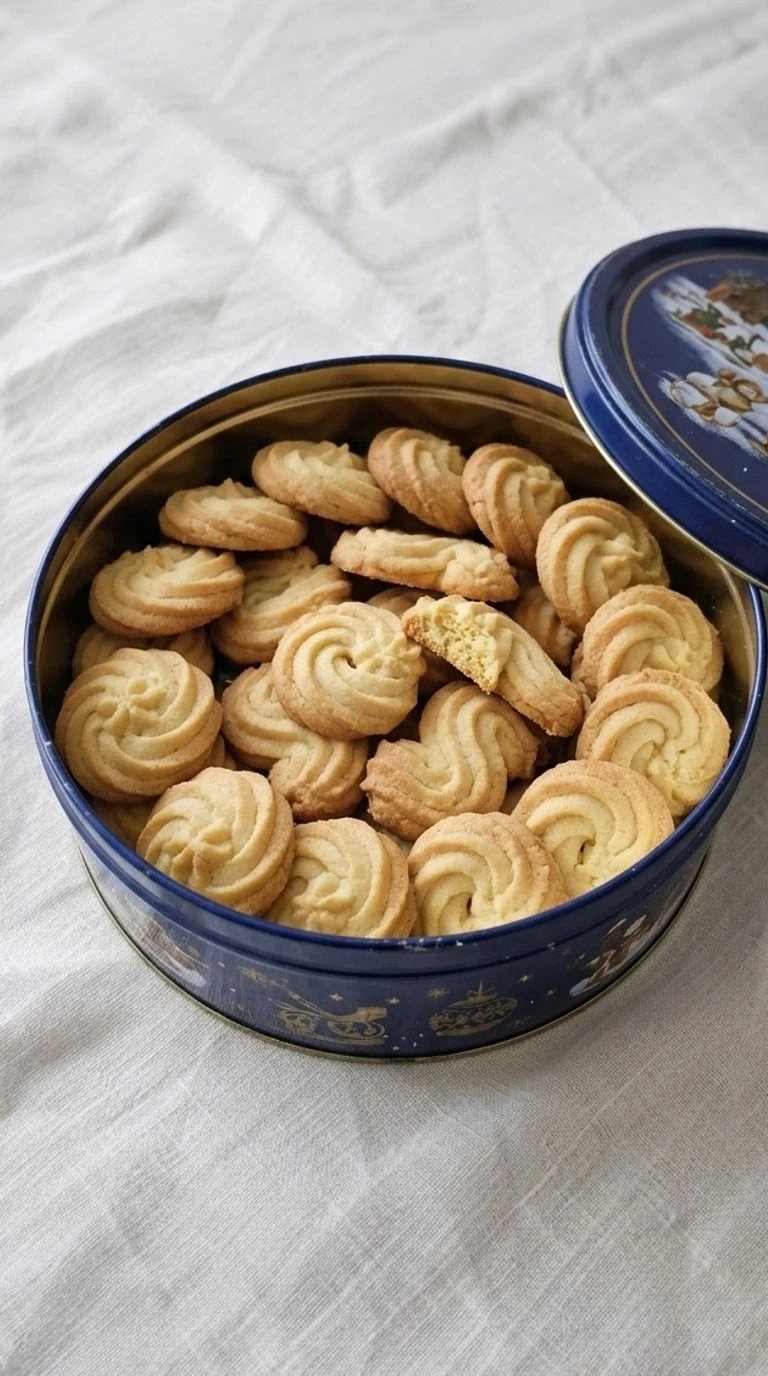
You get crisp golden ridges and a tender middle that melts away as you bite. A cup of tea helps. So does making an extra batch because the first tin never stays full for long. These old-fashioned Danish-style butter cookies also keep their flavor well which makes them a great choice when holiday baking gets busy.
Why This Recipe Works
Butter Cookies Tin Style works because powdered cane sugar blends into soft butter without leaving coarse sugar crystals. Two egg yolks add fat and tenderness while just 2 tablespoons of whole milk loosen the dough enough for clean piping.
Chilling the shaped cookies for 15 minutes helps the butter firm up before baking at 350°F. That short chill also helps the piped ridges stay distinct while the edges turn crisp.
Ingredients
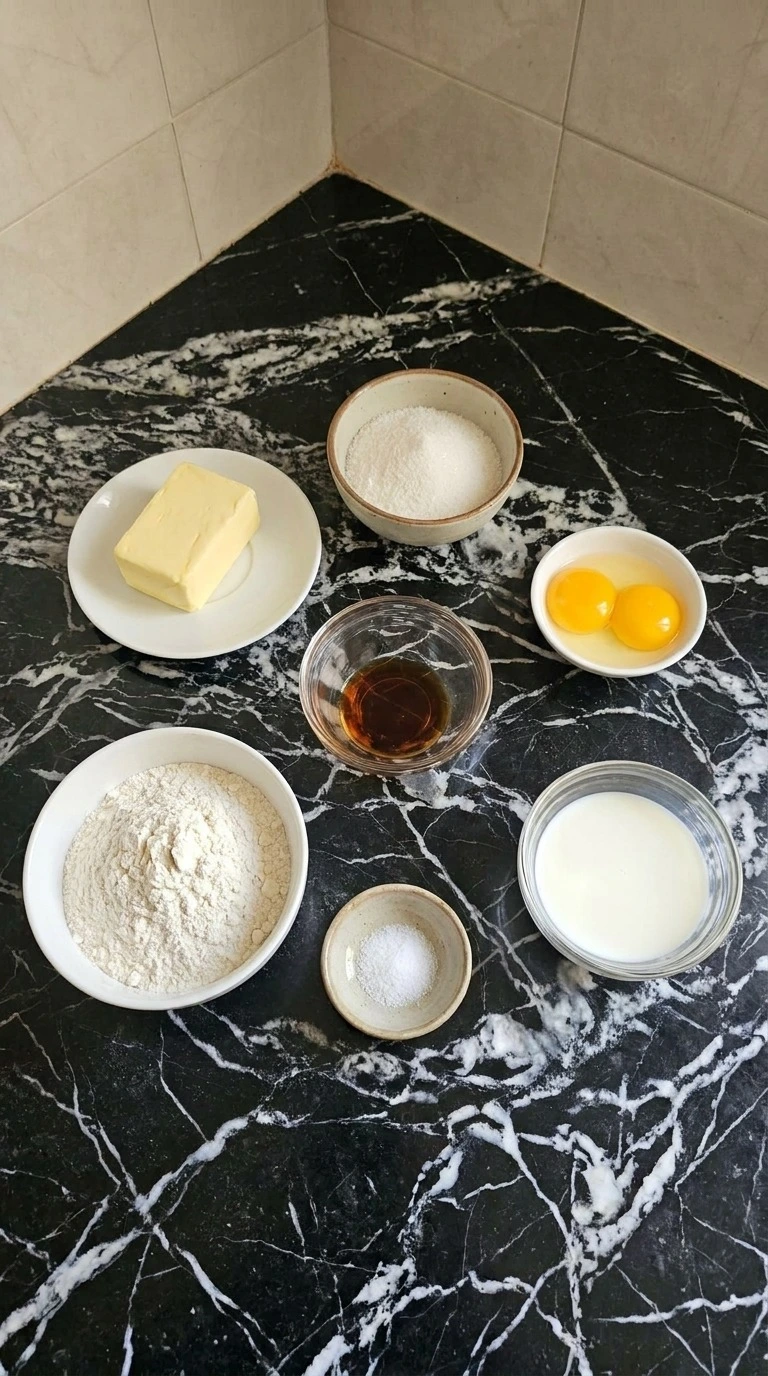
- unsalted European-style butter: Softened to about 65°F to 68°F so it creams smoothly and gives the cookies their rich butter flavor. Butter with around 82% fat is ideal.
- powdered cane sugar: Sifted if lumpy to blend smoothly into the butter. Its fine texture helps create a tender crumb without gritty sugar crystals.
- large egg yolks: Separated from the whites and allowed to lose their fridge chill. They add richness and help the butter mixture bind.
- pure vanilla extract: Adds the familiar sweet vanilla aroma associated with classic Danish-style butter cookies.
- whole milk: Adds enough moisture to make the dough easier to pipe while helping the shaped cookies hold their ridges.
- all-purpose wheat flour: Measured without packing and folded gently into the butter mixture. It gives the cookies structure without making them too firm.
- fine sea salt: Mixed into the flour to balance the sweetness and bring out the rich butter and vanilla flavors.
Kitchen Equipment
- Large mixing bowl: A sturdy 3-quart mixing bowl gives the butter and sugar enough room to blend without spilling. Choose a bowl with a stable base because a narrow lightweight bowl makes creaming difficult.
- Electric hand mixer: A mixer with at least three speeds creams the butter smoothly and blends the egg yolks evenly. Use a stand mixer with a paddle attachment if preferred but avoid high speed because it adds too much air.
- Rubber spatula: A flexible silicone spatula folds the flour into the butter mixture without overworking the dough. Choose one with a firm core so thick cookie dough doesn’t bend it out of shape.
- Large piping bag: A sturdy 16-inch piping bag holds enough dough for several cookies and gives good control when forming ridges. Thin sandwich bags often split under the pressure of thick butter cookie dough.
- Large open star piping tip: A metal open star tip about 1/2 inch wide creates the classic ridged rosettes and S shapes. A narrow tip can make the dough hard to pipe and may cause the bag to burst.
- Two rimmed baking sheets: Two sturdy 13-by-18-inch baking sheets give the cookies room to spread without touching. Choose light-colored metal because very dark sheets absorb more heat and can brown the bottoms too quickly.
- Parchment paper: Two sheets of oven-safe parchment prevent sticking and help the shaped cookies release cleanly. Check that the parchment is rated for at least 350°F and avoid wax paper because it isn’t oven-safe.
- Wire cooling rack: A wire rack at least 12 inches wide lets air circulate around the cookies while their centers finish setting. A solid plate traps heat underneath and may soften the bottoms.
- Round airtight cookie tin: A round metal tin about 9 inches wide protects the cooled cookies and gives them their traditional gift-ready look. Choose one with a snug lid because loose-fitting tins let humidity soften the crisp texture.
How to Make It
Step 1: Cream the softened butter and powdered sugar

Put 1 cup of softened unsalted butter in a large mixing bowl and add 2/3 cup of powdered cane sugar. The butter should be cool but soft enough to dent with a finger at about 65°F to 68°F. Beat with an electric mixer on medium speed for 2 to 3 minutes. Stop halfway through and scrape the sides with a rubber spatula so no dense butter stays near the bottom.
Keep the motion steady because you’re aiming for a smooth cream rather than a bowl full of air. Don’t rush it. If you beat for much longer the extra air can make your cookies spread as they bake. The mixture should turn pale ivory and look soft with a smooth buttery texture.
You shouldn’t see dry pockets of powdered sugar. If it looks shiny and greasy then the butter may be too warm. Cream gently because too much trapped air can blur the piped ridges.
Tip: Choose European-style unsalted butter with about 82% butterfat for a richer flavor and a slightly more delicate bite.
Step 2: Beat in the egg yolks and vanilla
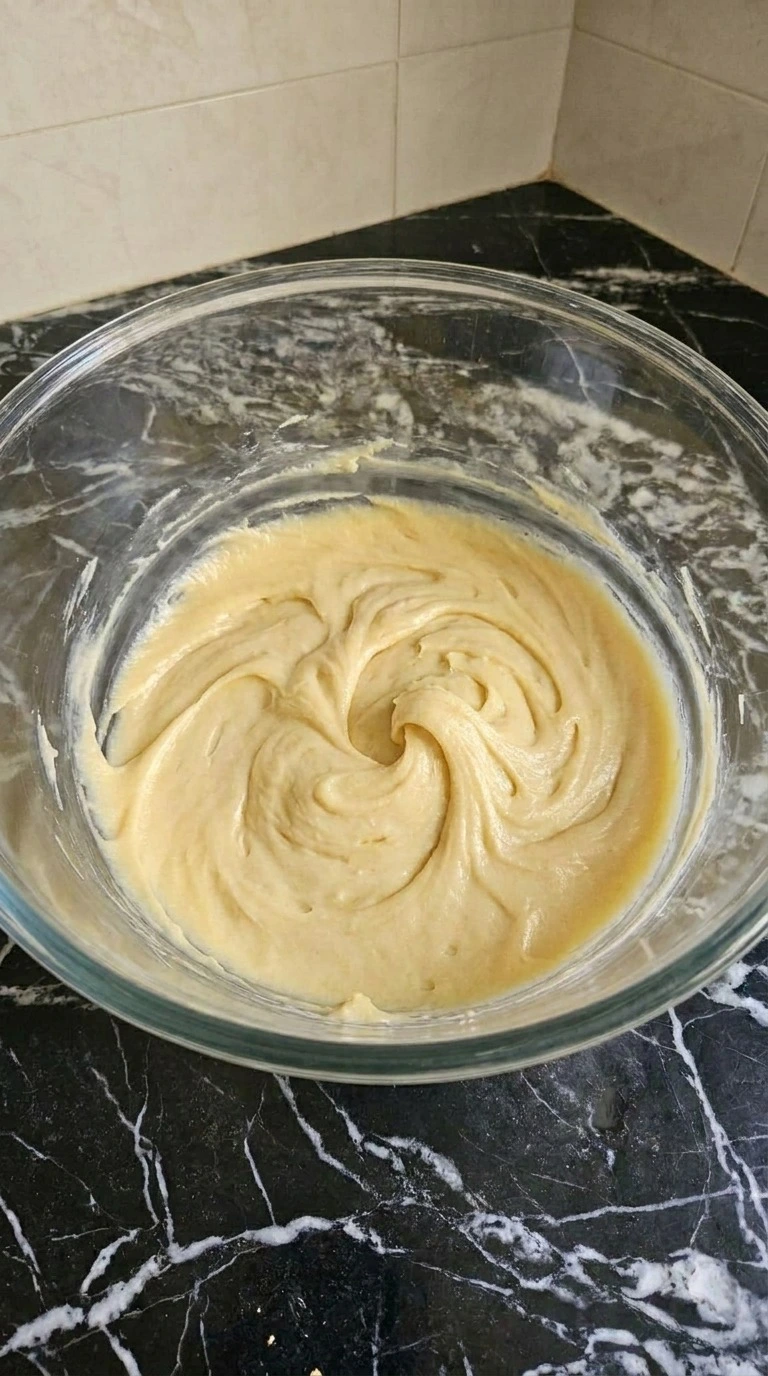
Add 2 large egg yolks to the creamed butter mixture and pour in 1 teaspoon of pure vanilla extract. Keep the ingredients close to 68°F so the butter doesn’t turn firm when you add the yolks. Beat on low speed for 45 to 60 seconds. Then pour in 2 tablespoons of whole milk and mix for another 20 to 30 seconds.
Scrape along the bottom once to catch any unmixed butter. The dough base should look smooth and thick rather than foamy. Stop as soon as everything blends because extra mixing adds air that you don’t need. You’ll notice the color shift from pale ivory to a soft yellow cream.
The vanilla smell becomes clear and the mixture should look even without liquid around the edges. If it starts to split then the ingredients may be too cold. Mix briefly so the yolks bind the fat and liquid.
Tip: Separate cold eggs because the yolks hold together better, then let them sit covered for 15 minutes before mixing.
Step 3: Fold the flour into a soft piping dough

Add 2 cups of all-purpose wheat flour and 1/4 teaspoon of fine sea salt to the butter mixture. Fold with a rubber spatula by pressing through the center and turning the dough over itself. Keep folding for about 60 to 90 seconds until no dry flour remains. The mixture should form a thick soft dough that holds gentle ridges but still gives when pressed.
If you use a mixer then keep it on the lowest speed for no more than 30 seconds after the last dry streak fades. Don’t knead it. Too much mixing builds gluten and can turn a delicate cookie into a firm biscuit. At first you’ll see flour patches around the edges.
Then the mix will turn into one pale yellow mass with uneven folds and a soft matte finish. If it seems stiff then check whether your butter was too cold before adding extra liquid. Fold just until smooth because limited gluten keeps the crumb tender.
Tip: Measure the flour by spooning it into the cup and leveling it. Two packed cups can add enough extra flour to make piping difficult.
Step 4: Pipe the dough into ridged rosettes and S shapes

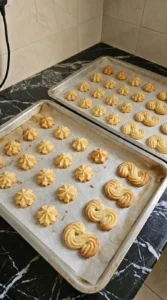
Fit a large piping bag with an open star tip about 1/2 inch wide and fill it with the soft dough. Pipe 24 small rosettes and 12 ridged S-shaped cookies onto parchment-lined baking sheets. Each cookie should use about 1 tablespoon of dough and measure roughly 1. 5 to 2 inches across. Leave about 2 inches between each piece.
Press steadily and lift the tip cleanly at the end of each shape. If the dough feels too stiff then warm the filled bag between your hands for 1 to 2 minutes. Chill the shaped cookies for 15 minutes at about 40°F before baking. The ridges should stand up clearly and the dough shouldn’t slump into flat puddles. Small differences in each swirl are fine.
Butter Cookies Tin Style gets its familiar shape from those raised lines. Skip the chill and the edges may spread too far. Cool the dough so the butter firms and holds each ridge.
Tip: Pipe the first 3 cookies as a trial before filling both sheets. If the dough tears at the tip then massage the bag gently.
Step 5: Bake until the ridges turn lightly golden

Heat the oven to 350°F and place one sheet of chilled cookies on the middle rack. Bake for 12 to 15 minutes. Turn the sheet from front to back around minute 8 if your oven tends to brown unevenly. Watch the bottoms and outer ridges rather than waiting for the whole cookie to turn dark. The centers should remain pale golden while the thin edges develop a deeper toasted color.
Bake the second sheet the same way and keep its dough chilled until the oven is free. Let both batches rest on their trays for 5 minutes before transferring them to a cooling rack. The kitchen should smell strongly of warm butter and vanilla. Look for dry tops with golden outlines and firm ridges that still keep their shape. (I once waited for every cookie to turn brown and lost that soft center.
Pale tops taste better. ) Baking too long makes them hard. Stop at lightly golden edges because residual heat keeps setting the centers.
Tip: Use the middle oven rack and bake one sheet at a time for more even color. Dark baking sheets may need checking at minute 11.
Step 6: Cool completely and arrange the cookies for serving
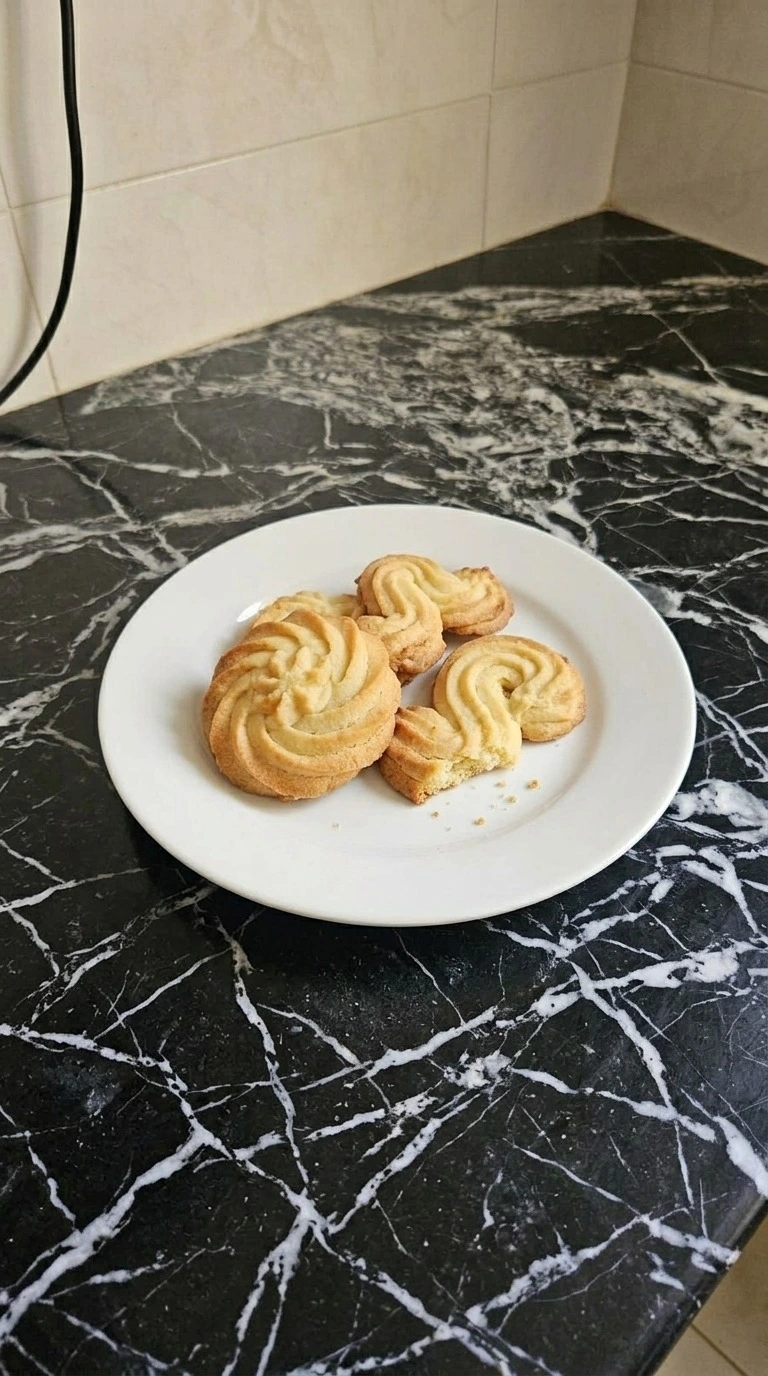
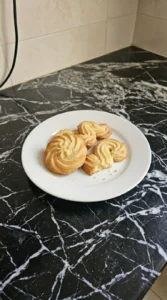
Leave the cookies on a cooling rack for 20 to 30 minutes until they reach room temperature near 70°F. Don’t stack them while warm because trapped moisture can soften those crisp edges. Choose 3 cookies for a serving plate and place the rest in an airtight cookie tin once completely cool. Set one rosette and two S-shaped cookies slightly apart so the ridges don’t break when you pick them up.
You can gently break one cookie to show the crumb. It should snap with little pressure but still feel tender as you eat it. Keep the tin closed between servings. The finished cookies should feel dry and light with a fine pale yellow interior.
Their golden edges will look slightly uneven and that’s part of the homemade charm. Stack them too soon and moisture dulls their crisp bite. Cool fully because escaping steam must leave before the tin closes.
Tip: Place a sheet of parchment between loosely stacked cookie layers in the tin. A 9-inch round tin usually holds this batch comfortably.
Pro Tips
- Use butter around 65°F to 68°F before creaming. It should dent when pressed but still hold its shape rather than looking shiny or greasy.
- Weigh your flour to reach 240 g instead of scooping directly from the bag. Too much flour makes the dough stiff and difficult to pipe.
- Choose a large open star tip about 1/2 inch wide. Smaller tips squeeze the dough too tightly and make it harder to form smooth rosettes.
- Keep each piped cookie close to 1 tablespoon of dough. Similar portions help the thinner S shapes and thicker rosettes bake within the same time window.
- Before baking all 36 cookies, test 2 or 3 on a small tray at 350°F. You’ll see whether your dough holds its shape.
- Rotate the baking sheet once around minute 8 if your oven has hot spots. Look for lightly toasted edges rather than waiting for dark golden tops.
- For a stronger vanilla aroma, replace half the vanilla extract with 1/2 teaspoon of almond extract. The flavor becomes more fragrant without changing the texture.
- Let cookies cool completely for at least 20 minutes before closing the tin. Even slight leftover warmth can create moisture and soften their crisp edges.
- For vanilla almond butter cookies, use 1/2 teaspoon of pure vanilla extract and 1/2 teaspoon of almond extract. You’ll get a fragrant cookie with a delicate nutty finish.
- Make orange butter cookies by folding 2 teaspoons of finely grated orange zest into the creamed butter mixture. The citrus adds a fresh Christmas flavor without changing the bake time.
- For chocolate-dipped butter cookies, melt 100 g of dark chocolate and dip one end of each fully cooled cookie. Let the coating set for 30 minutes before packing.
- Give the cookies a warm holiday spice note by adding 1/4 teaspoon of ground Ceylon cinnamon and 1/8 teaspoon of ground cardamom to the flour. Keep the amounts small so the butter flavor stays noticeable.
Substitutions & Variations
- unsalted European-style butter: Use 1 cup (227 g) of plant-based baking butter with at least 80% fat for a dairy-free version. Choose firm baking sticks rather than soft tub spreads because extra water can flatten the piped ridges. Chill the shaped cookies for 20 minutes instead of 15. The flavor will be slightly less rich and the edges may spread more.
- all-purpose wheat flour: Replace 2 cups (240 g) of all-purpose wheat flour with 240 g of a gluten-free 1-to-1 baking flour blend containing. The cookies may feel more fragile and slightly sandy after baking. Let them cool on their trays for 10 minutes before moving them. If you enjoy gluten-free holiday baking, try our Gluten Free Gingerbread Cookies for another Christmas treat.
- large egg yolks: Replace the 2 large egg yolks with 2 tablespoons of plain unsweetened soy yogurt and 1 teaspoon of cornstarch. This egg-free option adds moisture and some binding but won’t give quite the same rich yellow crumb. The dough may need an extra 5 minutes of chilling. Expect a slightly softer cookie with less of the classic melt-in-your-mouth texture.
- powdered cane sugar: Replace 2/3 cup (80 g) of powdered cane sugar with 80 g of finely ground granulated white cane sugar. Grind the sugar until powdery and sift it before mixing. Coarser grains leave a slightly gritty texture and may make the edges spread more. Regular granulated sugar isn’t a direct texture match unless you grind it first.
- whole milk: Use 2 tablespoons of unsweetened almond milk or unsweetened soy milk instead of whole milk. Both options loosen the dough enough for piping without changing the bake time. Almond milk gives a faint nutty note while soy milk tastes more neutral. Add only the measured amount because excess liquid softens the ridges.
Storage Instructions
Keep Butter Cookies Tin Style in an airtight metal cookie tin at a cool room temperature for up to 7 days for the best crisp texture. Separate loose layers with parchment so the delicate ridges don’t break. The cookies can also stay in an airtight container in the refrigerator for up to 10 days, but they may lose some crispness. For longer storage, freeze fully cooled cookies between parchment layers in a freezer-safe container for up to 2 months.
Thaw them while covered to help prevent moisture from forming on their surfaces. If the cookies soften during storage, spread them on a baking sheet and warm them at 275°F for 3 to 5 minutes. Then let them cool for 15 minutes before serving. Don’t add liquid because the goal is to dry the surface rather than soften the crumb.
Discard cookies that develop mold, an unusual smell or a rancid butter taste. Don’t try to refresh cookies showing signs of spoilage.
Butter Cookies Tin Style
Ingredients
Method
- Put 1 cup of softened unsalted butter in a large mixing bowl and add 2/3 cup of powdered cane sugar. The butter should be cool but soft enough to dent with a finger at about 65°F to 68°F. Beat with an electric mixer on medium speed for 2 to 3 minutes. Stop halfway through and scrape the sides with a rubber spatula so no dense butter stays near the bottom. Keep the motion steady because you’re aiming for a smooth cream rather than a bowl full of air. Don’t rush it. If you beat for much longer the extra air can make your cookies spread as they bake. The mixture should turn pale ivory and look soft with a smooth buttery texture. You shouldn’t see dry pockets of powdered sugar. If it looks shiny and greasy then the butter may be too warm. Cream gently because too much trapped air can blur the piped ridges.

- Add 2 large egg yolks to the creamed butter mixture and pour in 1 teaspoon of pure vanilla extract. Keep the ingredients close to 68°F so the butter doesn’t turn firm when you add the yolks. Beat on low speed for 45 to 60 seconds. Then pour in 2 tablespoons of whole milk and mix for another 20 to 30 seconds. Scrape along the bottom once to catch any unmixed butter. The dough base should look smooth and thick rather than foamy. Stop as soon as everything blends because extra mixing adds air that you don’t need. You’ll notice the color shift from pale ivory to a soft yellow cream. The vanilla smell becomes clear and the mixture should look even without liquid around the edges. If it starts to split then the ingredients may be too cold. Mix briefly so the yolks bind the fat and liquid.
- Add 2 cups of all-purpose wheat flour and 1/4 teaspoon of fine sea salt to the butter mixture. Fold with a rubber spatula by pressing through the center and turning the dough over itself. Keep folding for about 60 to 90 seconds until no dry flour remains. The mixture should form a thick soft dough that holds gentle ridges but still gives when pressed. If you use a mixer then keep it on the lowest speed for no more than 30 seconds after the last dry streak fades. Don’t knead it. Too much mixing builds gluten and can turn a delicate cookie into a firm biscuit. At first you’ll see flour patches around the edges. Then the mix will turn into one pale yellow mass with uneven folds and a soft matte finish. If it seems stiff then check whether your butter was too cold before adding extra liquid. Fold just until smooth because limited gluten keeps the crumb tender.

- Fit a large piping bag with an open star tip about 1/2 inch wide and fill it with the soft dough. Pipe 24 small rosettes and 12 ridged S-shaped cookies onto parchment-lined baking sheets. Each cookie should use about 1 tablespoon of dough and measure roughly 1.5 to 2 inches across. Leave about 2 inches between each piece. Press steadily and lift the tip cleanly at the end of each shape. If the dough feels too stiff then warm the filled bag between your hands for 1 to 2 minutes. Chill the shaped cookies for 15 minutes at about 40°F before baking. The ridges should stand up clearly and the dough shouldn’t slump into flat puddles. Small differences in each swirl are fine. Butter Cookies Tin Style gets its familiar shape from those raised lines. Skip the chill and the edges may spread too far. Cool the dough so the butter firms and holds each ridge.

- Heat the oven to 350°F and place one sheet of chilled cookies on the middle rack. Bake for 12 to 15 minutes. Turn the sheet from front to back around minute 8 if your oven tends to brown unevenly. Watch the bottoms and outer ridges rather than waiting for the whole cookie to turn dark. The centers should remain pale golden while the thin edges develop a deeper toasted color. Bake the second sheet the same way and keep its dough chilled until the oven is free. Let both batches rest on their trays for 5 minutes before transferring them to a cooling rack. The kitchen should smell strongly of warm butter and vanilla. Look for dry tops with golden outlines and firm ridges that still keep their shape. (I once waited for every cookie to turn brown and lost that soft center. Pale tops taste better.) Baking too long makes them hard. Stop at lightly golden edges because residual heat keeps setting the centers.
- Leave the cookies on a cooling rack for 20 to 30 minutes until they reach room temperature near 70°F. Don’t stack them while warm because trapped moisture can soften those crisp edges. Choose 3 cookies for a serving plate and place the rest in an airtight cookie tin once completely cool. Set one rosette and two S-shaped cookies slightly apart so the ridges don’t break when you pick them up. You can gently break one cookie to show the crumb. It should snap with little pressure but still feel tender as you eat it. Keep the tin closed between servings. The finished cookies should feel dry and light with a fine pale yellow interior. Their golden edges will look slightly uneven and that’s part of the homemade charm. Stack them too soon and moisture dulls their crisp bite. Cool fully because escaping steam must leave before the tin closes.
Notes
Frequently Asked Questions
Yes. You can make the dough up to 24 hours before baking and keep it covered in the refrigerator. However, cold dough becomes difficult to pipe because the butter firms up. For easier baking, pipe the cookies first and refrigerate the shaped dough for up to 24 hours. Bake straight from the refrigerator at 350°F and add 1 to 2 minutes if needed.
The most common causes are overly warm butter and too much air whipped into the dough. Keep the butter around 65°F to 68°F and cream it for only 2 to 3 minutes. After piping, chill the cookies for 15 minutes before baking at 350°F. If the first tray spreads too much, chill the next batch for another 10 minutes.
Store fully cooled cookies in an airtight metal tin at a cool room temperature for up to 7 days for the best texture. They’re often still enjoyable for up to 10 days if kept dry. Butter Cookies Tin Style stays crisp longer when you separate layers with parchment and keep the container away from moisture. Don’t pack warm cookies because trapped steam makes them soft.
Yes, but the texture won’t be exactly the same. Replace the 2 egg yolks with 2 tablespoons of plain unsweetened soy yogurt mixed with 1 teaspoon of cornstarch. The cookies may be slightly softer and less rich. Chill the piped dough for 20 minutes and bake at 350°F until the edges turn light gold.
Absolutely. Double every ingredient to make approximately 72 small cookies and prepare four baking sheets. Mix the dough in two batches if your bowl holds less than 5 quarts. Bake one sheet at a time at 350°F for 12 to 15 minutes so the cookies brown evenly. Keep the remaining shaped dough refrigerated while each tray bakes.
Yes. Freeze the unbaked shapes on a lined tray for about 2 hours before transferring them to an airtight freezer container. They’ll keep for up to 2 months and can bake from frozen at 350°F with about 2 extra minutes. Fully baked cookies also freeze for up to 2 months. Thaw them in their closed container to limit surface moisture.
These rich cookies taste lovely with black tea or coffee because their crisp texture balances a warm drink. For a festive gathering, arrange 3 or 4 cookies per guest and pair them with our Non Alcoholic Christmas Punch. You can also include them in a mixed dessert tin with Butter Pecan Cookies for a contrasting nutty crunch.
Final Thoughts
These little golden cookies have become one of my favorite Christmas baking traditions. Butter Cookies Tin Style brings back that familiar blue tin with a richer homemade flavor and tender crumb.
The christmas butter cookies tin style version makes 36 cookies with crisp ridges and soft buttery centers, and I still love packing them beside Gluten Free Gingerbread Cookies or sharing them with our Non Alcoholic Christmas Punch. Try this butter cookies tin style recipe for your next holiday cookie box and share a batch with someone who remembers opening those tins as a child. It works just as well when you are after easy butter cookies tin style.
Those familiar blue tins of Danish butter cookies have become a Christmas tradition in many homes. And plenty of families give the empty tins a second life as sewing boxes or storage for small household items. The ridged rosettes and S shapes are part of what makes these classic cookies so recognizable. Homemade versions often have slightly uneven edges, which gives each batch its own character.