
Ingredients
Method
- Preheat the oven to 350°F. Keep the unsalted butter near 68°F so it bends without looking greasy. Beat it with creamy peanut butter and both sugars for 2 to 3 minutes. The mixture should lighten slightly. Then beat in the large egg and pure vanilla extract for 30 seconds. Whisk the all-purpose flour with baking soda and fine sea salt separately. Fold the dry mixture into the peanut butter base until no dry streaks remain. The dough for Halloween Peanut Butter Cookies should look thick and matte with faint sugar crystals still visible. Stop mixing as soon as the flour disappears. You'll smell roasted peanuts and vanilla while the dough holds soft ridges when moved. If you keep mixing for several minutes after the flour disappears, the cookies can turn tougher and spread unevenly. Mix only until combined because excess agitation develops more gluten.

- Heat the oven to 350°F. Scoop the dough into 18 portions of about 1 1/2 tablespoons each and roll them gently. Space the rounds about 2 inches apart. Flatten each one slightly and press shallow fork marks across the top. Bake the Halloween Peanut Butter Cookies for 10 to 12 minutes. Rotate the pan once around minute 6 if your oven browns unevenly. Look for pale golden centers with edges that have deepened by one shade. Small cracks should appear around the fork marks while the middle still looks soft. Don't wait for the centers to become dark brown. Go past 12 to 13 minutes and they'll firm too much for the chocolate bodies. (My first batch baked for 15 minutes, pressing in the cups split several cookies.) Pull them while soft because residual heat finishes the centers.

- Remove the cookies after 10 to 12 minutes and wait only 2 minutes. Then press one mini milk chocolate peanut butter cup gently into each warm center. Push just far enough to anchor the chocolate without splitting the cookie. Leave all 18 cookies undisturbed for 20 minutes at about 68°F to 72°F. The chocolate cups will soften slightly where they touch the warm crumb but should keep their shape. You'll see a shallow chocolate impression settle into every cookie as the centers firm. The peanut butter cups may turn a little glossy at their bases. That's normal. If you press them into piping-hot cookies immediately, they can melt too far. Wait more than 8 to 10 minutes and they won't anchor securely. Use the brief warm window because softened chocolate grips the setting cookie crumb.

- Melt the semi-sweet chocolate chips at 50 percent microwave power in 20-second intervals. Stir after every interval and stop near 90°F when the chocolate turns smooth. Let it cool for 2 minutes. Then pipe four uneven legs from each side of every chocolate body. Add two candy eyeballs to each spider while the piped chocolate remains tacky. Decorating all 18 Halloween Peanut Butter Cookies usually takes 8 to 10 minutes. The finished chocolate lines should hold soft ridges instead of spreading flat. Each spider will look a little different. That's exactly right. The eyes should stay upright when you gently move the cookie. Overheat the chocolate above roughly 110°F and it may become thick or streaky as it sets. Keep the chocolate gently melted because controlled heat preserves a smooth piping texture.
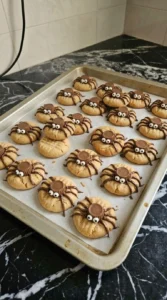
- Leave the decorated cookies at 68°F to 72°F for 20 to 25 minutes. Don't stack them while the legs still look glossy. Once the chocolate turns matte and feels firm at the edge, transfer the cookies to a serving plate. Arrange them with loose overlap instead of straight rows. Break one cookie open if you want to show the soft peanut butter center beside the finished spiders. The final cookies should have golden edges and soft tan centers with firm chocolate decorations. You'll smell peanut butter before the chocolate as the plate sits out. If you stack the cookies before the legs set, the spiders smear against one another. Finally, serve after the chocolate firms because the decoration needs structure before the cookies touch.

Notes
Store Halloween Peanut Butter Cookies in an airtight container at room temperature for 3 to 4 days. If your kitchen stays above 75°F, refrigerate them for up to 5 days so the chocolate spiders remain firm. Place parchment between layers to protect the legs and eyes. For longer storage, freeze the cookies in a single layer for 1 hour. Then wrap them carefully and freeze for up to 2 months. To refresh refrigerated cookies, leave them at room temperature for 20 to 30 minutes before serving. You can warm an undecorated cookie at 275°F for 4 to 5 minutes, but don't heat decorated spiders because the chocolate will smear. Frozen cookies should thaw uncovered for 30 to 45 minutes. Discard any cookie with a stale oily smell, visible moisture, mold or chocolate that has become unusually sticky after storage.