Halloween Peanut Butter Cookies
When you’re greedy like me and want real peanut butter flavor in every bite, not just a tiny hint of “maybe that tastes like peanuts? ”, Halloween Peanut Butter Cookies can be trickier than they seem. I wanted peanut butter halloween cookies that stayed soft but were still sturdy enough to hold a chocolate spider without falling apart.
At first, I thought it would be easy: bake my favorite peanut butter cookie dough, then add a chocolate spider on top. Turns out, every method had a problem. Add the chocolate too soon and it melts into a puddle, while the candy eyes slide right off the warm cookies.
Wait too long and the peanut butter cups won’t stick. Bake the cookies a little too much, and they crack when you press the centers. If you’re a soft-cookie fan like me, try my Banana Pudding Cookies next.
Why This Recipe Works
Halloween Peanut Butter Cookies stay soft because the dough bakes at 350°F for only 10 to 12 minutes. Brown sugar keeps more moisture in the center while granulated sugar helps the edges set. Pressing the chocolate cups in after a 2-minute rest anchors them without melting their shape.
That same soft-cookie approach is useful if you enjoy my Banana Pudding Cookies. The decorating window matters just as much as the bake. Chocolate near 90°F pipes smoothly and firms with visible ridges instead of puddling. Meanwhile, letting the cookies cool about 20 minutes before piping keeps the spider bodies from sliding.
Those small timing choices give you crisp visual details without sacrificing the soft peanut butter crumb.
Ingredients

- all-purpose flour: Spoon into the measuring cup and level it so the dough doesn’t become dry or dense.
- baking soda: Provides enough lift and spread for soft centers with lightly cracked surfaces.
- fine sea salt: Balances the sweetness and sharpens the roasted peanut flavor.
- unsalted butter: Bring to about 68°F so it creams smoothly without becoming greasy.
- creamy peanut butter: Use a smooth conventional style for predictable spread and a tender cookie texture.
- light brown sugar: Packed lightly to provide moisture and a soft chewy center.
- granulated sugar: Adds sweetness and helps the cookie edges develop a light crispness.
- large egg: Bring near room temperature before mixing so it blends evenly into the butter mixture.
- pure vanilla extract: Adds warm aroma and rounds out the roasted peanut flavor.
- mini milk chocolate peanut butter cups: Unwrap before baking finishes so each cup can be pressed into a warm cookie quickly.
- candy eyeballs: Use two per cookie and attach while the piped chocolate remains tacky.
- semi-sweet chocolate chips: Melt gently for piping the spider legs and securing the candy eyeballs.
Kitchen Equipment
- Large mixing bowl: A 4-quart mixing bowl gives the dough enough room to combine cleanly, while a much smaller bowl makes flour spill during folding.
- Electric hand mixer: A hand mixer creams the butter, peanut butter and sugars evenly, and a model with several low speeds helps prevent sugar from flying out.
- Large baking sheet: A heavy 13-by-18-inch baking sheet promotes even browning, while thin dark pans can overbrown the cookie bottoms before the centers set.
- 1 1/2-tablespoon cookie scoop: A 1 1/2-tablespoon scoop keeps the 18 cookies close in size, while inconsistent portions finish baking at different times.
- Small piping bag: A small piping bag gives control over narrow chocolate spider legs, and an opening near 1/8 inch prevents thick uneven ropes.
- Serving plate: A 12-inch plate holds a generous portion without crushing the decorations, while a small plate forces freshly set spiders to overlap too heavily.
How to Make It
Step 1: Mix the peanut butter cookie dough
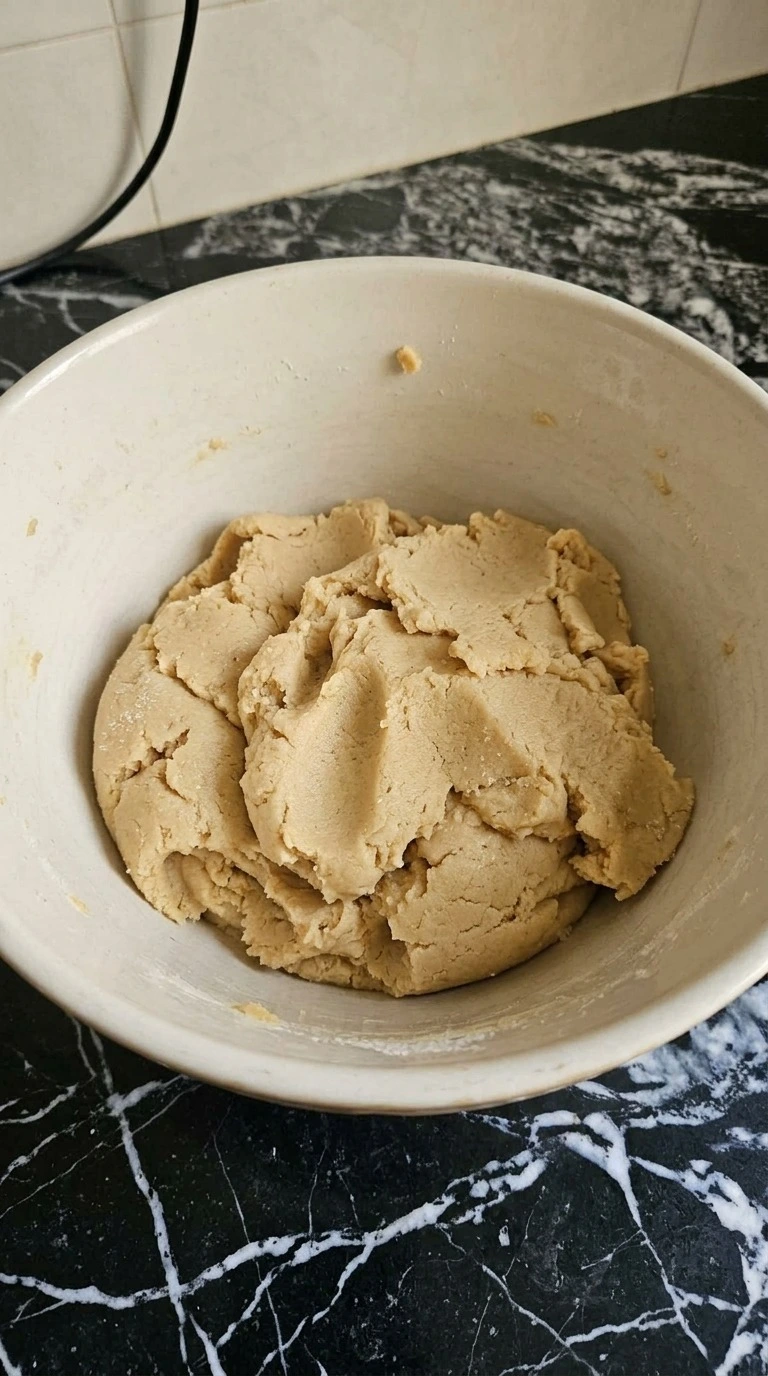
Preheat the oven to 350°F. Keep the unsalted butter near 68°F so it bends without looking greasy. Beat it with creamy peanut butter and both sugars for 2 to 3 minutes. The mixture should lighten slightly.
Then beat in the large egg and pure vanilla extract for 30 seconds. Whisk the all-purpose flour with baking soda and fine sea salt separately. Fold the dry mixture into the peanut butter base until no dry streaks remain. The dough for Halloween Peanut Butter Cookies should look thick and matte with faint sugar crystals still visible.
Stop mixing as soon as the flour disappears. You’ll smell roasted peanuts and vanilla while the dough holds soft ridges when moved. If you keep mixing for several minutes after the flour disappears, the cookies can turn tougher and spread unevenly. Mix only until combined because excess agitation develops more gluten.
Tip: If your kitchen is above 75°F, chill the finished dough for 15 minutes before shaping so the cookies keep thicker centers.
Step 2: Shape and bake the peanut butter cookies
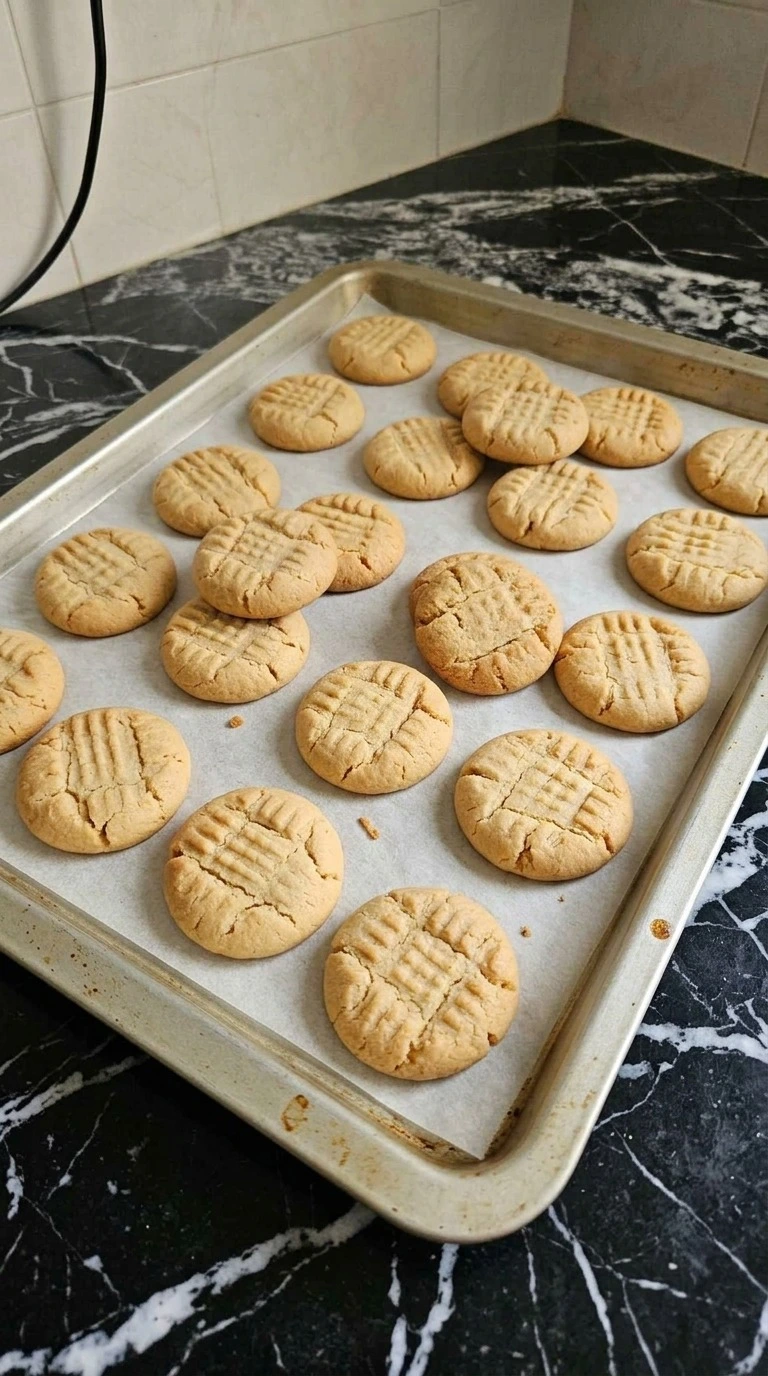
Heat the oven to 350°F. Scoop the dough into 18 portions of about 1 1/2 tablespoons each and roll them gently. Space the rounds about 2 inches apart. Flatten each one slightly and press shallow fork marks across the top.
Bake the Halloween Peanut Butter Cookies for 10 to 12 minutes. Rotate the pan once around minute 6 if your oven browns unevenly. Look for pale golden centers with edges that have deepened by one shade. Small cracks should appear around the fork marks while the middle still looks soft.
Don’t wait for the centers to become dark brown. Go past 12 to 13 minutes and they’ll firm too much for the chocolate bodies. (My first batch baked for 15 minutes, pressing in the cups split several cookies. ) Pull them while soft because residual heat finishes the centers.
Tip: Bake one test cookie first if your scoop size changes. A larger 2-tablespoon cookie may need about 12 to 14 minutes.
Step 3: Press in the chocolate spider bodies

Remove the cookies after 10 to 12 minutes and wait only 2 minutes. Then press one mini milk chocolate peanut butter cup gently into each warm center. Push just far enough to anchor the chocolate without splitting the cookie. Leave all 18 cookies undisturbed for 20 minutes at about 68°F to 72°F.
The chocolate cups will soften slightly where they touch the warm crumb but should keep their shape. You’ll see a shallow chocolate impression settle into every cookie as the centers firm. The peanut butter cups may turn a little glossy at their bases. That’s normal.
If you press them into piping-hot cookies immediately, they can melt too far. Wait more than 8 to 10 minutes and they won’t anchor securely. Use the brief warm window because softened chocolate grips the setting cookie crumb.
Tip: Unwrap all 18 chocolate cups before the cookies leave the oven so you can work within the short 2-minute pressing window.
Step 4: Pipe the chocolate legs and attach candy eyes

Melt the semi-sweet chocolate chips at 50 percent microwave power in 20-second intervals. Stir after every interval and stop near 90°F when the chocolate turns smooth. Let it cool for 2 minutes. Then pipe four uneven legs from each side of every chocolate body.
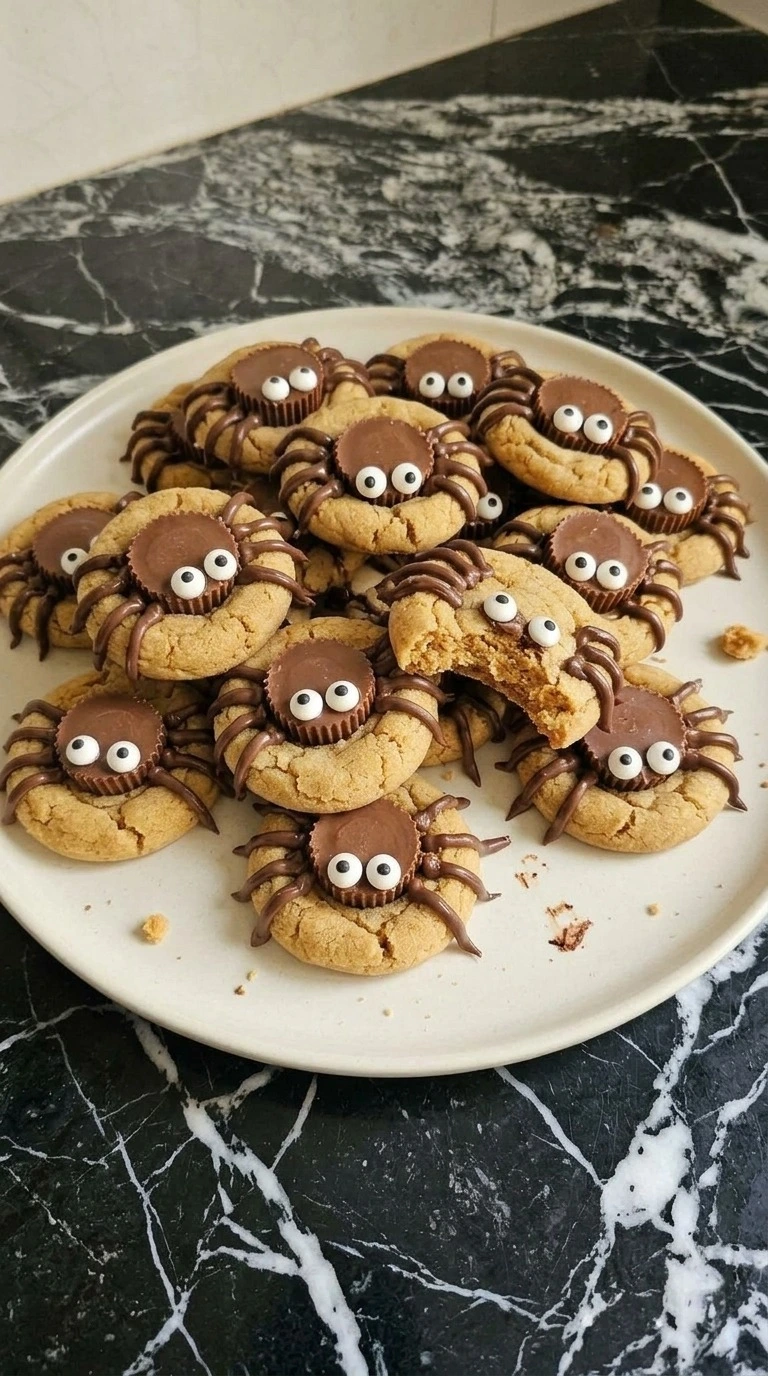
Add two candy eyeballs to each spider while the piped chocolate remains tacky. Decorating all 18 Halloween Peanut Butter Cookies usually takes 8 to 10 minutes. The finished chocolate lines should hold soft ridges instead of spreading flat. Each spider will look a little different.
That’s exactly right. The eyes should stay upright when you gently move the cookie. Overheat the chocolate above roughly 110°F and it may become thick or streaky as it sets. Keep the chocolate gently melted because controlled heat preserves a smooth piping texture.
Tip: Keep the opening very small, about 1/8 inch, so each spider gets distinct legs instead of thick chocolate ropes.
Step 5: Let the spiders set and serve

Leave the decorated cookies at 68°F to 72°F for 20 to 25 minutes. Don’t stack them while the legs still look glossy. Once the chocolate turns matte and feels firm at the edge, transfer the cookies to a serving plate.
Arrange them with loose overlap instead of straight rows. Break one cookie open if you want to show the soft peanut butter center beside the finished spiders. The final cookies should have golden edges and soft tan centers with firm chocolate decorations.
You’ll smell peanut butter before the chocolate as the plate sits out. If you stack the cookies before the legs set, the spiders smear against one another. Finally, serve after the chocolate firms because the decoration needs structure before the cookies touch.
Tip: For a party tray, set the cookies in one layer until serving time and allow about 2 inches of space near the plate edge.
Pro Tips
- Use conventional creamy peanut butter rather than a runny natural style. A separated jar can make the dough spread too far during the 10 to 12 minute bake.
- Keep the unsalted butter near 68°F before mixing. Butter above about 75°F can make the dough greasy and cause flatter cookies.
- Measure each dough portion at about 1 1/2 tablespoons. Matching sizes help all 18 cookies finish within the same 10 to 12 minute window.
- Press the mini chocolate cups into the cookies about 2 minutes after baking. Waiting 8 to 10 minutes makes the centers too firm to grip them securely.
- Melt the semi-sweet chocolate in 20-second intervals at 50 percent power. Stop when it’s smooth near 90°F so the spider legs keep defined ridges.
- Let the finished decorations set for 20 to 25 minutes before stacking. The chocolate should look matte instead of glossy when it’s firm enough.
- Add 1/2 teaspoon ground cinnamon to the flour mixture for a warmer fall flavor that still lets the peanut butter lead.
- Replace the semi-sweet chocolate chips with 1/3 cup dark chocolate chips for deeper cocoa flavor and slightly less sweetness.
- Use orange and purple candy eyeballs instead of plain white ones for a brighter Halloween party version without changing the dough.
- Drizzle 2 tablespoons of melted white chocolate across the cooled cookies before adding the spiders for a simple web-like finish.
Substitutions & Variations
- all-purpose flour: 1-to-1 gluten-free baking flour with xanthan gum — Replace the flour cup for cup. The cookies may spread slightly less and feel a little more delicate after cooling, so leave them on the baking sheet for 5 extra minutes before moving them.
- unsalted butter: plant-based baking butter — Use the same 1/2 cup amount and choose a firm baking-style stick rather than a soft tub spread. The cookies will taste slightly less buttery but should keep a similar thickness. For another fall baking idea, try the Low Carb Pumpkin Muffins Recipe.
- large egg: 1 tablespoon ground flaxseed mixed with 3 tablespoons water — Let the mixture stand for 10 minutes before adding it. The cookies become slightly denser and more fragile, so cool them for at least 5 minutes before pressing or moving the decorations.
- mini milk chocolate peanut butter cups: 18 small milk chocolate squares or dairy-free chocolate pieces — Use one piece per cookie and press it into the center after the same 2-minute cooling period. The spider body will look flatter and less rounded but the chocolate flavor stays strong.
- creamy peanut butter: smooth almond butter — Use the same 1/2 cup amount. Almond butter creates a milder roasted flavor and may make the dough slightly softer, so chill it for 15 to 20 minutes before shaping if needed.
Storage Instructions
Store Halloween Peanut Butter Cookies in an airtight container at room temperature for 3 to 4 days. If your kitchen stays above 75°F, refrigerate them for up to 5 days so the chocolate spiders remain firm. Place parchment between layers to protect the legs and eyes.
For longer storage, freeze the cookies in a single layer for 1 hour. Then wrap them carefully and freeze for up to 2 months. To refresh refrigerated cookies, leave them at room temperature for 20 to 30 minutes before serving.
You can warm an undecorated cookie at 275°F for 4 to 5 minutes, but don’t heat decorated spiders because the chocolate will smear. Frozen cookies should thaw uncovered for 30 to 45 minutes. Discard any cookie with a stale oily smell, visible moisture, mold or chocolate that has become unusually sticky after storage.
Halloween Peanut Butter Cookies
Ingredients
- 1 1/2 cups all-purpose flour Spoon into the measuring cup and level it so the dough doesn’t become dry or dense.
- 1/2 teaspoon baking soda Provides enough lift and spread for soft centers with lightly cracked surfaces.
- 1/4 teaspoon fine sea salt Balances the sweetness and sharpens the roasted peanut flavor.
- 1/2 cup unsalted butter Bring to about 68°F so it creams smoothly without becoming greasy.
- 1/2 cup creamy peanut butter Use a smooth conventional style for predictable spread and a tender cookie texture.
- 1/2 cup light brown sugar Packed lightly to provide moisture and a soft chewy center.
- 1/4 cup granulated sugar Adds sweetness and helps the cookie edges develop a light crispness.
- 1 large large egg Bring near room temperature before mixing so it blends evenly into the butter mixture.
- 1 teaspoon pure vanilla extract Adds warm aroma and rounds out the roasted peanut flavor.
- 18 pieces mini milk chocolate peanut butter cups Unwrap before baking finishes so each cup can be pressed into a warm cookie quickly.
- 36 pieces candy eyeballs Use two per cookie and attach while the piped chocolate remains tacky.
- 1/3 cup semi-sweet chocolate chips Melt gently for piping the spider legs and securing the candy eyeballs.
Instructions
- Preheat the oven to 350°F. Keep the unsalted butter near 68°F so it bends without looking greasy. Beat it with creamy peanut butter and both sugars for 2 to 3 minutes. The mixture should lighten slightly. Then beat in the large egg and pure vanilla extract for 30 seconds. Whisk the all-purpose flour with baking soda and fine sea salt separately. Fold the dry mixture into the peanut butter base until no dry streaks remain. The dough for Halloween Peanut Butter Cookies should look thick and matte with faint sugar crystals still visible. Stop mixing as soon as the flour disappears. You’ll smell roasted peanuts and vanilla while the dough holds soft ridges when moved. If you keep mixing for several minutes after the flour disappears, the cookies can turn tougher and spread unevenly. Mix only until combined because excess agitation develops more gluten.

- Heat the oven to 350°F. Scoop the dough into 18 portions of about 1 1/2 tablespoons each and roll them gently. Space the rounds about 2 inches apart. Flatten each one slightly and press shallow fork marks across the top. Bake the Halloween Peanut Butter Cookies for 10 to 12 minutes. Rotate the pan once around minute 6 if your oven browns unevenly. Look for pale golden centers with edges that have deepened by one shade. Small cracks should appear around the fork marks while the middle still looks soft. Don’t wait for the centers to become dark brown. Go past 12 to 13 minutes and they’ll firm too much for the chocolate bodies. (My first batch baked for 15 minutes, pressing in the cups split several cookies.) Pull them while soft because residual heat finishes the centers.

- Remove the cookies after 10 to 12 minutes and wait only 2 minutes. Then press one mini milk chocolate peanut butter cup gently into each warm center. Push just far enough to anchor the chocolate without splitting the cookie. Leave all 18 cookies undisturbed for 20 minutes at about 68°F to 72°F. The chocolate cups will soften slightly where they touch the warm crumb but should keep their shape. You’ll see a shallow chocolate impression settle into every cookie as the centers firm. The peanut butter cups may turn a little glossy at their bases. That’s normal. If you press them into piping-hot cookies immediately, they can melt too far. Wait more than 8 to 10 minutes and they won’t anchor securely. Use the brief warm window because softened chocolate grips the setting cookie crumb.

- Melt the semi-sweet chocolate chips at 50 percent microwave power in 20-second intervals. Stir after every interval and stop near 90°F when the chocolate turns smooth. Let it cool for 2 minutes. Then pipe four uneven legs from each side of every chocolate body. Add two candy eyeballs to each spider while the piped chocolate remains tacky. Decorating all 18 Halloween Peanut Butter Cookies usually takes 8 to 10 minutes. The finished chocolate lines should hold soft ridges instead of spreading flat. Each spider will look a little different. That’s exactly right. The eyes should stay upright when you gently move the cookie. Overheat the chocolate above roughly 110°F and it may become thick or streaky as it sets. Keep the chocolate gently melted because controlled heat preserves a smooth piping texture.
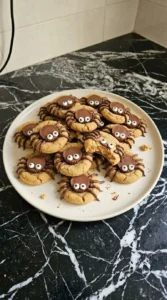
- Leave the decorated cookies at 68°F to 72°F for 20 to 25 minutes. Don’t stack them while the legs still look glossy. Once the chocolate turns matte and feels firm at the edge, transfer the cookies to a serving plate. Arrange them with loose overlap instead of straight rows. Break one cookie open if you want to show the soft peanut butter center beside the finished spiders. The final cookies should have golden edges and soft tan centers with firm chocolate decorations. You’ll smell peanut butter before the chocolate as the plate sits out. If you stack the cookies before the legs set, the spiders smear against one another. Finally, serve after the chocolate firms because the decoration needs structure before the cookies touch.
Notes
Nutrition
Frequently Asked Questions
Yes. Mix the dough up to 24 hours ahead and keep it covered in the refrigerator. Let it sit at room temperature for about 15 minutes before scooping if it feels very firm. You can also bake the cookies one day early and decorate them after they return to room temperature.
The butter or peanut butter was probably too warm. Keep the butter near 68°F and use thick conventional creamy peanut butter rather than a runny natural variety. If your kitchen is above 75°F, chill the shaped dough for 15 minutes before baking at 350°F.
Yes. Double every ingredient and make about 36 cookies. Bake one tray at a time for the most consistent results, or rotate two trays from top to bottom around minute 6. Keep each dough portion near 1 1/2 tablespoons so the 10 to 12 minute bake time still applies.
Yes, but freeze them in one layer first for about 1 hour so the chocolate legs become firm. Then place parchment between layers and freeze for up to 2 months. Thaw the cookies uncovered at room temperature for 30 to 45 minutes so condensation doesn’t soften the decorations.
Small chocolate squares work well if you don’t have mini peanut butter cups. Press one square into each cookie after the same 2-minute cooling period. The spiders will look flatter but they’ll still hold candy eyes and piped legs once the chocolate cools and firms.
Arrange the cookies in one loose layer or with only light overlap after the chocolate has set for 20 to 25 minutes. Serve them at room temperature because the peanut butter centers stay softer that way. They pair well with hot chocolate, cold milk or a simple vanilla ice cream scoop.
Final Thoughts
Those classic fork marks on peanut butter cookies aren’t just for looks. Pressing down the thick dough helps the centers bake more evenly, which is handy when each cookie needs to hold a chocolate spider.