
Ingredients
Method
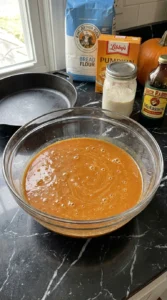
- Measure the wet components into your vessel to build a smooth foundation for the flour. Combine the pumpkin puree, mature active starter, lukewarm water, and molasses thoroughly using a sturdy balloon whisk with firm circular motions. Make sure the ambient temperature stays around 75°F to keep the wild yeast comfortable during this initial phase. Watch for the thick orange puree to completely dissolve into a uniform rustic copper liquid without any dark streaks of molasses. You'll smell the distinct tangy aroma of the starter mixing with the sweet earthy scent of the pumpkin. (I tried using cold water the first time and the starter clumped up instead of dispersing. Lukewarm water is the fix for smooth blending.) Mix the liquids entirely before introducing any dry flour, this hydration technique ensures the starter distributes evenly so the dough ferments uniformly later.
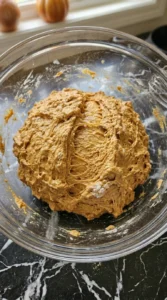
- Add the strong bread flour, warm spices, and fine sea salt directly into the liquid base. Stir the mass using a sturdy wooden spoon or your bare hand by sweeping around the sides and folding inward for about 2 minutes. Work the mixture just until all dry patches disappear and a rough mass forms. The dough will look sticky, uneven, and completely unrefined with a deep gold hue from the pumpkin spice spices. You will see strands of wet flour clinging to the sides but no loose white powder should remain at the bottom. (My first batch looked too wet here and I added extra flour, don't do it because the pumpkin hydrates slowly over the next hour.) Let the mass rest unworked for 30 minutes, this autolyse period allows the flour proteins to absorb the pumpkin moisture completely so the gluten bonds begin forming naturally.
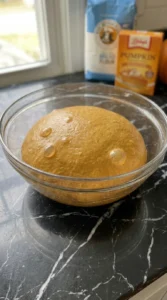
- Slide your wet hand under one side of the rested dough, pull it gently upward, and fold it over the center. Rotate the container 90 degrees and repeat this action three more times to complete one full cycle. Execute four separate sets of these stretch and folds over a 2-hour window, waiting exactly 30 minutes between each session. You will feel the structure change from loose and tearing to smooth, elastic, and holding a clean rounded shape in the center. The surface will develop a satin sheen, and small air pockets will start inflating under the skin as the fermentation advances. Go past the 2-hour mark without folding and the dough collapses into a flat sticky puddle. Fold the mass gently without snapping the strands, this careful manipulation builds structural tension so the loaf rises high instead of spreading wide.
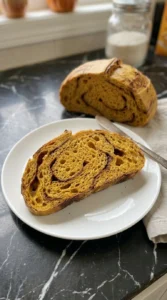
- Mist your work surface lightly with water and turn the fermented dough out onto it. Press and slide your hands underneath, lifting from the center to stretch it out into a large thin rectangle about 12 by 18 inches. Scatter the dark brown sugar and extra ground cinnamon evenly across the entire surface, leaving a clean 1-inch border along the edges. The orange dough will look translucent and thin enough to see through in some spots, creating a stark contrast against the dark brown cinnamon sugar layer. You'll smell the sharp sweet spice instantly as the sugar hits the wet dough surface. (I tried using granulated sugar once but it liquefied too fast and leaked through the seams, stick to brown sugar.) Roll the sheet up tightly into a log then shape it into a smooth round boule, this layering method locks the cinnamon inside so it creates distinct swirls without weakening the bread structure.
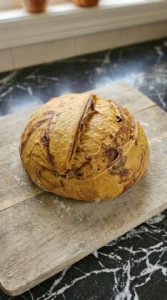
- Preheat your heavy cast iron Dutch oven at 450°F for an hour, then score the top of your chilled loaf with a sharp blade. Drop the loaf into the hot pot, slide the heavy lid on, and bake for exactly 20 minutes before removing the cover to finish. Drop the oven heat to 400°F and bake uncovered for another 20 to 25 minutes until the exterior darkens. You will see the scored cut burst wide open, revealing a orange interior contrasting against the rapidly browning outer skin. The kitchen will fill with a deep caramelized pumpkin aroma mixed with toasted cinnamon. Miss the window to remove the lid and the crust stays soft and pale instead of crisp. Bake with the lid tightly sealed first, the trapped steam keeps the outer skin soft so the loaf achieves maximum oven spring before setting.
Notes
Store your baked bread at room temperature wrapped loosely in a clean brown paper bag for up to three days. Keep the cut side facing down on a solid wooden board to preserve the interior moisture while keeping the outer crust crisp. For long-term preservation, slice the boule completely, wrap each piece in plastic wrap, and freeze the slices in a heavy freezer bag for three months. Reheat frozen slices directly in your toaster on medium heat for about three minutes until the center is hot and the edges crisp up. If you are warming a larger chunk, wrap it in foil and heat in a 350°F oven for 15 minutes before removing the foil for the final two minutes. Watch for a dull look or a stale texture, which indicates the starch structure is breaking down.