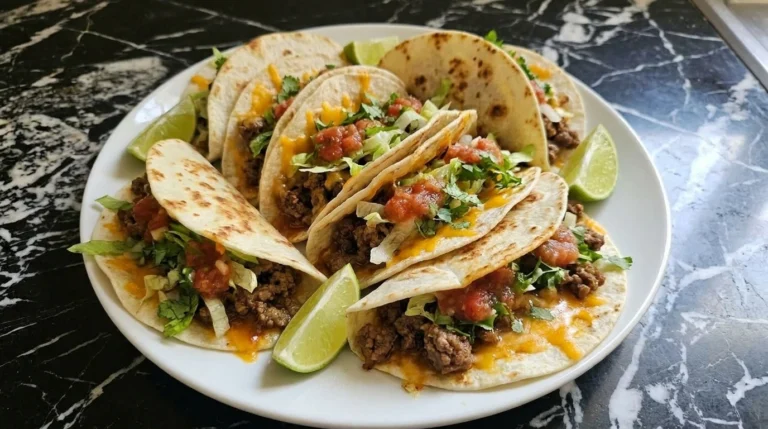
Homemade Burrito
I don’t make burritos every week, but when I do, I want them to feel worth it. Warm, filling, and actually satisfying. Nothing fussy, just solid comfort food that holds together.
What I like most is how flexible they are. You can keep it simple and still end up with something that feels complete. If you like meals like this, you’ll probably enjoy this Healthy Quinoa Salad too https://leagueofcooking.

com/healthy-quinoa-salad/. This version sticks to what works. A well-seasoned filling, soft tortillas, and that quick toast at the end that makes everything come together.
The Secret to This Recipe
Browning the beef at medium-high heat without constant stirring builds deep flavor before anything else goes in. Then folding the rice and beans gently at medium heat keeps the texture light instead of dense. That final toast at medium heat melts the cheese while crisping the tortilla, which locks everything together.
Ingredients You Will Need
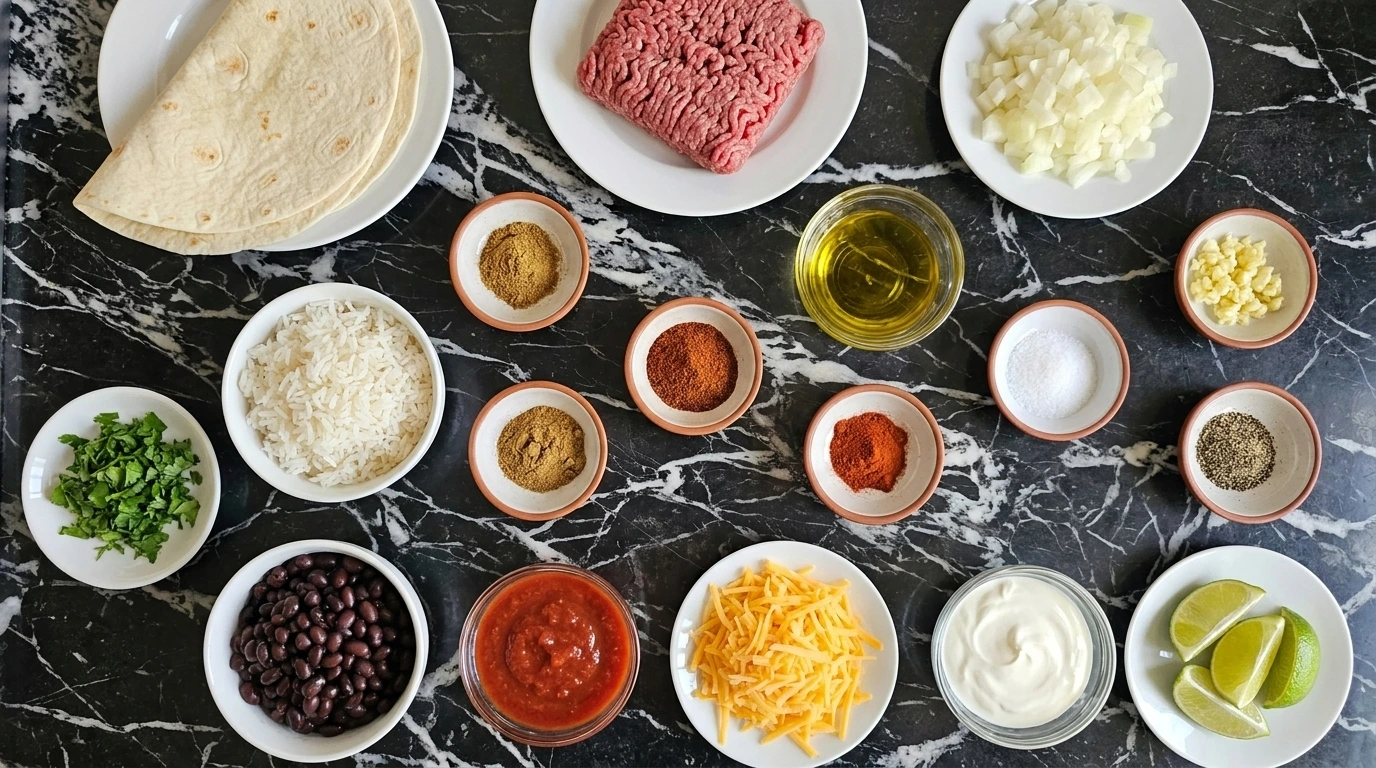
- large flour tortillas: Soft, pliable tortillas that warm easily and develop light golden spots without cracking.
- lean ground beef: Lean beef that browns well while keeping the filling rich but not overly greasy.
- yellow onion: Finely diced for even cooking and a mild sweetness once softened.
- garlic cloves: Fresh minced garlic that releases aroma quickly when heated.
- olive oil: A light drizzle to prevent sticking and help the onion soften evenly.
- chili powder: Warm spice blend that adds color and depth.
- ground cumin: Earthy seasoning that gives a classic burrito flavor.
- smoked paprika: Adds a subtle smoky note and deeper color.
- kosher salt: Balances and enhances the overall flavor.
- black pepper: Adds mild heat and contrast.
- cooked long grain white rice: Fluffy rice that stays separate and absorbs seasoning well.
- canned black beans: Rinsed beans with a creamy interior and no excess liquid.
- thick tomato salsa: Chunky salsa that adds moisture without making the filling watery.
- sharp cheddar cheese: Shredded cheese that melts quickly with a bold flavor.
- sour cream: Cool, creamy topping that balances the spices.
- fresh cilantro: Roughly chopped for a fresh, bright finish.
- lime wedges: Fresh citrus for squeezing right before serving.
Kitchen Equipment
Instructions
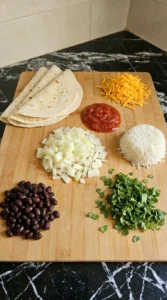
Step 1: Chop the onion and cilantro and gather the fillings

Start on a clean board and dice the onion into small pieces, about 1/4 inch. This should take 2 to 3 minutes. Use a steady rocking motion with the knife so you cut cleanly instead of crushing. Chop the cilantro loosely for about 30 to 45 seconds. Keep it rough. You’ll smell that sharp onion bite and see the cilantro stay bright green. If you rush or chop too fine, the herbs turn wet and lose their texture. Lay everything out while your pan preheats later to medium heat, about 5 out of 10 for 2 minutes. Miss this setup and you’ll be scrambling while things cook, which can lead to overcooked beef.
Tip: Group ingredients by when you’ll use them so you can move smoothly once cooking starts.
Step 2: Brown the beef with onion and garlic

Heat a pan to medium-high, about 7 out of 10, for 2 minutes before adding olive oil and beef. Press the beef down with a spatula and leave it undisturbed for the first 2 minutes, then break it apart. Cook for 6 to 8 minutes total. Add the onion and garlic around minute 6 and keep cooking until minute 10, stirring twice with a scrape-and-turn motion. You’ll see deep brown bits and smell the garlic turn mellow. If you keep stirring constantly, the beef steams and never browns properly. Let it sit briefly between stirs. That’s where the flavor builds.
Tip: Use a wide pan so the beef spreads out and browns instead of crowding.
Step 3: Fold in the rice and beans and salsa

Lower the heat to medium, about 5 out of 10, then add the rice, beans, and salsa. Fold everything together with a scoop-and-turn motion for 2 to 3 minutes. Keep it gentle so the grains stay intact. You’ll hear a soft simmer and see the mixture turn glossy as it heats through. The smell gets fuller again as the spices wake up. If you overmix, the rice breaks down and the filling turns heavy. (I used to stir it too much, and it always felt dense. Folding makes a big difference.)
Tip: Make sure the beans are well drained so the filling doesn’t turn watery.
Step 4: Fill and fold the burritos

Warm the tortillas in a dry pan over medium heat, about 5 out of 10, for 30 seconds per side. They should feel soft and flexible, not stiff. If you skip this, they’ll crack when folding. Spread sour cream, then add about 1 cup of filling and cheese in the center. Fold the sides in, then roll from the bottom using a tuck-and-roll motion. You’ll feel the tortilla stretch slightly without tearing. If you overfill, it won’t seal and everything spills out. Keep it tight and controlled.
Tip: Place the seam side down right away so it holds its shape before toasting.
Step 5: Toast the burritos until crisp and melty
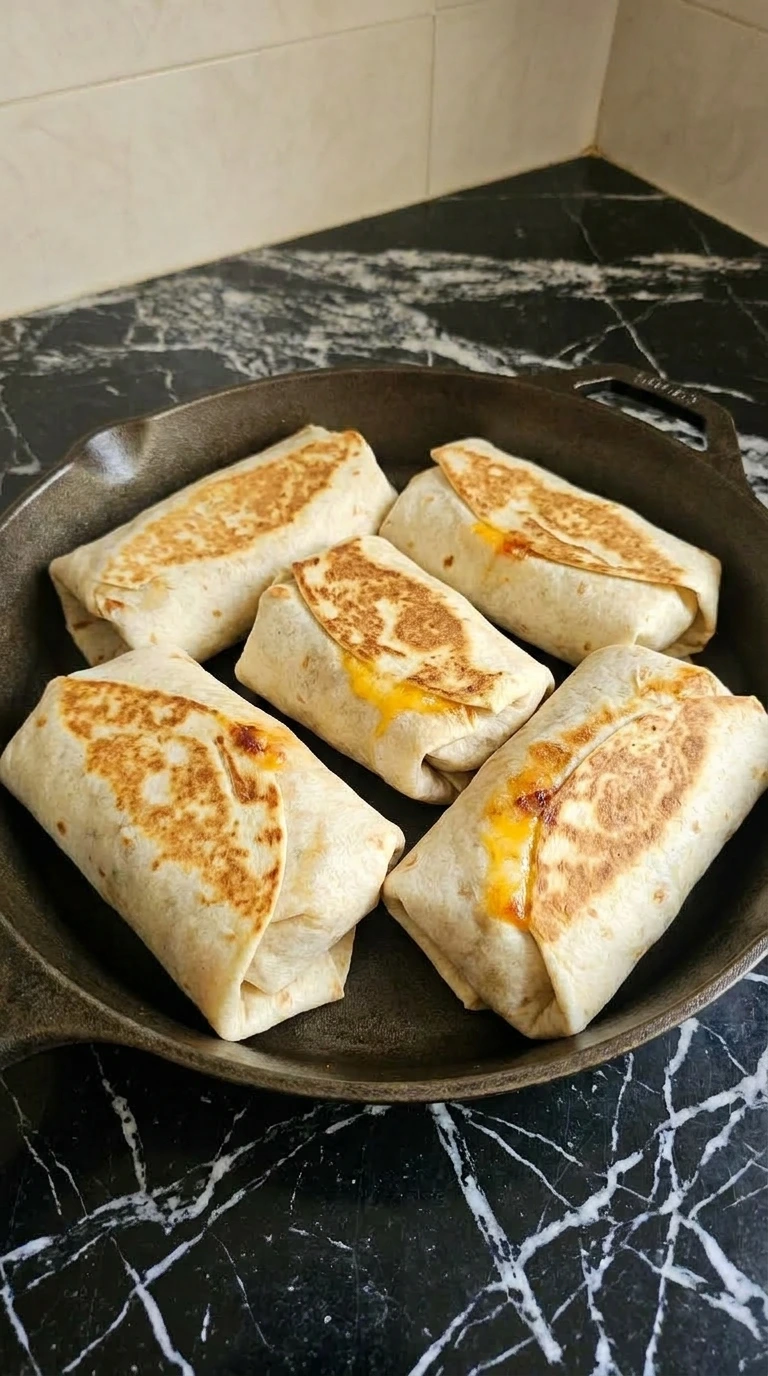
Place the burritos seam-side down in a dry pan over medium heat, about 5 out of 10. Cook for 2 to 3 minutes per side. Press lightly with a spatula at minute 2. You’ll hear a light sizzle and see golden patches form while the cheese melts inside. Flip once when the bottom is golden and finish the second side. If you go past 6 minutes total, the tortilla turns stiff instead of crisp. That short window is what gives you a crisp outside and soft inside.
Tip: Don’t add oil here. A dry pan gives the best texture.
Step 6: Plate and finish with sour cream and lime

Let the burrito rest for exactly 2 minutes before cutting. This gives the filling time to settle so it doesn’t spill out. Cut at a slight angle with a steady downward motion. You’ll see a bit of steam escape and the cheese stretch slightly. That’s the right moment. If you cut too early, everything slides out and loses structure. Top with sour cream, cilantro, and a squeeze of lime just before serving.
Tip: Wipe your knife between cuts so each slice stays clean.
Helpful Tips
- Drain excess fat so the filling stays thick and not greasy.
- Let the filling cool for a minute so the tortillas don’t tear while rolling.
- Place cheese right against the hot filling so it melts evenly.
- Wrap leftovers tightly to help them keep their shape.
Swaps and Variations
- lean ground beef: ground turkey — milder flavor so you may need extra seasoning
- flour tortillas: corn tortillas — they’re smaller and more fragile so rolling changes
- cheddar cheese: monterey jack — melts smoother but has a softer flavor
- sour cream: plain Greek yogurt — slightly tangier but works well for a lighter option
- white rice: brown rice — adds a nuttier taste and slightly firmer texture, similar to this Healthy Quinoa Salad https://leagueofcooking.com/healthy-quinoa-salad/
Storing Leftovers
Wrap leftover burritos tightly and store in the fridge for up to 3 days. Keep them sealed so they don’t dry out. For longer storage, freeze them individually wrapped for up to 2 months. Reheat in a pan over medium heat for 6 to 8 minutes, flipping once, or in the oven at 350°F until heated through.
Homemade Burrito
Ingredients
- large flour tortillas
- lean ground beef
- yellow onion
- garlic cloves
- olive oil
- chili powder
- ground cumin
- smoked paprika
- kosher salt
- black pepper
- cooked long grain white rice
- canned black beans
- thick tomato salsa
- sharp cheddar cheese
- sour cream
- fresh cilantro
- lime wedges
Instructions
-
Start on a clean board and dice the onion into small pieces, about 1/4 inch. This should take 2 to 3 minutes. Use a steady rocking motion with the knife so you cut cleanly instead of crushing. Chop the cilantro loosely for about 30 to 45 seconds. Keep it rough. You’ll smell that sharp onion bite and see the cilantro stay bright green. If you rush or chop too fine, the herbs turn wet and lose their texture. Lay everything out while your pan preheats later to medium heat, about 5 out of 10 for 2 minutes. Miss this setup and you’ll be scrambling while things cook, which can lead to overcooked beef.
-
Heat a pan to medium-high, about 7 out of 10, for 2 minutes before adding olive oil and beef. Press the beef down with a spatula and leave it undisturbed for the first 2 minutes, then break it apart. Cook for 6 to 8 minutes total. Add the onion and garlic around minute 6 and keep cooking until minute 10, stirring twice with a scrape-and-turn motion. You’ll see deep brown bits and smell the garlic turn mellow. If you keep stirring constantly, the beef steams and never browns properly. Let it sit briefly between stirs. That’s where the flavor builds.

-
Lower the heat to medium, about 5 out of 10, then add the rice, beans, and salsa. Fold everything together with a scoop-and-turn motion for 2 to 3 minutes. Keep it gentle so the grains stay intact. You’ll hear a soft simmer and see the mixture turn glossy as it heats through. The smell gets fuller again as the spices wake up. If you overmix, the rice breaks down and the filling turns heavy. (I used to stir it too much, and it always felt dense. Folding makes a big difference.)

-
Warm the tortillas in a dry pan over medium heat, about 5 out of 10, for 30 seconds per side. They should feel soft and flexible, not stiff. If you skip this, they’ll crack when folding. Spread sour cream, then add about 1 cup of filling and cheese in the center. Fold the sides in, then roll from the bottom using a tuck-and-roll motion. You’ll feel the tortilla stretch slightly without tearing. If you overfill, it won’t seal and everything spills out. Keep it tight and controlled.

-
Place the burritos seam-side down in a dry pan over medium heat, about 5 out of 10. Cook for 2 to 3 minutes per side. Press lightly with a spatula at minute 2. You’ll hear a light sizzle and see golden patches form while the cheese melts inside. Flip once when the bottom is golden and finish the second side. If you go past 6 minutes total, the tortilla turns stiff instead of crisp. That short window is what gives you a crisp outside and soft inside.

-
Let the burrito rest for exactly 2 minutes before cutting. This gives the filling time to settle so it doesn’t spill out. Cut at a slight angle with a steady downward motion. You’ll see a bit of steam escape and the cheese stretch slightly. That’s the right moment. If you cut too early, everything slides out and loses structure. Top with sour cream, cilantro, and a squeeze of lime just before serving.

Notes
Frequently Asked Questions
Yes, you can assemble them and keep them wrapped in the fridge. Toast them right before serving so they stay crisp. That final step makes a big difference.
Ground turkey or shredded chicken both work well. Just season a bit more since they’re milder. The texture will be slightly lighter.
Don’t overfill and always tuck the sides in tightly before rolling. Keep the seam side down while toasting so it seals. That step really holds everything together.
Yes, let them cool completely first, then wrap tightly. Reheat after thawing for the best texture. Toasting again helps bring back the crispness.
Too much salsa or excess moisture from beans can cause it. Make sure everything is drained and the filling is thick before assembling. A quick toast also helps.
You can, but it won’t have the same texture. Toasting seals the wrap and melts the cheese evenly. It also keeps the burrito from getting soggy.
Wrap Up
This is one of those meals you can rely on. Simple, filling, and always satisfying when done right.
If you want something just as cozy, try this Creamy Garlic Parmesan Pasta https://leagueofcooking. com/?
p=3098.
Wrapping a burrito tightly traps steam inside, which keeps the filling hotter longer than most handheld foods.