Honey Glazed Ham
I made this for the first time the week we moved into our house in 2019, boxes everywhere, no proper kitchen setup, and somehow it turned out better than expected. What saved me that night was keeping the heat lower than I thought I should while it warmed through. It’s the kind of main dish that looks fancy but actually lets you relax because most of the work happens in the oven while you’re doing other things. Since then it’s become my go-to when I’m exhausted but still want something that tastes real and feeds us for days.
Mark (my husband) always says it’s better than takeout, and Emma, who’s usually suspicious of anything new, asks for seconds. I usually pair this with a Creamy Potato Salad because the cold potatoes and tangy dressing cut right through that sweet honey glaze. You’ll only need a few pantry staples like honey and brown sugar to turn a standard ham into something that feels like a celebration. The whole process is incredibly straightforward and doesn’t require any fancy tools or chef skills.
Ready in about 90 minutes, one pan, no fancy techniques. If you’ve got extra time in the morning, you might want to try a Cottage Cheese Protein Bowl so you’re not tempted to snack on the ham while it’s still cold. This recipe is all about patience during the first hour and then high energy during the last ten minutes of glazing. It’s a classic for a reason and I promise your family will be asking for the recipe before the meal is even over.
Why You’ll Love It
Cooking the ham at a steady 325°F before cranking the heat ensures the center reaches a safe 140°F without the outer glaze burning. The honey and brown sugar combination works because the different sugar molecules caramelize at slightly different rates which creates a complex crust.
Adding Dijon mustard and apple cider vinegar is the technical secret that keeps this from being cloyingly sweet. The acid breaks down the heavy fats on the surface while the mustard acts as an emulsifier for the glaze.
If you love big flavors, try serving this alongside a Grilled Chicken Salad for a balanced lunch spread.
What You’ll Need
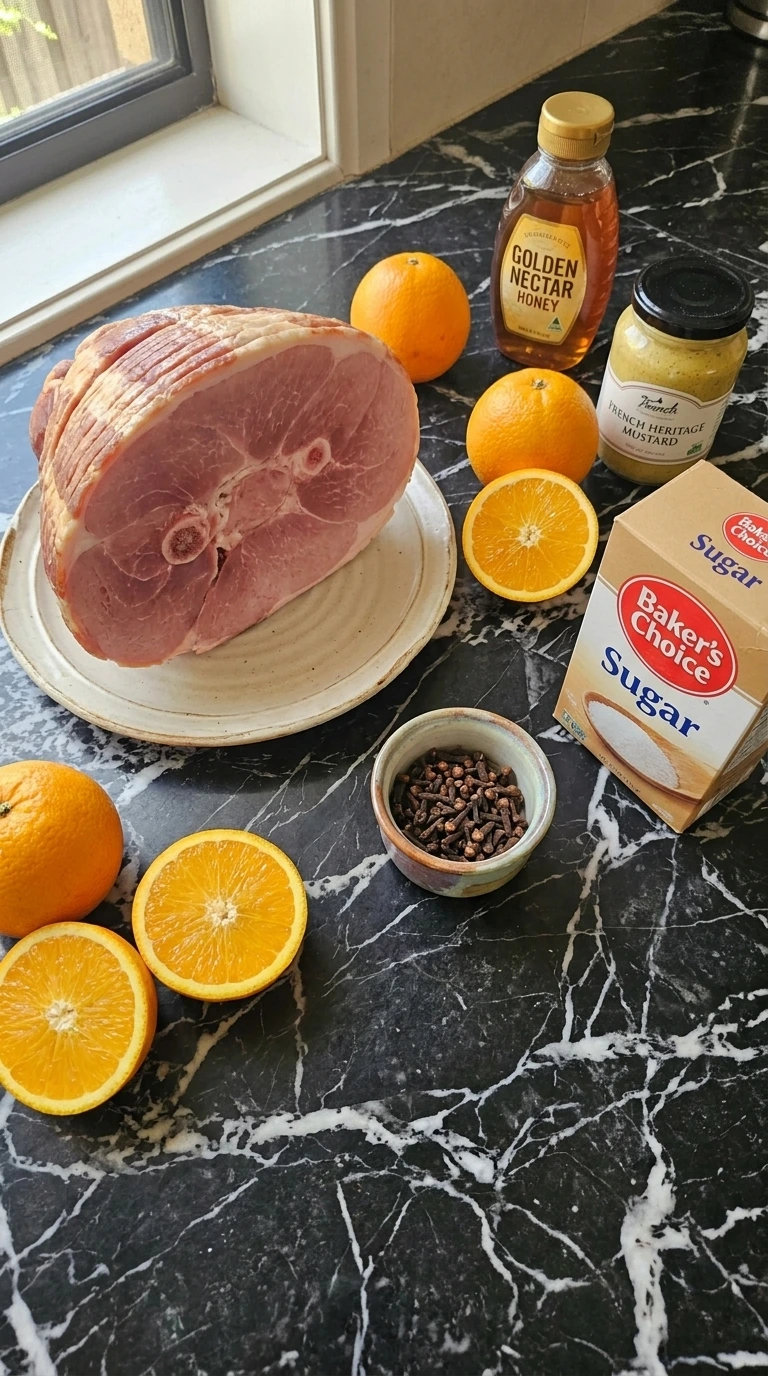
- bone-in spiral-cut ham: Fully cooked, bone-in for better flavor, and spiral-sliced for easy serving.
- golden honey: Clover or wildflower honey works best for a classic floral sweetness.
- light brown sugar: Packed firmly to ensure a deep molasses flavor in the crust.
- Dijon mustard: Adds a necessary tang to balance out the heavy sugars.
- apple cider vinegar: Cuts through the fat and brightens the overall glaze flavor.
- whole cloves: Pushed into the score marks for an aromatic holiday scent.
- ground cinnamon: Provides a warm earthy base note to the honey mixture.
What You’ll Use
- 9×13 ceramic baking dish: A heavy ceramic dish holds heat better than a thin metal pan which prevents the honey glaze from burning on the bottom.
- silicone basting brush: Silicone bristles won’t melt under high oven heat and they carry more glaze into the score marks than a spoon.
- meat thermometer: A digital thermometer is the only way to know the center is hot without overcooking the outer slices.
- small stainless saucepan: Stainless steel allows you to see the color change of the honey so you don’t accidentally scorch it.
Step-by-Step Instructions
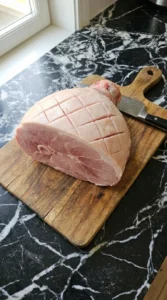
Step 1: Score the ham
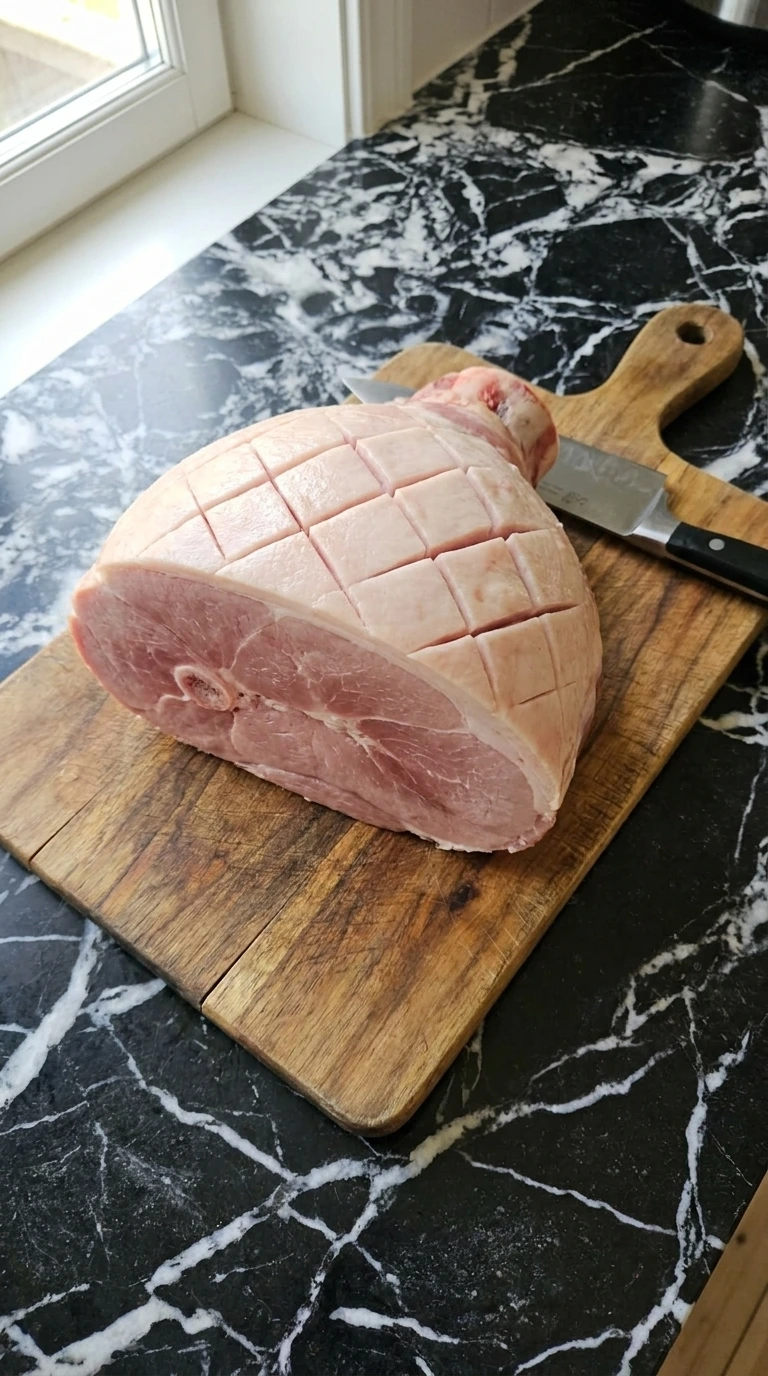
Place your bone-in spiral ham on a wooden cutting board and use a sharp chef’s knife to score the surface. You’ll want to cut 1-inch deep diamond patterns across the entire top dome. This opens up the meat so the glaze can actually penetrate the layers instead of just sliding off the skin.
(I tried skipping this once and the flavor stayed purely on the outside, definitely take the two minutes to do it. ) You’ll see the fat cap pull apart slightly as you cut and the pink meat should peek through. The ham should feel cold but pliable as you work the knife through the tough outer layer.
Aim for even spacing between your diagonal lines because it makes for a much prettier final result. Score 1-inch deep diamonds, this creates more surface area for the glaze to cling to later.
Tip: Use a sharp serrated knife if your chef’s knife is sliding. It grabs the fat cap much easier without needing a lot of pressure.
Step 2: Simmer the honey glaze
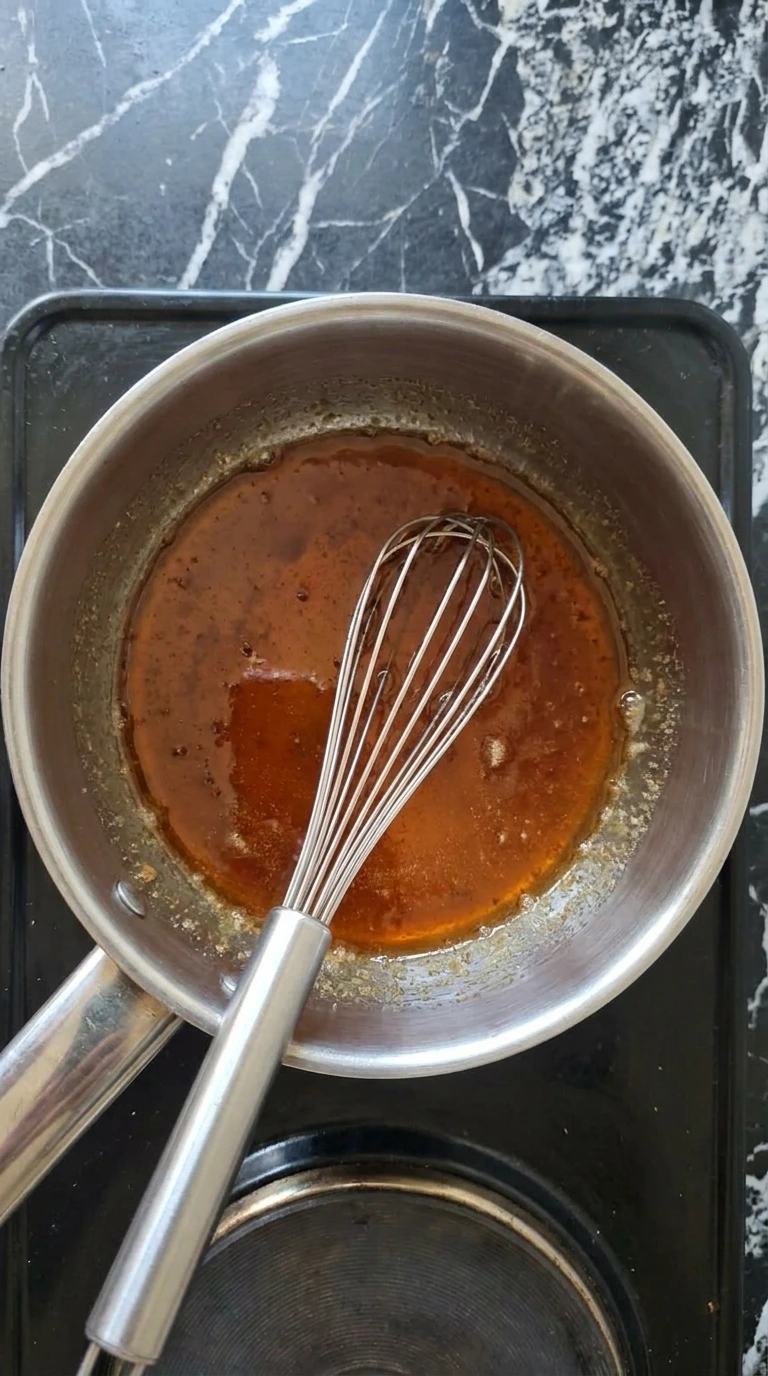
Combine the golden honey light brown sugar and Dijon mustard in a small stainless saucepan over medium-low heat. Whisk the mixture constantly for 5 to 7 minutes until the sugar granules completely dissolve into the liquid. You’re looking for a smooth syrupy consistency that coats the back of a spoon.
If you see it start to bubble too aggressively then turn the heat down to 2 or 3 on your dial. The kitchen will start to smell like warm sugar and vinegar as the ingredients meld together. You’ll see tiny bubbles forming around the edges and the color will shift from pale yellow to a deep amber.
If the mixture gets too thick too fast it’ll be hard to brush on so keep it moving. (I used to rush this on high heat but the honey scorched and tasted bitter, slow and steady is the secret here. ) Simmer exactly 6 minutes, gentle heat binds the sugars without burning the delicate honey notes.
Tip: Add a splash of water if the glaze looks like candy. It should be thick but still pourable so it runs into the score marks.
Step 3: Bake and baste
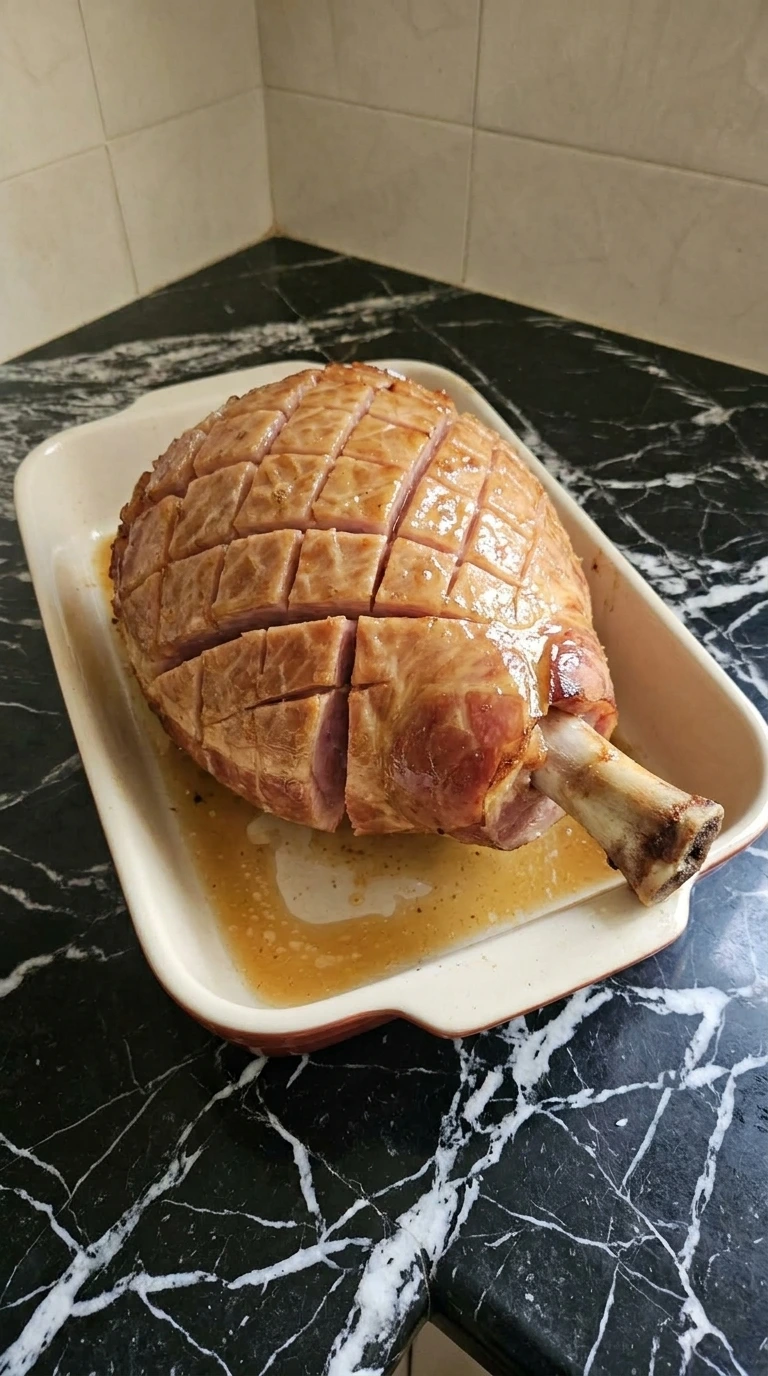
Move the ham into a 9×13 ceramic baking dish and pour half of your glaze over the top. Bake at 325°F for about 60 to 75 minutes depending on the size of your cut. You’ll want to reach an internal temperature of 140°F before the final glazing step starts.
Every 20 minutes use a silicone brush to scoop the juices from the bottom and coat the top again. You’ll hear the ham sizzling in the pan and the edges of the spiral slices will start to curl slightly. The glaze will look wet and glossy at first but then it’ll start to tack up as the moisture evaporates in the oven.
The smell of cloves and ham will become very strong around the 45-minute mark. Don’t pull it out early or the center will stay cold and the fat won’t render properly. Bake at 325°F internal 140°F, slow roasting ensures the interior is hot without drying out the edges.
Tip: Tent the ham with aluminum foil if the top starts to brown too quickly. You want a slow warm-up for the first hour.
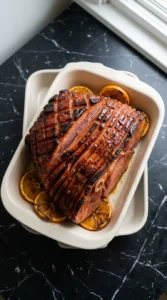
Step 4: The high heat finish
Increase the oven temperature to 400°F and brush the remaining glaze over every inch of the meat. Roast for another 10 to 12 minutes until the surface turns a dark mahogany color. Watch it closely through the oven window because the sugar can go from perfect to burnt in under a minute.
You want to see the edges of the diamonds getting crispy and almost black in some spots. The glaze will start to crackle and pop as the sugars caramelize under the intense heat. You’ll see the glaze thicken into a sticky lacquer that clings to the meat even when you tilt the pan.
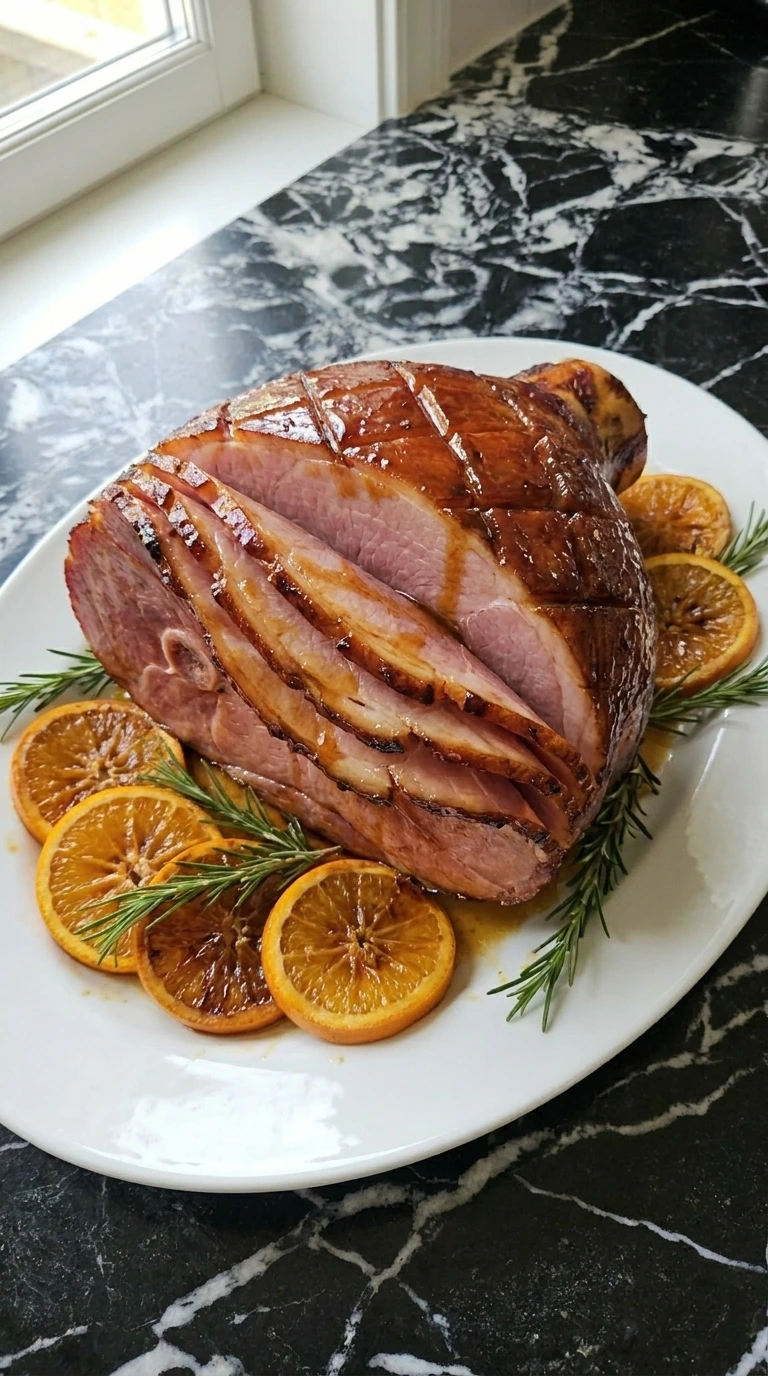
The oranges in the pan should look charred and the rosemary will be fragrant and slightly toasted. This is where the magic happens and all that patience pays off with a perfect crust. Roast at 400°F for 10 min, intense heat triggers the Maillard reaction for a crispy sweet crust.
Tip: Use the broil setting for the last 2 minutes if you want extra crunch. Just don’t walk away from the oven during this time.
Step 5: Rest and slice

Transfer the ham to a clean white ceramic platter and let it rest for exactly 15 minutes before touching it. This allows the juices to settle back into the meat so every slice stays moist and tender. If you cut it immediately the glaze will slide off and the center will be dry.
(I used to skip the rest but the first cut leaks half the sauce, don’t skip it. ) You’ll see the glaze set into a firm and sticky shell as it cools slightly. The aroma of cloves and sweet pork will be incredible as you carry it to the table.
Use a long carving knife to follow the natural spiral cuts and let the slices fall gently onto the platter. Arrange a few fresh orange rounds around the base for a pop of color and extra juice. Rest 15 minutes before slicing, resting redistributed juices so the ham stays moist through every bite.
Tip: Save the bone for a soup later. It has tons of flavor and works perfectly in a Shepherd’s Pie style base.
Chef’s Notes
- Let the ham sit at room temperature for 30 minutes before baking to ensure even heating.
- Score the diamonds only 1-inch deep to prevent the ham from drying out too fast.
- Whisk the glaze until the sugar is completely dissolved or it will feel gritty on the meat.
- Brush the glaze into every spiral slice for flavor in every single bite.
- Keep the ham covered with foil for the first 45 minutes to trap moisture inside.
- Use a digital thermometer to hit 140°F exactly so the meat stays tender and juicy.
- Save the glaze drippings from the bottom of the pan to serve as a side sauce.
- Garnish with fresh rosemary only at the very end so the leaves stay green and .
- Add 1/4 cup of pineapple juice to the glaze for a tropical twist that kids love.
- Whisk in 1 teaspoon of smoked paprika for a deeper savory flavor that mimics wood fire.
- Swap the honey for agave nectar for a lower glycemic index and a cleaner sweetness.
- Toss 1/2 cup of bourbon into the glaze simmer for an adult version with oaky notes.
Variations to Try
- golden honey: maple syrup — Use Grade A maple syrup for a woodier flavor but the glaze will be slightly thinner.
- light brown sugar: dark brown sugar — This will make the glaze much darker and give it a stronger molasses taste.
- apple cider vinegar: orange juice — Provides a similar acidity with a fruitier profile that pairs great with cloves.
- Dijon mustard: yellow mustard — Works in a pinch but you’ll lose that refined sharp bite from the Dijon.
How to Store & Reheat
Store your leftovers in a shallow airtight glass container for up to 5 days in the refrigerator. If you want to keep it longer, wrap individual slices in freezer paper and store them in a heavy-duty freezer bag for 2 months.
Label the bag with the date so you don’t forget it. To reheat a large portion, place it in a baking dish with a splash of apple juice at 300°F for 20 minutes.
This adds moisture back into the meat and revives the sticky glaze. Watch for any sour smells or greyish tint as these are signs the ham has spoiled.
Honey Glazed Ham
Ingredients
- 8 pounds bone-in spiral-cut ham Fully cooked, bone-in for better flavor, and spiral-sliced for easy serving.
- 0.5 cups golden honey Clover or wildflower honey works best for a classic floral sweetness.
- 0.5 cups light brown sugar Packed firmly to ensure a deep molasses flavor in the crust.
- 2 tablespoons Dijon mustard Adds a necessary tang to balance out the heavy sugars.
- 1 tablespoon apple cider vinegar Cuts through the fat and brightens the overall glaze flavor.
- 12 units whole cloves Pushed into the score marks for an aromatic holiday scent.
- 0.25 teaspoons ground cinnamon Provides a warm earthy base note to the honey mixture.
Instructions
- Place your bone-in spiral ham on a wooden cutting board and use a sharp chef’s knife to score the surface. You’ll want to cut 1-inch deep diamond patterns across the entire top dome. This opens up the meat so the glaze can actually penetrate the layers instead of just sliding off the skin. (I tried skipping this once and the flavor stayed purely on the outside, definitely take the two minutes to do it.) You’ll see the fat cap pull apart slightly as you cut and the pink meat should peek through. The ham should feel cold but pliable as you work the knife through the tough outer layer. Aim for even spacing between your diagonal lines because it makes for a much prettier final result. Score 1-inch deep diamonds, this creates more surface area for the glaze to cling to later.
- Combine the golden honey light brown sugar and Dijon mustard in a small stainless saucepan over medium-low heat. Whisk the mixture constantly for 5 to 7 minutes until the sugar granules completely dissolve into the liquid. You’re looking for a smooth syrupy consistency that coats the back of a spoon. If you see it start to bubble too aggressively then turn the heat down to 2 or 3 on your dial. The kitchen will start to smell like warm sugar and vinegar as the ingredients meld together. You’ll see tiny bubbles forming around the edges and the color will shift from pale yellow to a deep amber. If the mixture gets too thick too fast it’ll be hard to brush on so keep it moving. (I used to rush this on high heat but the honey scorched and tasted bitter, slow and steady is the secret here.) Simmer exactly 6 minutes, gentle heat binds the sugars without burning the delicate honey notes.

- Move the ham into a 9×13 ceramic baking dish and pour half of your glaze over the top. Bake at 325°F for about 60 to 75 minutes depending on the size of your cut. You’ll want to reach an internal temperature of 140°F before the final glazing step starts. Every 20 minutes use a silicone brush to scoop the juices from the bottom and coat the top again. You’ll hear the ham sizzling in the pan and the edges of the spiral slices will start to curl slightly. The glaze will look wet and glossy at first but then it’ll start to tack up as the moisture evaporates in the oven. The smell of cloves and ham will become very strong around the 45-minute mark. Don’t pull it out early or the center will stay cold and the fat won’t render properly. Bake at 325°F internal 140°F, slow roasting ensures the interior is hot without drying out the edges.

- Increase the oven temperature to 400°F and brush the remaining glaze over every inch of the meat. Roast for another 10 to 12 minutes until the surface turns a dark mahogany color. Watch it closely through the oven window because the sugar can go from perfect to burnt in under a minute. You want to see the edges of the diamonds getting crispy and almost black in some spots. The glaze will start to crackle and pop as the sugars caramelize under the intense heat. You’ll see the glaze thicken into a sticky lacquer that clings to the meat even when you tilt the pan. The oranges in the pan should look charred and the rosemary will be fragrant and slightly toasted. This is where the magic happens and all that patience pays off with a perfect crust. Roast at 400°F for 10 min, intense heat triggers the Maillard reaction for a crispy sweet crust.
- Transfer the ham to a clean white ceramic platter and let it rest for exactly 15 minutes before touching it. This allows the juices to settle back into the meat so every slice stays moist and tender. If you cut it immediately the glaze will slide off and the center will be dry. (I used to skip the rest but the first cut leaks half the sauce, don’t skip it.) You’ll see the glaze set into a firm and sticky shell as it cools slightly. The aroma of cloves and sweet pork will be incredible as you carry it to the table. Use a long carving knife to follow the natural spiral cuts and let the slices fall gently onto the platter. Arrange a few fresh orange rounds around the base for a pop of color and extra juice. Rest 15 minutes before slicing, resting redistributed juices so the ham stays moist through every bite.

Notes
Nutrition
FAQ
You can keep the glazed ham in an airtight container for up to 5 days. Make sure it is completely cool before sealing to prevent condensation from making the crust soggy. It is also great for sandwiches or dicing into a breakfast hash.
Yes, you can freeze it for up to 2 months if you wrap it tightly in plastic wrap and then foil. When you are ready to eat, let it thaw in the fridge for 24 hours. The glaze might lose some crunch but the flavor stays perfect.
This usually happens if the oven is too hot or the glaze has too much sugar and not enough liquid. Make sure you stay at 325°F for the main cook and only go to 400°F for the final 10 minutes. Tenting with foil also helps protect the sugar.
You don’t have to but the bone acts as a conductor for heat and keeps the meat much juicier. Boneless hams tend to dry out faster and don’t have the same structural integrity. If you use boneless, check the temperature 15 minutes earlier.
Put the slice on a microwave-safe plate with a teaspoon of water and cover it with a damp paper towel. Heat for 30 to 45 seconds on medium power. This creates a small steam chamber that keeps the meat tender and the glaze sticky.
In Conclusion
If you make this on a weekend afternoon with music playing, the way I do, you’ll understand why it’s been in our family rotation for years now. The little trick I mentioned about not rushing the final step is honestly the difference between okay and really good.
Tag me on Instagram if you make it, I love seeing what you cook. And Liam says hi (he ate almost half of this when I tested it, which is the highest endorsement you’ll get from a 5-year-old).
This ham is truly the star of any table it sits on.
People have been glazing ham with honey for centuries because it was a clever way to preserve the meat while making it taste amazing. It’s not just about that sweet finish we love today. Back then, the sugar in the honey acted as a natural barrier against spoilage so the ham stayed fresh longer. Nowadays we mostly do it for that perfect mahogany crust, but it’s cool to think the technique started out as a practical kitchen hack.