Parmesan Roasted Patty Pan Squash
Last summer we were visiting my in-laws and my mother-in-law made this Parmesan Roasted Patty Pan Squash three nights in a row because the kids kept asking for it. I must have watched her make it four times before I figured out her little secret, she dries every slice first and adds most of the Parmesan near the end. Now it’s on heavy rotation in our house too. Honestly it took me three tries to get the balance right.
The first time I used too much olive oil and it drowned every crisp edge. These golden slices work especially well beside Garlic Butter Shrimp Pasta for a simple weeknight dinner because they catch the buttery sauce without turning heavy. The finished squash has tender centers and crisp cheese at the edges. And the scalloped slices look a little different every time, which I like.
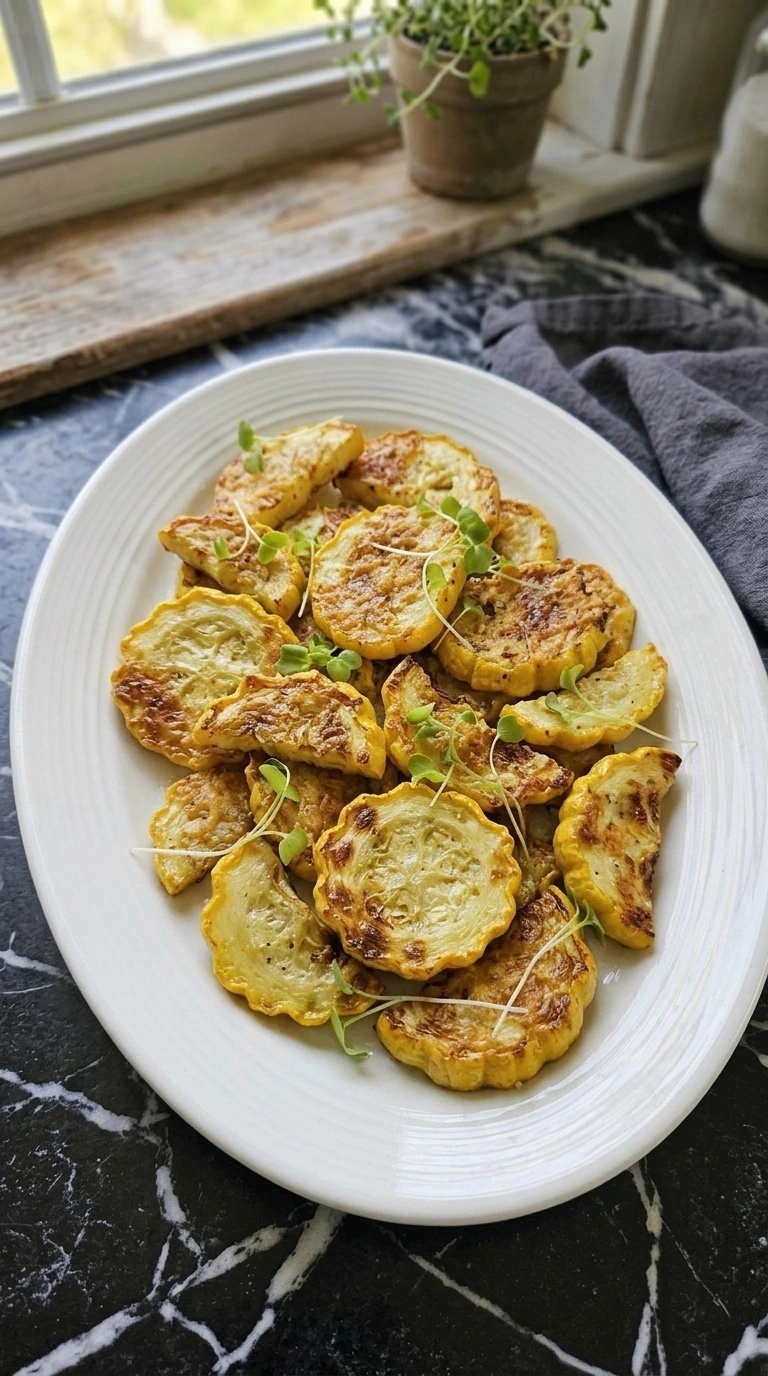
You’ll get the best color from firm small squash and a hot pan. Nothing fancy. Just enough heat, enough space and the patience to add the cheese after the first roast every single time.
The Secret to This Recipe
Half-inch slices expose enough surface for browning while keeping the centers tender and pleasantly firm. Drying them removes water that would otherwise create steam. A 425°F oven then colors the edges before the squash turns limp.
The first roast happens without cheese, so direct heat reaches every cut face well. Parmigiano-Reggiano goes on after the flip because its fine crystals brown very quickly. Adding it late creates toasted patches without bitter edges.
A light oil coating carries heat and helps garlic and thyme cling evenly. The same late-cheese idea gives our Garlic Bread its crisp and deeply savory top finish.
Shopping List
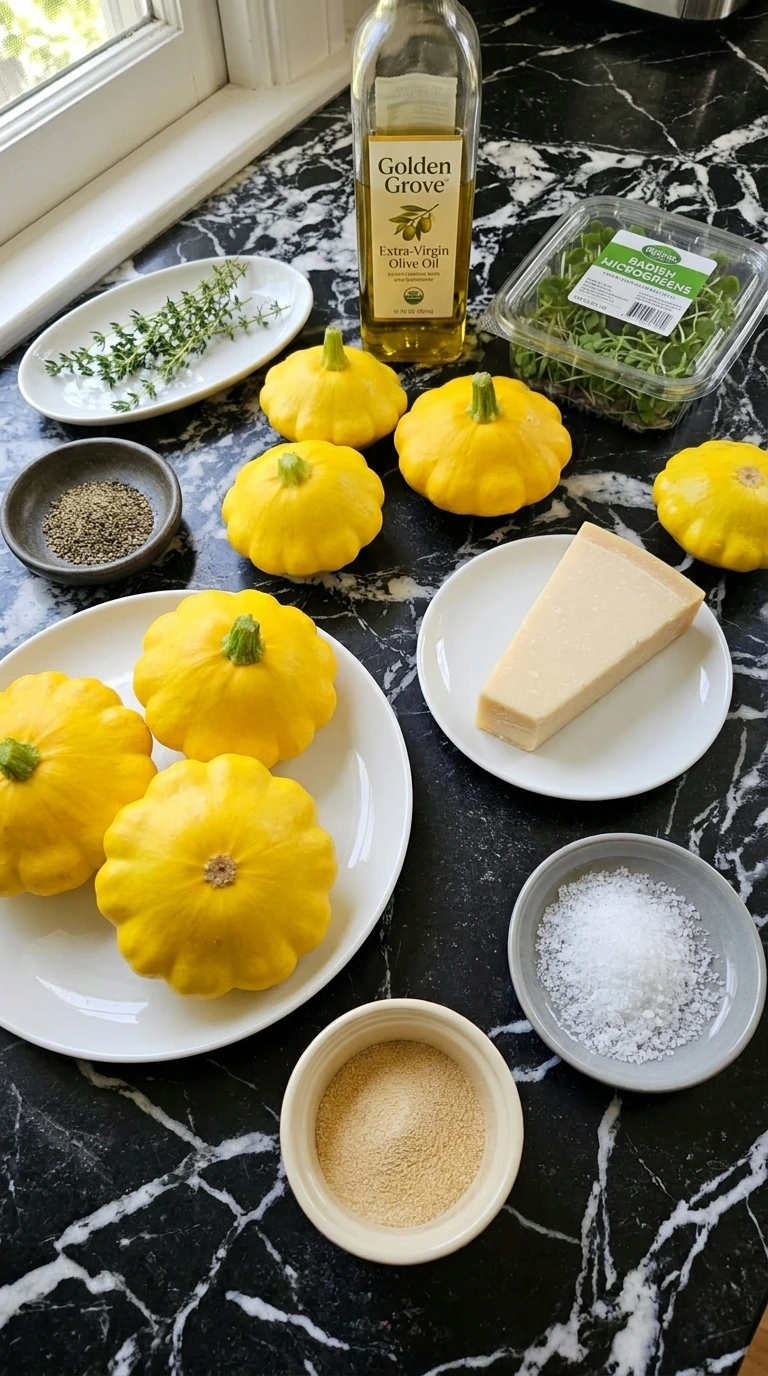
- yellow patty pan squash: Trimmed and cut crosswise into 18 half-inch rounds, with oversized slices quartered for even roasting.
- extra-virgin olive oil: Used to create a thin heat-conducting coating without making the squash greasy.
- Parmigiano-Reggiano: Finely grated and divided, with 6 tablespoons for roasting and 2 tablespoons for finishing.
- garlic powder: Distributed across the slices for even garlic flavor without wet chopped garlic.
- Diamond Crystal kosher salt: Added just before roasting so the squash doesn’t release excess moisture.
- freshly ground black pepper: Ground medium-fine so visible specks cling to the oiled cut faces.
- fresh thyme: Leaves stripped from the stems and scattered through the oil coating.
- radish microgreens: Added after roasting for fresh color and a mild peppery finish.
The Gear
- Chef’s knife: An 8-inch sharp chef’s knife cuts clean half-inch slices, while a dull blade crushes the scalloped edges and makes uneven pieces.
- Large cutting board: A board at least 12×18 inches gives six squash enough room, while a smaller board encourages crowded and inconsistent cuts.
- Large mixing bowl: A 4-quart bowl lets 18 slices tumble freely, while a narrow bowl leaves oily patches and dry seasoning pockets.
- Rimmed sheet pan: A light-colored 13×18-inch aluminum pan spreads heat evenly, while a dark thin pan can scorch the cheese before centers soften.
- Fine grater: A microplane makes feathery Parmigiano-Reggiano that melts quickly, while a coarse box grater leaves heavier strands and patchy coverage.
Step-by-Step Instructions
Step 1: Slice and dry the squash

Heat the oven to 425°F while you trim six small yellow patty pan squash for 8 to 10 minutes. Cut each squash crosswise into three half-inch slices. Quarter any slice wider than 3 inches so every piece roasts at the same pace.
Then press both sides firmly with clean towels until no moisture beads remain. The cut faces should look matte and pale yellow instead of wet or glossy. You should smell fresh squash but no grassy moisture should pool beneath it.
Uneven slices turn soft before thicker pieces color, so keep the thickness close. Don’t leave damp surfaces because steam blocks browning. Dry slices brown faster because steam can’t block the Maillard reaction.
Tip: Choose squash measuring 2 to 3 inches wide. Larger ones contain more seeds and can need 2 extra roasting minutes.
Step 2: Coat the slices with herbs and oil
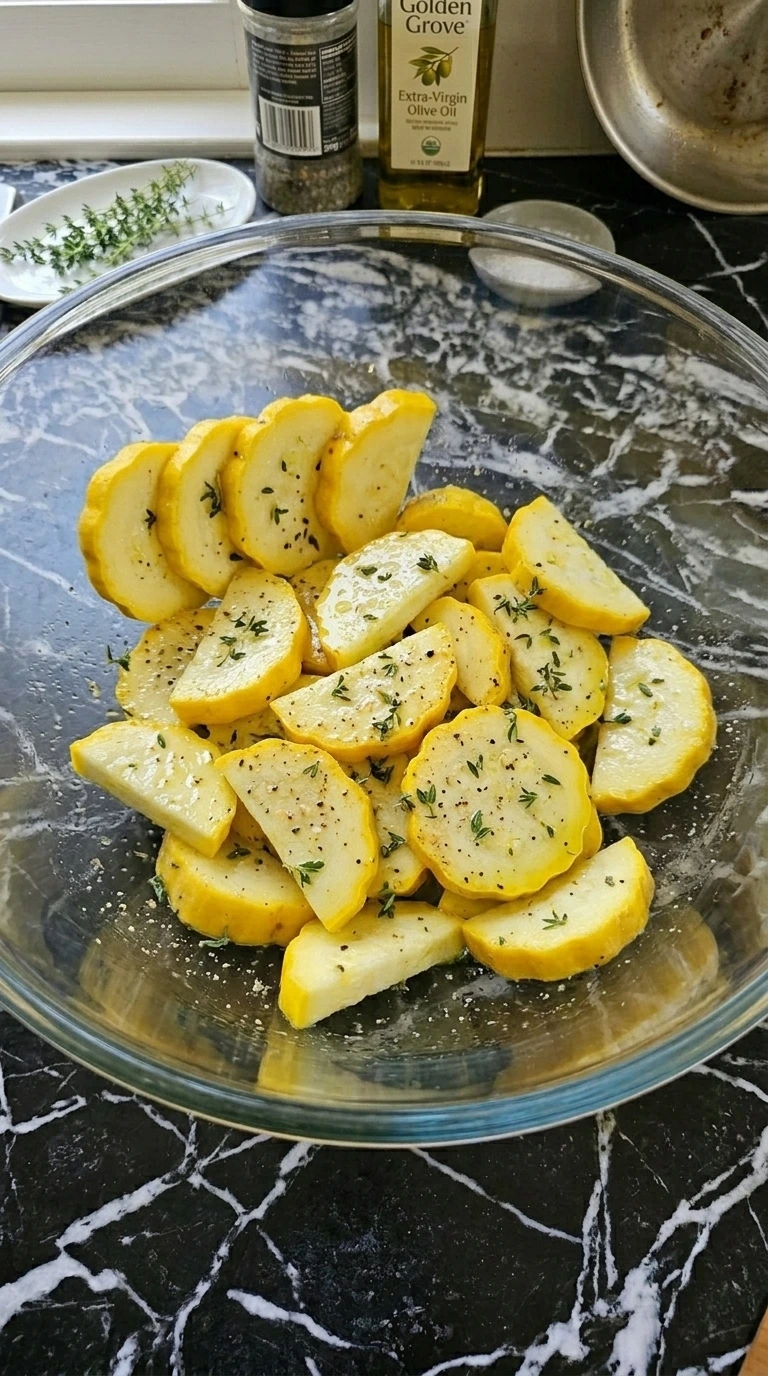
Keep the oven at 425°F. Add the squash to a large bowl with 3 tablespoons extra-virgin olive oil. Sprinkle in garlic powder, kosher salt, black pepper and fresh thyme. Toss with two broad scooping motions for 60 to 90 seconds.
Stop once every cut face carries a thin glossy film and visible seasoning specks. The slices should slide against each other without oil pooling beneath them. You’ll smell thyme and pepper as the coating warms from your hands. Letting the salted squash sit beyond 5 minutes draws water and weakens the crust.
(I tried 4 tablespoons of oil once, the pieces steamed instead of coloring. ) A thin coating transfers heat without trapping excess moisture.
Tip: Measure the oil instead of pouring freely. Three tablespoons coat 2 pounds without creating a greasy layer on the pan.
Step 3: Roast the first side

Spread all 18 coated slices across a 13×18-inch rimmed sheet pan in one loose layer. Keep small gaps between most pieces and allow only slight overlap at two edges. Roast at 425°F for 12 minutes.
At minute 8, rotate the pan 180 degrees and shift two darker edge pieces toward the center. The undersides should show pale golden patches while the tops remain glossy yellow. You’ll hear a soft sizzle and smell sweet squash near minute 10.
If the slices stay crowded, released water collects and softens their edges. Go beyond 14 minutes before turning and the thinnest pieces can collapse. Open spacing lets dry oven heat reach each cut face.
Tip: Use a light-colored aluminum pan. Dark nonstick metal can brown the bottoms 2 to 3 minutes sooner.
Step 4: Flip and add the Parmesan

Flip every slice and move the paler pieces toward the hotter outer rim. Scatter 6 tablespoons finely grated Parmigiano-Reggiano across the exposed faces. Return the pan to the 425°F oven for 6 to 8 minutes.
Check at minute 6 and pull any very thin quartered pieces before the larger rounds. The cheese should melt into lacy patches with toasted tan freckles. Meanwhile, the squash edges deepen to amber and the centers stay tender but intact.
You’ll smell toasted milk solids when the pan is close. Leave it past 8 minutes and the fine cheese turns bitter. Late-added cheese browns without shielding the squash from early heat.
Tip: Grate Parmigiano-Reggiano on a microplane. Fine strands melt in 6 minutes while coarse shreds can stay chewy.
Step 5: Rest and finish each serving

Rest the squash on the hot pan for exactly 3 minutes after it leaves the 425°F oven. Then slide four or five slices onto each white plate with a thin lifting motion. Finish the four servings with the reserved 2 tablespoons Parmigiano-Reggiano and 2 tablespoons radish microgreens.
Keep the pieces casually overlapped rather than stacked high. The crust should feel dry at the edges while the centers yield gently. Fresh Parmesan looks snowy against the golden surfaces and the microgreens stay bright.
Transfer too soon and the molten cheese can tear away from the squash. Wait longer than 8 minutes and the slices lose their best heat. A short rest sets the cheese crust before plating.
Tip: Warm the serving plates at 200°F for 5 minutes. The squash stays hot without continuing to soften.
Chef’s Notes
- Choose six firm squash measuring 2 to 3 inches wide. Larger fruits develop tougher seeds and need about 2 extra roasting minutes.
- Cut every slice close to 1/2 inch thick. Thinner 1/4-inch pieces soften before the Parmesan reaches a toasted color.
- Dry both cut faces for 30 seconds with clean towels. Any visible moisture turns into steam and prevents crisp edges.
- Leave at least 1/4 inch between most slices on a 13×18-inch pan. Crowding creates a watery patch in the center.
- Add the Parmesan only after 12 minutes of roasting. Earlier cheese shields the squash and can brown before the centers soften.
- Check the pan at minute 6 after adding cheese. Remove thin quartered pieces as soon as their edges reach deep amber.
- Finish with 2 tablespoons fresh Parmigiano-Reggiano after plating. The contrast between snowy cheese and toasted patches sharpens the flavor.
- Add 1 teaspoon smoked paprika and 1/8 teaspoon cayenne to the oil for a warm barbecue-style version.
- Replace thyme with 1 tablespoon chopped rosemary and finish with 1 teaspoon finely grated lemon zest for a brighter herbal flavor.
- Scatter 1/3 cup panko breadcrumbs with the Parmesan for extra crunch, then watch closely during the final 6 minutes.
- Use the nutritional yeast and almond flour swap, then add 1/2 teaspoon onion powder for a fully dairy-free savory crust.
Variations to Try
- yellow patty pan squash: yellow zucchini or crookneck squash — Use the same 2-pound weight and cut half-inch rounds. Start checking 2 minutes earlier because zucchini softens faster and lacks the firm scalloped rim.
- Parmigiano-Reggiano: 1/3 cup nutritional yeast plus 2 tablespoons almond flour — This dairy-free blend makes a drier and nuttier crust. Add it after flipping and reduce the second roast to 5 to 7 minutes.
- Parmigiano-Reggiano: 1/4 cup Parmigiano-Reggiano plus 1/4 cup low-moisture mozzarella — The surface turns softer and stretchier with less crisp lace. It gives a milder finish similar to the cheese pull in our Mozzarella Sticks.
- gluten-containing seasonings: certified gluten-free garlic powder and pepper — The recipe is naturally gluten-free when seasonings contain no wheat-based anti-caking agents. Use the same measurements and expect no texture change.
- egg: no replacement needed — This recipe is already egg-free because oil helps the cheese and seasonings cling. Don’t add an egg wash because it forms a soft coating.
- fresh thyme: 1 teaspoon dried thyme — Use one-third as much dried thyme because its flavor is concentrated. The result tastes earthier and loses the fresh green notes.
How to Store & Reheat
Cool leftovers for no more than 30 minutes, then place them in a shallow airtight container. Refrigerate for up to 4 days and separate layers with parchment to protect the cheese crust. Freezing isn’t ideal because summer squash releases water after thawing.
If necessary, freeze slices in one layer for 30 minutes, then bag them for up to 1 month. Reheat refrigerated squash at 425°F for 6 to 8 minutes on a preheated pan. An air fryer also works at 375°F for 4 to 5 minutes.
Add fresh microgreens and a teaspoon of grated Parmesan after reheating. Don’t microwave longer than 45 seconds because the centers turn watery. Discard pieces with a sour smell, slimy coating or gray wet patches.
Parmesan Roasted Patty Pan Squash
Ingredients
- 6 small, about 2 pounds yellow patty pan squash Trimmed and cut crosswise into 18 half-inch rounds, with oversized slices quartered for even roasting.
- 3 tablespoons extra-virgin olive oil Used to create a thin heat-conducting coating without making the squash greasy.
- 1/2 cup Parmigiano-Reggiano Finely grated and divided, with 6 tablespoons for roasting and 2 tablespoons for finishing.
- 1 teaspoon garlic powder Distributed across the slices for even garlic flavor without wet chopped garlic.
- 3/4 teaspoon Diamond Crystal kosher salt Added just before roasting so the squash doesn’t release excess moisture.
- 1/2 teaspoon freshly ground black pepper Ground medium-fine so visible specks cling to the oiled cut faces.
- 1 tablespoon fresh thyme Leaves stripped from the stems and scattered through the oil coating.
- 2 tablespoons radish microgreens Added after roasting for fresh color and a mild peppery finish.
Instructions
- Heat the oven to 425°F while you trim six small yellow patty pan squash for 8 to 10 minutes. Cut each squash crosswise into three half-inch slices. Quarter any slice wider than 3 inches so every piece roasts at the same pace. Then press both sides firmly with clean towels until no moisture beads remain. The cut faces should look matte and pale yellow instead of wet or glossy. You should smell fresh squash but no grassy moisture should pool beneath it. Uneven slices turn soft before thicker pieces color, so keep the thickness close. Don’t leave damp surfaces because steam blocks browning. Dry slices brown faster because steam can’t block the Maillard reaction.

- Keep the oven at 425°F. Add the squash to a large bowl with 3 tablespoons extra-virgin olive oil. Sprinkle in garlic powder, kosher salt, black pepper and fresh thyme. Toss with two broad scooping motions for 60 to 90 seconds. Stop once every cut face carries a thin glossy film and visible seasoning specks. The slices should slide against each other without oil pooling beneath them. You’ll smell thyme and pepper as the coating warms from your hands. Letting the salted squash sit beyond 5 minutes draws water and weakens the crust. (I tried 4 tablespoons of oil once, the pieces steamed instead of coloring.) A thin coating transfers heat without trapping excess moisture.
- Spread all 18 coated slices across a 13×18-inch rimmed sheet pan in one loose layer. Keep small gaps between most pieces and allow only slight overlap at two edges. Roast at 425°F for 12 minutes. At minute 8, rotate the pan 180 degrees and shift two darker edge pieces toward the center. The undersides should show pale golden patches while the tops remain glossy yellow. You’ll hear a soft sizzle and smell sweet squash near minute 10. If the slices stay crowded, released water collects and softens their edges. Go beyond 14 minutes before turning and the thinnest pieces can collapse. Open spacing lets dry oven heat reach each cut face.

- Flip every slice and move the paler pieces toward the hotter outer rim. Scatter 6 tablespoons finely grated Parmigiano-Reggiano across the exposed faces. Return the pan to the 425°F oven for 6 to 8 minutes. Check at minute 6 and pull any very thin quartered pieces before the larger rounds. The cheese should melt into lacy patches with toasted tan freckles. Meanwhile, the squash edges deepen to amber and the centers stay tender but intact. You’ll smell toasted milk solids when the pan is close. Leave it past 8 minutes and the fine cheese turns bitter. Late-added cheese browns without shielding the squash from early heat.

- Rest the squash on the hot pan for exactly 3 minutes after it leaves the 425°F oven. Then slide four or five slices onto each white plate with a thin lifting motion. Finish the four servings with the reserved 2 tablespoons Parmigiano-Reggiano and 2 tablespoons radish microgreens. Keep the pieces casually overlapped rather than stacked high. The crust should feel dry at the edges while the centers yield gently. Fresh Parmesan looks snowy against the golden surfaces and the microgreens stay bright. Transfer too soon and the molten cheese can tear away from the squash. Wait longer than 8 minutes and the slices lose their best heat. A short rest sets the cheese crust before plating.

Notes
Nutrition
Reader Questions
Yes. Slice and dry the squash up to 8 hours early, then refrigerate it between clean towels in a sealed container. Don’t add salt or oil until 5 minutes before roasting because both encourage moisture to collect on the cut faces.
Keep leftovers in a shallow airtight container for up to 4 days. Separate layers with parchment so the Parmigiano-Reggiano crust doesn’t peel away during storage. Discard the squash if it smells sour, feels slimy or shows wet gray patches.
Use 1/3 cup nutritional yeast mixed with 2 tablespoons almond flour instead of 1/2 cup Parmigiano-Reggiano. Roast for the same 6 to 8 minutes after flipping. Expect a drier crust and a nuttier flavor without the same melt.
Watery squash usually comes from crowded slices or damp cut faces. Pat every piece dry and leave small gaps on a 13×18-inch pan. Roast at 425°F and don’t salt the pieces more than 5 minutes before they enter the oven.
Double every ingredient and divide the squash between two 13×18-inch pans. Place racks in the upper and lower thirds, then switch pan positions at minute 8. Add 2 to 4 minutes if both pans still look pale after flipping.
Serve the squash beside grilled chicken, shrimp pasta or a holiday roast. Reheat a single portion at 425°F for 6 to 8 minutes, then add fresh microgreens after heating. Freezing works for 1 month, but the centers become softer after thawing.
Final Thoughts
Every time I make this, I think about the first batch, nervous about ruining tender summer squash. Turns out it’s one of those dishes that forgives you for being a beginner.
The late Parmesan makes it special, even when your timing slips like mine did three times. Try it and leave a comment, then serve it with Stuffing or Mini Sliders.
Patty pan squash is a summer squash, so its scalloped skin stays tender enough to eat. Small fruits also contain fewer developed seeds than oversized ones.