Roast Chicken
I honestly haven’t really shared many whole poultry recipes on my blog, but this Roast Chicken recipe was one I had to share. This recipe is inspired by classic home cooking and is simple to prepare. It’s a super tasty dish packed full of protein and is quite filling.
When people think about roasting a whole bird they probably avoid making it since it can easily dry out in the oven. But trust me on this when it’s prepared in the right way it offers a rich and savory taste that’s very satisfying. You can serve it alongside our Green Bean Casserole for the perfect comforting family meal.

This recipe is super tasty and simple to make. I recommend this meal for those who want to experience a cozy traditional Sunday dinner right at home.
Why This Recipe Works
Roasting at 400°F strikes the perfect balance for whole poultry. The high heat quickly renders the fat beneath the skin to create a thin crispy barrier before the white breast meat can overcook.
Blending melted butter with olive oil provides excellent surface coverage and encourages beautiful uniform browning. Stuffing the interior cavity with wet aromatics creates localized steam during the baking process.
This moisture works from the inside out to keep the delicate breasts incredibly juicy while the dry heat crisps the exterior skin. If you want a faster chicken option for lunch try our Grilled Chicken Wraps instead.
What You’ll Need

- whole chicken: Giblets removed and skin left completely intact for optimal crispness.
- unsalted butter: Melted completely to help brown the skin and add a rich dairy flavor.
- Pompeian Olive Oil: Combined with the butter to raise the smoke point and keep the rub smooth.
- coarse salt: Essential for drawing out moisture from the skin to make it extra crunchy.
- black pepper: Freshly cracked for a sharp rustic bite across the surface.
- garlic powder: Distributed evenly in the dry rub for an intense savory baseline flavor.
- onion powder: Adds a sweet aromatic depth that complements the garlic perfectly.
- paprika: Provides a warm earthy flavor and gives the skin a stunning red glow.
- French’s Ground Mustard: Gives a subtle tangy warmth that cuts through the rich chicken fat.
- Italian seasoning: A dried herb blend that brings a classic rustic aroma to the crust.
- lemon: Cut into thick round slices to steam inside the cavity during cooking.
- garlic clove: Peeled and lightly smashed to release aromatic oils inside the bird.
- fresh rosemary: Whole stalks tucked into the cavity for a pungent piney essence.
- fresh parsley: Tucked alongside the herbs to add a clean grassy lift to the meat juices.
What You’ll Use
- large white ceramic baking dish: A heavy ceramic baking dish retains heat wonderfully for even roasting and prevents the chicken drippings from scorching on the bottom.
- kitchen twine: Unbleached cotton kitchen twine holds the bird’s shape tight so the breast meat cooks at the same rate as the thick thighs.
- wooden cutting board: A large wooden board with a perimeter juice groove catches any running liquids so your countertops stay completely clean.
- instant-read meat thermometer: A digital thermometer ensures you hit the safe target temp without guessing and avoids serving dangerous undercooked poultry.
Step-by-Step Instructions
Step 1: Pat the chicken dry and season
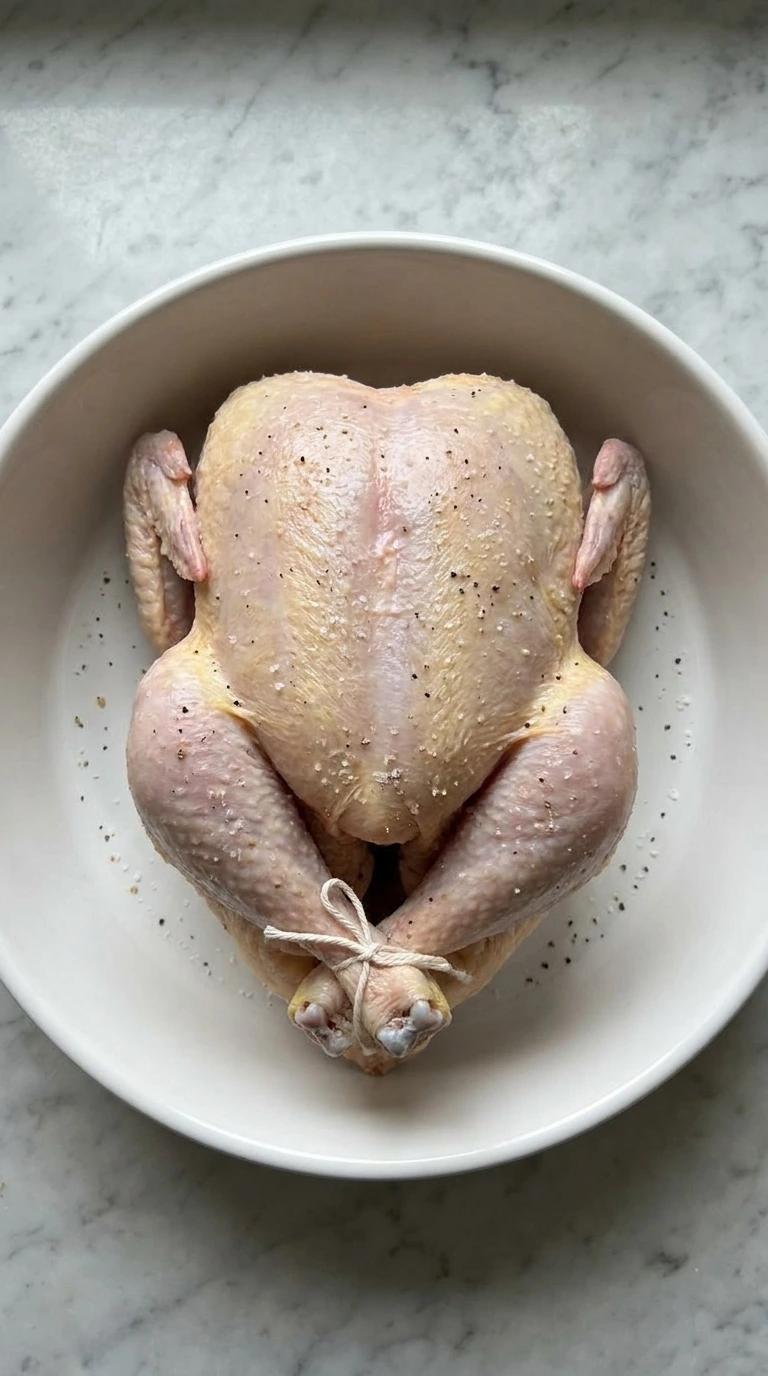
Start by prepping your poultry. Use paper towels to pat the surface of the raw bird completely dry. This step is crucial because any moisture left on the skin will create steam in the oven. Steam prevents the skin from crisping up properly.
Place the bird on a large clean cutting board to keep things tidy. You’ll notice the skin turns matte and pale pink as you pat it down. Sprinkling the coarse salt and black pepper evenly from high above ensures uniform coverage across the breasts and legs. (I tried skipping the drying step during my first test, the skin came out rubbery and pale instead of crispy.
) Miss this drying window and the skin stays soggy while baking. Pat the surface completely dry, removing surface moisture allows the fat to render quickly.
Tip: Make sure to dry inside the cavity as well. Trapped moisture inside releases steam during roasting and delays the cooking process.
Step 2: Apply the oil and spice rub

Mix your spices in a small bowl before applying. Whisk the garlic powder, onion powder, paprika, ground mustard, and Italian seasoning together. Pour the olive oil and melted butter directly over the bird.
Rub the mixture thoroughly over every inch using your hands to coat the entire surface. The skin will instantly transform into a orange-red color from the paprika. You’ll smell the pungent garlic and herbaceous notes blending with the rich butter.
Work the rub into the folds near the wings and drumsticks so no spot is left bare. Go past this coating step without thorough coverage and you will end up with bland patches of skin. Rub the spices deeply into the skin, even fat distribution ensures a uniform golden crunch.
Tip: Gently loosen the skin over the breasts with your fingers and slide some spice rub underneath for maximum flavor.
Step 3: Stuff the cavity with aromatics
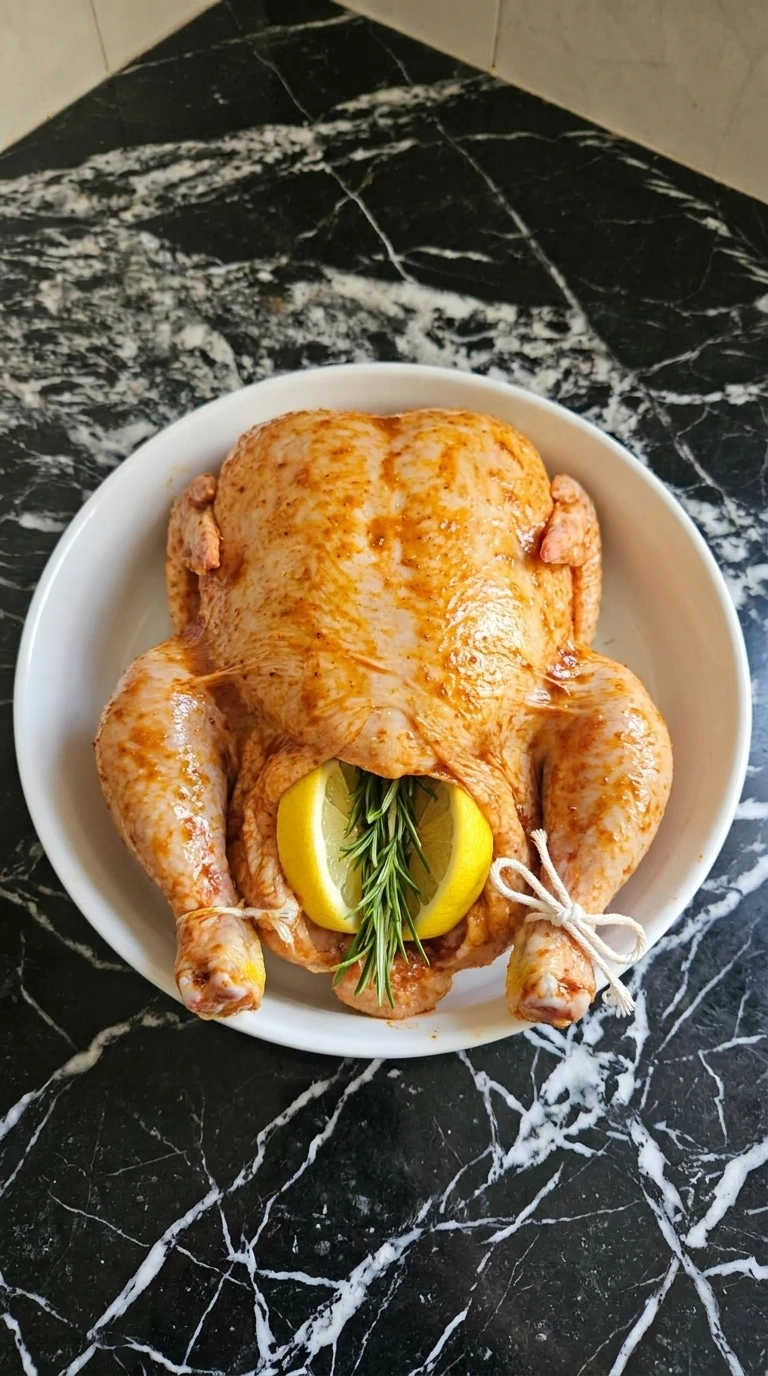
Stuff the interior cavity with your fresh aromatics. Shove the thick lemon slices, peeled garlic cloves, fresh rosemary, and thyme sprigs deep inside the bird. Tie the drumsticks together tightly using kitchen twine to seal the opening and keep the shape intact.
The chicken will plumper up as you fill the cavity. You’ll see the yellow edges of the lemon slices peeking out slightly from the back. The legs will bring closer together into a neat compact arrangement in the center of the dish.
Skip the kitchen twine and the cavity opens up too wide which lets the hot air dry out the inside. Stuff the cavity tightly, trapping steam inside infuses the meat with bright citrus oils.
Tip: Don’t overstuff the cavity completely to the brim or hot air won’t circulate enough to cook the inner thighs safely.
Step 4: Roast until deeply golden brown

Place the dish into a preheated oven at 400°F. Roast the bird undisturbed for 60 to 75 minutes. Check the progress halfway through to ensure even browning. You want the internal temperature to reach exactly 165°F in the thickest part of the thigh before removing it.
You’ll hear the chicken fat sizzling loudly in the bottom of the dish. The skin will turn a deep golden amber color and start to blister beautifully around the edges. Rich aromas of roasted garlic and browned butter will fill your kitchen completely. (My first batch went into a low heat oven and the skin stayed soft while the meat overcooked.
A hot 400°F environment is the fix. ) Leave the bird too long past the temperature target and the breast meat turns dry and stringy. Roast at 400°F until 165°F internal, high heat crisps skin before juices evaporate.
Tip: If the breast skin browns too quickly before the thighs cook through, tent a small piece of aluminum foil loosely over the top.
Step 5: Rest and carve a fresh slice
Transfer the hot bird onto a clean wooden cutting board. Let it rest for exactly 15 minutes before carving. Use a sharp chef knife to slice clean through the breast meat to reveal the tender interior.
The skin will crackle softly as the blade slices down. You’ll see steam rise gently from the meat as a clean slice falls away. The interior meat looks completely opaque white and glistening with hot juices while the outer rim retains its dark crusted edge.
Skip the rest period and all the trapped moisture will escape onto the board immediately. Rest 15 minutes before carving, resting allows muscle fibers to relax so moisture stays locked inside.
Tip: Save the remaining carcass and bones in your freezer. They make an incredibly rich homemade stock for future soups and stews.
Chef’s Notes
- Bring the raw poultry to room temperature for 30 minutes before roasting because cold meat causes the oven temperature to drop sharply.
- Never wash your raw poultry in the sink since splashing water spreads harmful bacteria across your kitchen counters and surfaces.
- Apply the salt rub twenty-four hours ahead and store uncovered in the fridge to dry out the skin completely for maximum crunch.
- Always insert the thermometer probe into the deepest part of the thigh without hitting bone because the bone registers inaccurate high numbers.
- Pour a cup of chicken stock into the bottom of your pan if the rendered fat starts smoking heavily during the baking process.
- Brush the remaining pan juices over the carved breast slices right before serving to add an instant hit of rich savory flavor.
- Tuck the wing tips behind the chicken’s back before trussing so they do not scorch under the direct heat of the oven.
- Use coarse kosher salt instead of fine table salt because the larger crystals distribute more evenly without making the meat overly salty.
- Add 1 tablespoon of smoked paprika and 1/2 cup of bacon bits for a barbecue twist that pairs well with grilled meats.
- Mix 2 tablespoons of hot honey into the melted butter rub for a sweet and spicy kick that caramelizes beautifully in the oven.
- Swap the Italian seasoning for ground cumin and chili powder to create a Tex-Mex style bird perfect for taco filling.
Substitutions & Variations
- unsalted butter: ghee or coconut oil — Works wonderfully for a dairy-free swap. It still delivers a beautiful golden color but coconut oil will add a very faint tropical sweetness.
- Italian seasoning: dried thyme and oregano — Mix equal parts dried thyme and oregano to mimic the earthy profile if you run out of the standard blend.
- lemon: small yellow onion — Use a quartered yellow onion instead. It lacks the bright acidity of citrus but adds a deeper savory sweetness to the inner juices.
- whole chicken: bone-in chicken thighs — Swap for 3 pounds of thighs if you are short on time. They cook faster but reduce the total oven time to about 35 minutes so the meat stays tender.
How to Store
Store your leftover roast chicken in an airtight glass container in the refrigerator for up to 4 days. If you want to freeze the leftovers carve the meat away from the bones completely first.
Wrap the meat tightly in heavy-duty aluminum foil and place it inside a freezer bag for up to 3 months. Reheat the chicken slices in a baking dish at 325°F for 12 minutes.
Add 2 tablespoons of fresh chicken broth over the meat before covering with foil to keep it moist. Check for sour odors or a slimy texture on the surface before eating because those are clear signs of spoilage.
Roast Chicken
Ingredients
- 4 to 5 pounds whole chicken Giblets removed and skin left completely intact for optimal crispness.
- 2 tablespoons unsalted butter Melted completely to help brown the skin and add a rich dairy flavor.
- 2 tablespoons Pompeian Olive Oil Combined with the butter to raise the smoke point and keep the rub smooth.
- 1 tablespoon coarse salt Essential for drawing out moisture from the skin to make it extra crunchy.
- 1 teaspoon black pepper Freshly cracked for a sharp rustic bite across the surface.
- 1 teaspoon garlic powder Distributed evenly in the dry rub for an intense savory baseline flavor.
- 1 teaspoon onion powder Adds a sweet aromatic depth that complements the garlic perfectly.
- 1 teaspoon paprika Provides a warm earthy flavor and gives the skin a stunning red glow.
- 0.5 teaspoon French’s Ground Mustard Gives a subtle tangy warmth that cuts through the rich chicken fat.
- 1 teaspoon Italian seasoning A dried herb blend that brings a classic rustic aroma to the crust.
- 1 whole lemon Cut into thick round slices to steam inside the cavity during cooking.
- 3 whole garlic clove Peeled and lightly smashed to release aromatic oils inside the bird.
- 3 sprigs fresh rosemary Whole stalks tucked into the cavity for a pungent piney essence.
- 4 sprigs fresh parsley Tucked alongside the herbs to add a clean grassy lift to the meat juices.
Instructions
- Start by prepping your poultry. Use paper towels to pat the surface of the raw bird completely dry. This step is crucial because any moisture left on the skin will create steam in the oven. Steam prevents the skin from crisping up properly. Place the bird on a large clean cutting board to keep things tidy. You’ll notice the skin turns matte and pale pink as you pat it down. Sprinkling the coarse salt and black pepper evenly from high above ensures uniform coverage across the breasts and legs. (I tried skipping the drying step during my first test, the skin came out rubbery and pale instead of crispy.) Miss this drying window and the skin stays soggy while baking. Pat the surface completely dry, removing surface moisture allows the fat to render quickly.

- Mix your spices in a small bowl before applying. Whisk the garlic powder, onion powder, paprika, ground mustard, and Italian seasoning together. Pour the olive oil and melted butter directly over the bird. Rub the mixture thoroughly over every inch using your hands to coat the entire surface. The skin will instantly transform into a orange-red color from the paprika. You’ll smell the pungent garlic and herbaceous notes blending with the rich butter. Work the rub into the folds near the wings and drumsticks so no spot is left bare. Go past this coating step without thorough coverage and you will end up with bland patches of skin. Rub the spices deeply into the skin, even fat distribution ensures a uniform golden crunch.

- Stuff the interior cavity with your fresh aromatics. Shove the thick lemon slices, peeled garlic cloves, fresh rosemary, and thyme sprigs deep inside the bird. Tie the drumsticks together tightly using kitchen twine to seal the opening and keep the shape intact. The chicken will plumper up as you fill the cavity. You’ll see the yellow edges of the lemon slices peeking out slightly from the back. The legs will bring closer together into a neat compact arrangement in the center of the dish. Skip the kitchen twine and the cavity opens up too wide which lets the hot air dry out the inside. Stuff the cavity tightly, trapping steam inside infuses the meat with bright citrus oils.

- Place the dish into a preheated oven at 400°F. Roast the bird undisturbed for 60 to 75 minutes. Check the progress halfway through to ensure even browning. You want the internal temperature to reach exactly 165°F in the thickest part of the thigh before removing it. You’ll hear the chicken fat sizzling loudly in the bottom of the dish. The skin will turn a deep golden amber color and start to blister beautifully around the edges. Rich aromas of roasted garlic and browned butter will fill your kitchen completely. (My first batch went into a low heat oven and the skin stayed soft while the meat overcooked. A hot 400°F environment is the fix.) Leave the bird too long past the temperature target and the breast meat turns dry and stringy. Roast at 400°F until 165°F internal, high heat crisps skin before juices evaporate.

- Transfer the hot bird onto a clean wooden cutting board. Let it rest for exactly 15 minutes before carving. Use a sharp chef knife to slice clean through the breast meat to reveal the tender interior. The skin will crackle softly as the blade slices down. You’ll see steam rise gently from the meat as a clean slice falls away. The interior meat looks completely opaque white and glistening with hot juices while the outer rim retains its dark crusted edge. Skip the rest period and all the trapped moisture will escape onto the board immediately. Rest 15 minutes before carving, resting allows muscle fibers to relax so moisture stays locked inside.
Notes
Questions I Get Asked
Soft skin happens when moisture gets trapped during roasting. If you do not pat the raw bird completely dry with paper towels the surface steams instead of frying in its own fat. Make sure your oven is hot enough at 400°F and avoid overcrowding the pan with too many watery vegetables.
You can safely store the leftovers in an airtight glass container for up to 4 days. Shred the meat away from the bones before storing to save space. If you cannot finish it within 4 days wrap the shredded meat tightly in plastic wrap and freeze it for up to 3 months.
Yes you can roast the bird ahead of time and carve it completely for weekly lunches. The meat stays incredibly juicy when stored in airtight containers. It pairs wonderfully with leftovers like our savory Grilled Sausage for easy protein-packed lunches throughout the week.
This is a common issue because white meat cooks faster than dark meat. If the breast hits 165°F but the thigh is low cover the breast loosely with a piece of aluminum foil. This blocks the direct heat and allows the thighs to finish cooking without drying out the top.
Place your chicken slices in a baking dish and add 2 tablespoons of chicken broth or water over the top. Cover the entire dish tightly with aluminum foil to trap the steam. Bake at 325°F for about 10 to 15 minutes until the meat is warmed through completely.
Before You Go
One of my signature recipes! This is a roast chicken made the traditional home-cooked way, with a rich herb rub and fresh lemon aromatics. No complicated steps, just pure comforting flavor.
Though it requires patience to bake, it is worth every minute. The breast meat is melt-in-your-mouth tender and the skin is wonderfully crispy and thick. Makes 6 normal servings.
This chicken pairs beautifully with roasted root vegetables or a fresh side salad, then finished with a drizzle of warm pan juices. You could stretch it to cover weekday lunches too. If making for a large holiday crowd, scale up the recipe by 50% (click on servings and slide) and use a very deep roasting pan!
Back in the day, traditional French kitchens used a whole roast chicken as the ultimate test for green chefs. It sounds simple, but it’s actually the perfect way to prove you can control oven temperatures.