Bbq Chicken Sliders
I wanted these to actually taste like barbecue in every bite, not just a swipe of sauce hiding in the middle. It took a few tries. The chicken kept drying out or the buns turned soggy before anything felt right.
The fix was simple once I stopped rushing it. Cook the chicken until it’s just tender, shred it while warm, then fold in enough sauce so every strand gets coated but nothing drips. If you like that kind of balanced dinner, this pairs well with our Grilled Chicken Salad for something lighter on the side.

Then it all goes into soft buns with cheddar and into the oven just long enough to melt and brown. You get a tray that’s a little messy, a little uneven, and exactly how sliders should be.
What Makes This Recipe Work
Cooking the chicken to about 165°F internal and shredding it while still hot lets the fibers open up and grab the sauce instead of sitting on top. Baking at 350°F for a short window melts the cheese and lightly toasts the buns without drying the filling. That timing balance keeps everything juicy but structured.
Ingredient List

- boneless skinless chicken breast: Lean chicken that shreds cleanly once cooked to 165°F.
- hickory smoked barbecue sauce: Thick, smoky sauce that clings to the shredded chicken without soaking the bread.
- sharp cheddar cheese: Bold cheese that melts into pockets instead of disappearing completely.
- sweet Hawaiian slider buns: Soft, slightly sweet buns that hold up to the saucy filling.
- extra virgin olive oil: Light coating to help spices stick and promote even browning.
- smoked paprika: Adds a warm smoky layer directly on the chicken.
- garlic powder: Even seasoning that blends into every bite.
- yellow onion: Finely diced so it softens quickly and melts into the filling.
- kosher salt: Essential base seasoning to bring out the chicken flavor.
- ground black pepper: Mild heat that balances the sweetness of the sauce.
- unsalted butter: Brushed on top for golden color and a soft finish.
- fresh parsley: Fresh herb sprinkle for color and a clean finish.
Kitchen Equipment
Instructions
Step 1: Season the chicken

Set the chicken on a board and drizzle with olive oil, then rub in the smoked paprika, garlic powder, salt, and pepper. Do this at room temp for about 10 minutes so the surface isn’t cold. Use your fingers to press and drag the spices across the meat so they stick in a thin layer. Scatter the diced onion around and lightly press some against the sides. You’ll see the chicken turn from pale to lightly red with speckles. If you skip pressing the seasoning in, it slides off once heat hits and you lose flavor.
Tip: Season both sides evenly and don’t forget the edges where flavor usually gets missed.
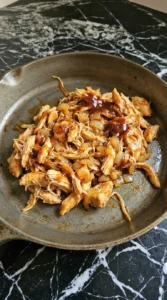
Step 2: Cook and shred the chicken

Cook the chicken in a pan over medium heat, about level 5 on a 10 dial, for 6 to 7 minutes per side until it reaches 165°F inside. Flip once halfway and leave it alone so it browns properly. The onion softens and turns glossy as it cooks alongside. Let it rest 3 minutes, then shred with two forks using a pulling motion. Fold in the barbecue sauce while it’s still warm, about 2 minutes of mixing. You’ll see the strands turn glossy and slightly sticky. If you wait too long and it cools, the sauce won’t cling the same way. (I used to shred it cold and the sauce always sat on top instead of soaking in.)
Tip: Keep some larger chunks when shredding so the texture doesn’t turn mushy.
Step 3: Fill the buns with chicken and cheese

Slice the buns and lay the bottoms in a baking dish. Spoon the warm chicken mixture over them in an even layer, about 2 to 3 minutes to spread without pressing down. Let it sit loosely so the sauce doesn’t soak straight through. Scatter the cheddar over the top and place the bun lids on gently. You’ll notice the cheese sits uneven and that’s good. If you pack the filling too tight, the sliders get dense and the cheese won’t melt into pockets.
Tip: Leave a little space at the edges so the filling doesn’t spill out while baking.
Step 4: Bake until melted and browned

Brush the tops with melted butter and bake at 350°F for 12 to 15 minutes. Rotate the pan once at minute 8 for even browning. The tops turn golden in patches and you’ll smell the butter toasting. Watch for melted cheese bubbling at the edges and the tops lightly crisping. Pull them right at that point. Go past 15 minutes and the bottoms start to dry out before the tops get much better.
Tip: Cover loosely with foil if the tops brown too fast before the cheese melts.
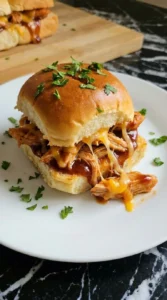
Step 5: Serve one hot slider

Let the tray rest for 2 minutes, then lift one slider out with a spatula. The cheese should stretch slightly and the chicken should look glossy and layered. Sprinkle parsley right before serving so it stays bright. Serve while hot, within 5 minutes of pulling from the oven. You’ll see the sauce still clinging and the bread soft but holding shape. If you wait too long, the cheese firms up and you lose that soft pull.
Tip: Use a sharp knife to separate sliders cleanly without dragging the filling out.
Pro Tips
- Shred the chicken while it’s still warm so it stays juicy and absorbs the sauce better.
- Add sauce gradually until the chicken is coated but not dripping.
- Scatter cheese unevenly so you get melty pockets instead of one flat layer.
- Brush just enough butter on top to coat without making the buns greasy.
Make It Your Own
- chicken breast: chicken thighs — juicier and harder to overcook but slightly richer flavor
- cheddar cheese: mozzarella — melts more but has less sharp flavor
- Hawaiian buns: regular slider rolls — less sweet so the overall taste is more savory
- barbecue sauce: homemade sauce — flavor depends on your mix but can be less thick
- butter: olive oil — works fine but you lose that rich browned top
- cheddar cheese: dairy free cheese — melts differently and won’t give the same texture, similar to swaps used in Healthy Quinoa Salad
How to Store
Store leftovers in a covered container in the fridge for up to 3 days. The buns soften more but the filling stays flavorful. Reheat at 325°F for 10 minutes until warmed through so the cheese loosens again. You can also store the chicken filling separately and assemble fresh for better texture.
Bbq Chicken Sliders
Ingredients
- 2 large boneless skinless chicken breast
- 1 cup hickory smoked barbecue sauce
- 1 1/2 cups shredded sharp cheddar cheese
- 12 buns sweet Hawaiian slider buns
- 1 tablespoon extra virgin olive oil
- 1 teaspoon smoked paprika
- 1 teaspoon garlic powder
- 1/2 small finely diced yellow onion
- 1 teaspoon kosher salt
- 1/2 teaspoon ground black pepper
- 2 tablespoons melted unsalted butter
- 1 tablespoon chopped fresh parsley
Instructions
-
Rub the 2 boneless skinless chicken breasts with extra virgin olive oil and smoked paprika and garlic powder and kosher salt and ground black pepper. The surface changes from pale and plain to lightly stained red and speckled with seasoning while the coating sits unevenly in natural patches and edges. Scatter the finely diced yellow onion around the chicken so the pieces sit loose rather than perfectly lined up. Everything should look raw yet more intentional with visible contrast between the smooth chicken and the rough onion pieces.

-
Cook the chicken until fully done and then pull it into rough shreds while still warm. The meat changes from smooth whole pieces to irregular strands with some thicker chunks and some finer bits while the onion softens and turns glossy and slightly translucent. Fold in the hickory smoked barbecue sauce so the chicken goes from dry shreds to a sticky coated mixture. Some pieces should hold more sauce than others and a few edges should look darker and slightly caramelized.
-
Split the 12 sweet Hawaiian slider buns and layer the bottom halves with the warm barbecue chicken mixture. The structure changes here because the loose filling settles into the bread and some sauce peeks into the corners while the chicken sits in casual mounds instead of a flat blanket. Scatter the shredded sharp cheddar cheese over the top and place the bun tops on loosely. The cheese adds a pale rough layer and the sliders start to look like a real tray of dinner rather than separate parts.

-
Brush the tops with melted unsalted butter and bake until the sharp cheddar cheese melts into the chicken and the buns darken in uneven spots. The tray changes from soft stacked buns to a joined pan of sliders with glossy tops and patchy golden colour and little pockets where the cheese bubbles out. The sauce thickens slightly as it heats and the edges look stickier and deeper in colour. This is the point where everything looks warm and cohesive and just messy enough to promise a good bite.

-
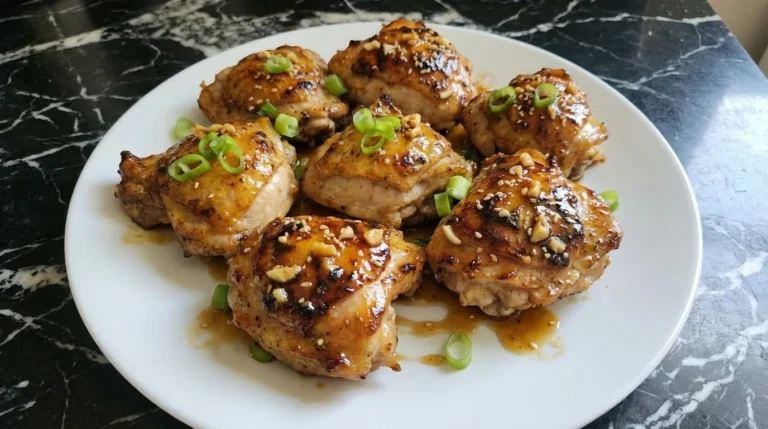
Lift one slider away from the rest and place it on the plate so the inside shows juicy shredded chicken and melted cheese stretching in soft uneven strands. The final change is from a shared tray to a single serving and the filling looks more detailed and textured once the side is visible. Finish with chopped fresh parsley over the top and a few loose flecks around the plate. The slider should look warm and slightly messy with browned bread and glossy sauce and non uniform layers.
Notes
Nutrition
Common Questions
Yes, cook and sauce the chicken up to a day ahead. Keep it chilled, then assemble and bake right before serving so the buns stay fresh.
Sharp cheddar works best because it holds its flavor next to the sauce. It also melts into small pockets instead of disappearing.
Yes, just shred it and warm it with onion and sauce for about 5 minutes. It’s a faster option but slightly less smoky since it isn’t seasoned the same way.
Use a thicker sauce and don’t overload the filling. Baking just until melted and golden also keeps the bread from soaking through.
You can freeze the filling but not the assembled sliders. The buns don’t thaw well and turn too soft.
Final Thoughts
These sliders are messy in the best way and always disappear fast.
Soft buns, saucy chicken, and melted cheese just work.
If you want something on the side, try Healthy Quinoa Salad for balance or keep things fun with Spinach Artichoke Dip.
Slider buns were originally designed to stay connected in a sheet so they could be baked and served all at once.