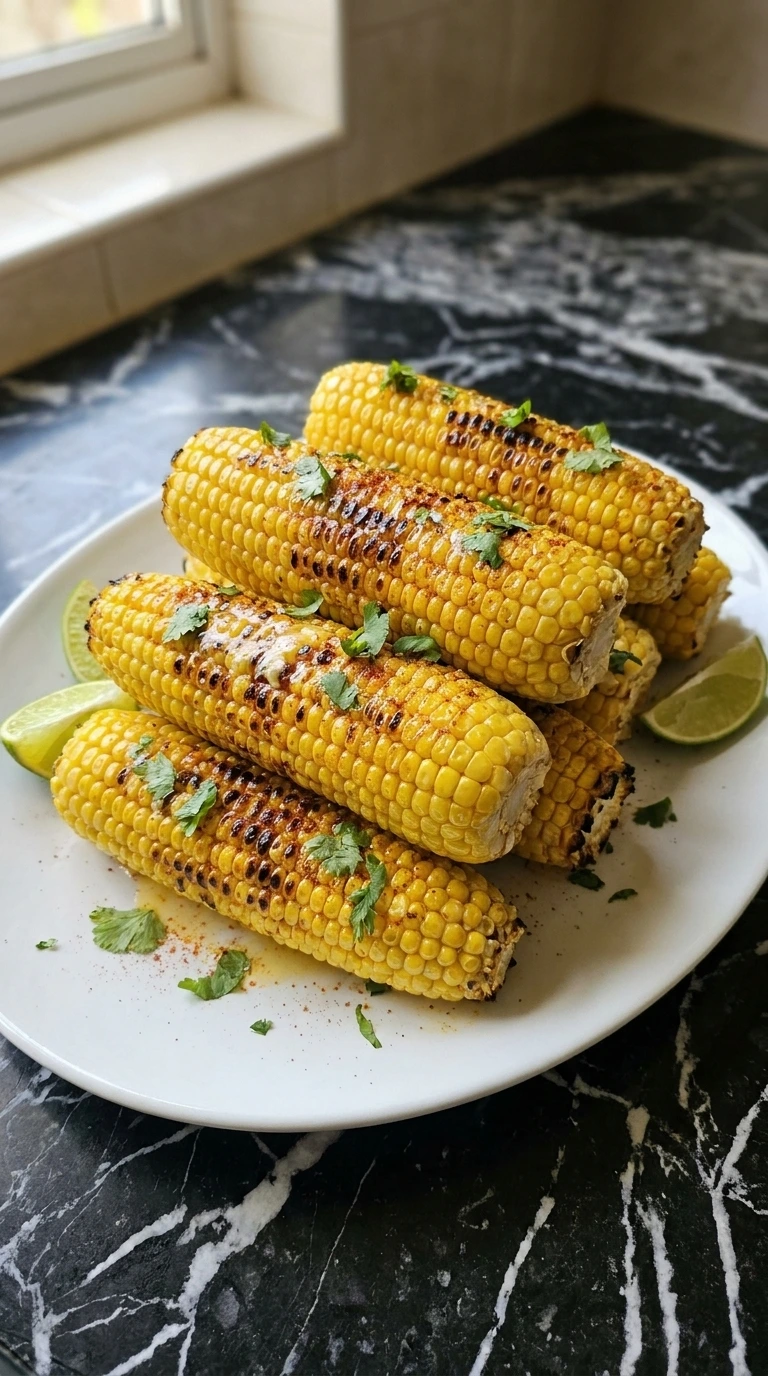
Grilled Corn
I made this for the first time the week we moved into our house in 2019, boxes everywhere, no proper kitchen setup, and somehow it turned out better than expected. What saved me that night was keeping the grill heat lower than I thought I should once the char was set. Since then it’s become my go-to when I’m exhausted but still want something that tastes real. Mark always says it’s better than the corn from our favorite BBQ joint.
Emma, who’s usually suspicious of anything charred, asks for seconds every single time I pull these off the grates. If you’re planning a full spread, this corn is the perfect partner for Bbq Ribs because the sweetness cuts right through the smoke. Ready in about 20 minutes, no fancy techniques, and just one set of tongs to wash. It’s the kind of side dish that feels like summer even if you’re just cooking in the backyard on a Tuesday.
I used to overcomplicate the seasoning but now I stick to the basics and let the fire do the heavy lifting. You don’t need a heavy marinade to make this shine, just a little fat and some high heat. It’s also a great base if you want to slice the kernels off later. Sometimes I toss the leftover charred bits into a bowl of Guacamole and Chips for an extra layer of flavor and crunch.
Why You’ll Love It
Grilling at 400°F instead of a lower temp is the key to creating the Maillard reaction on the kernels before the cob loses its moisture. The high heat caramelizes the natural sugars quickly which gives you that classic smoky-sweet .
Coating the corn in avocado oil first creates a heat-conductive barrier that prevents the kernels from sticking to the grates. If you want a full vegetable-forward meal, try serving this alongside our Creamy Potato Salad for a great texture contrast.
Ingredients
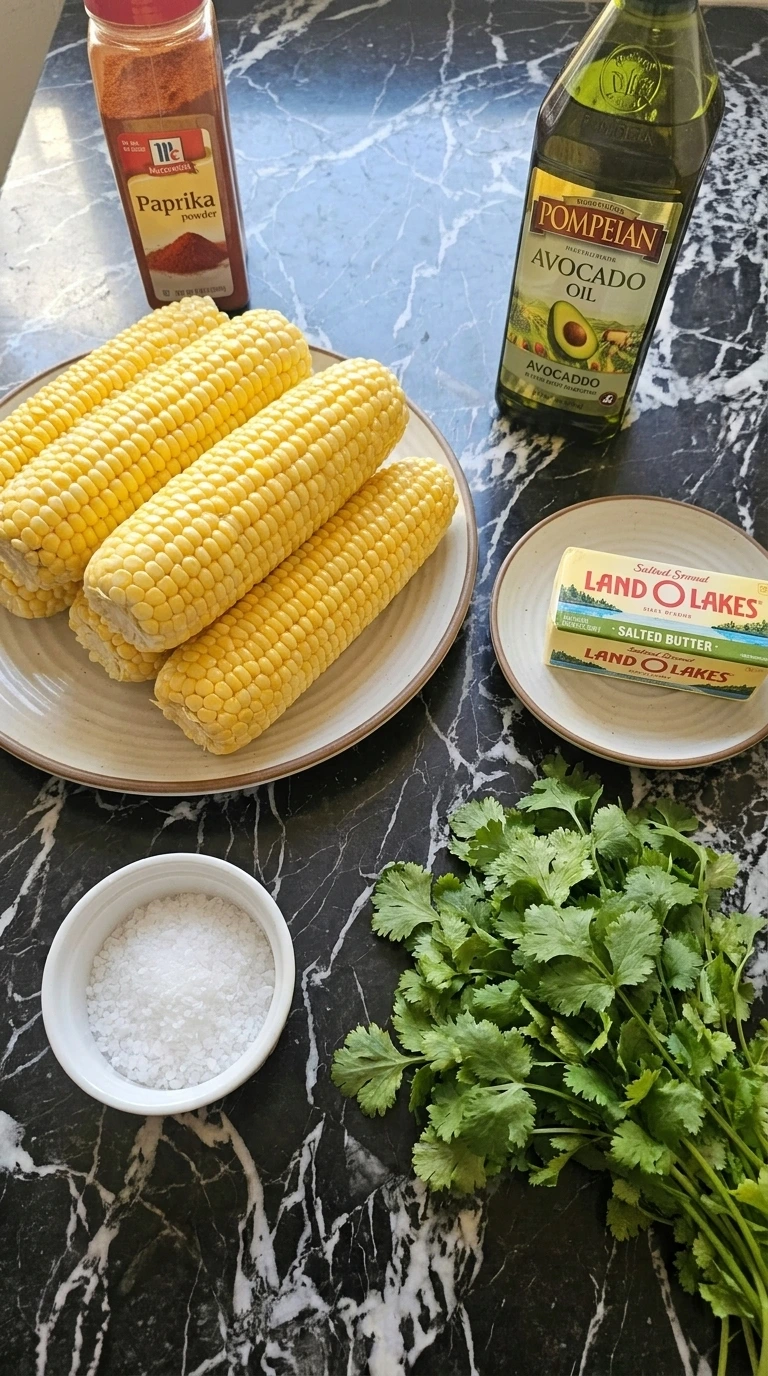
- yellow sweet corn: Husked and cleaned of all silk for a smooth eating surface.
- avocado oil: Used to coat the corn before grilling because it handles high temperatures without smoking.
- sea salt: Fine crystals used to enhance the natural sweetness of the kernels.
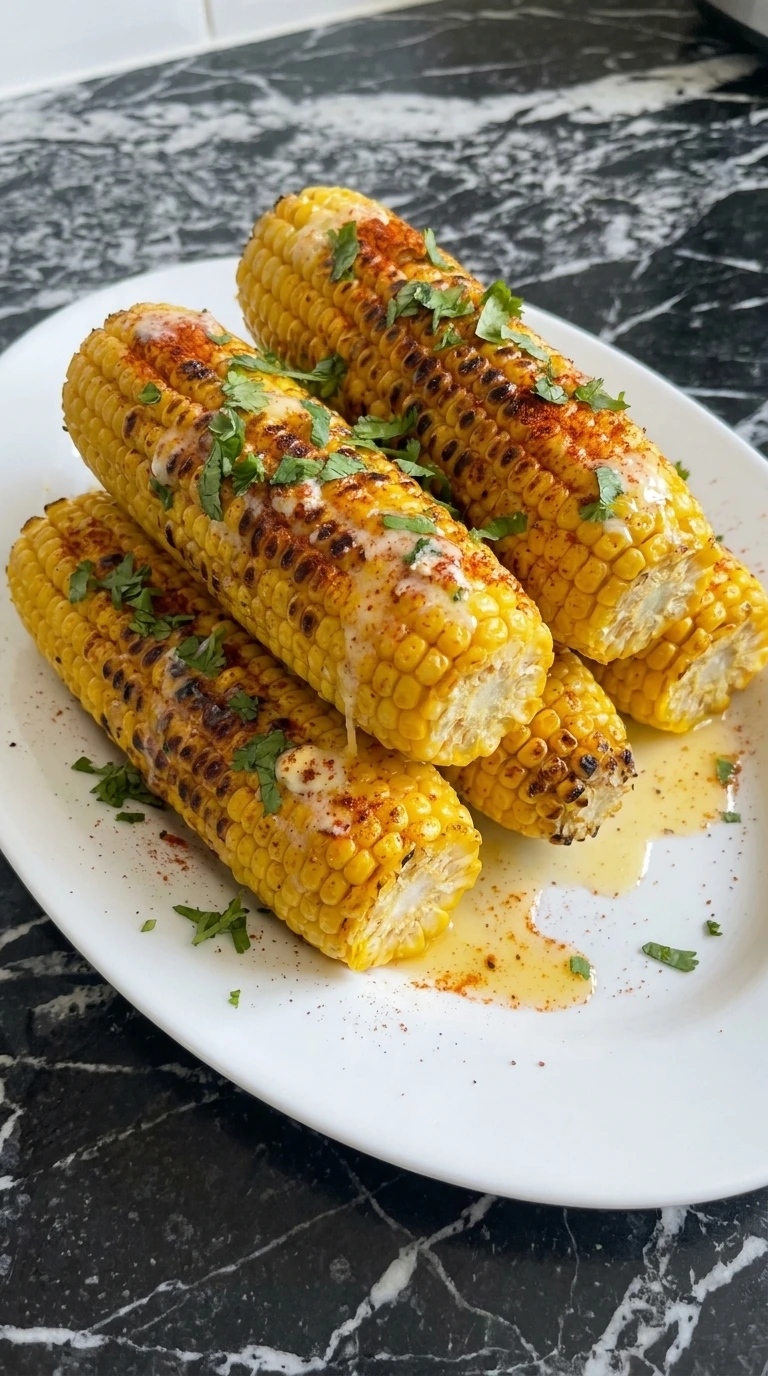
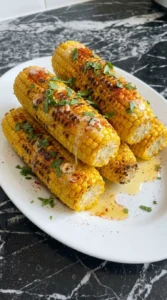
- salted butter: Softened and used to coat the hot corn for a rich, creamy finish.
- paprika: Dusted over the buttered corn for a mild earthy flavor and bright color.
- fresh cilantro: Finely chopped to add a burst of freshness to the smoky corn.
The Gear
- Outdoor Grill: A gas or charcoal grill that can maintain a steady 400°F is essential for getting deep char marks without drying out the kernels — weak heating elements will just steam the corn.
- Long Metal Tongs: A pair of 12-inch or longer tongs keeps your hands away from the high heat while allowing you to rotate the cobs precisely without piercing the kernels.
Let’s Make It
Step 1: Coat the corn
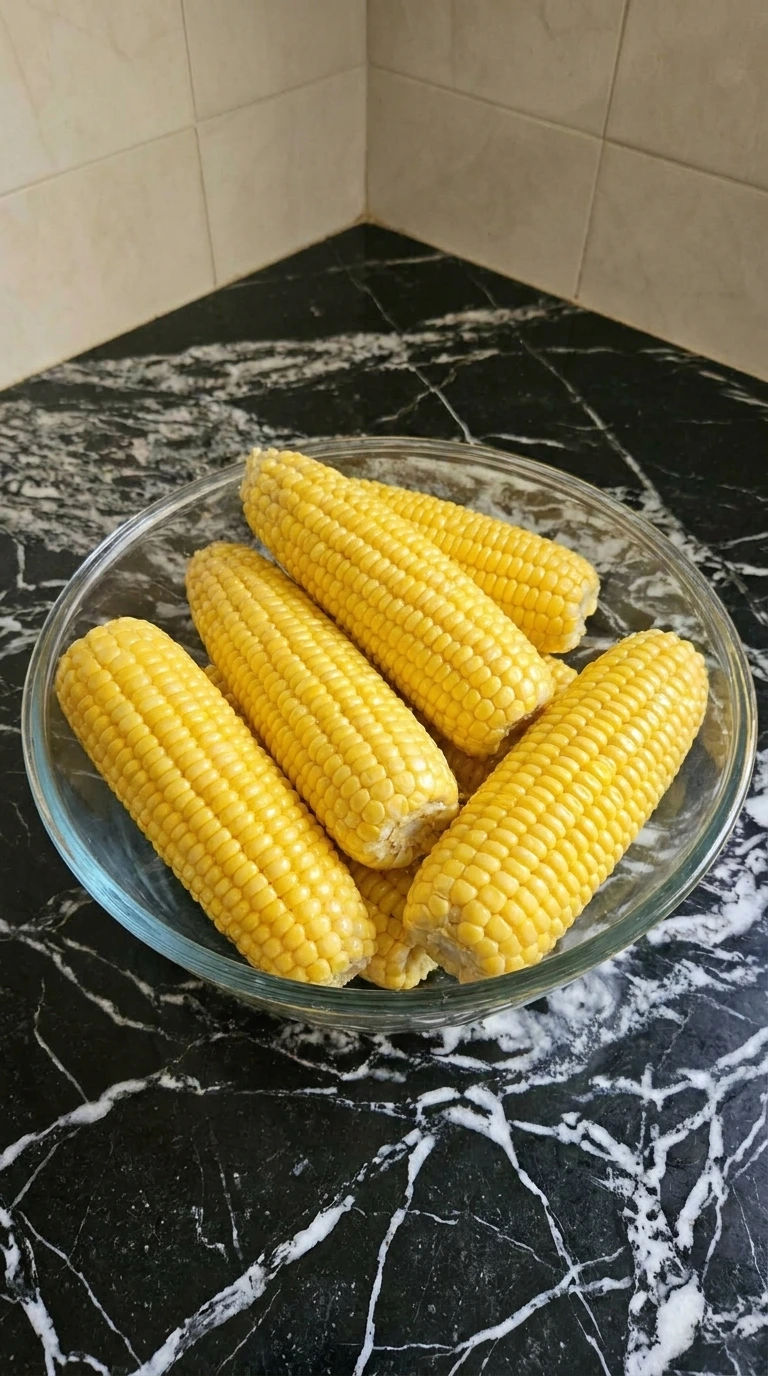
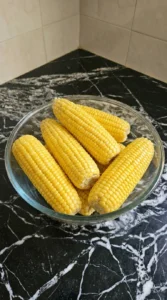
Place the 5 husked yellow sweet corn cobs into a large clear glass mixing bowl and drizzle with 2 tablespoons of avocado oil. Use your hands to rub the oil over every kernel until the cobs are slick and shiny. Sprinkle 1 teaspoon of sea salt over them while turning the cobs so the seasoning sticks to the oil.
You’ll see the corn turn a deeper, more yellow as the oil coats the surface. The oil shouldn’t be dripping off but every cob must have a thin, even layer. (I used to use butter for this step but it burned too fast, avocado oil has a much higher smoke point.
) Rub the oil at room temperature, this prevents the seasoning from clumping in one spot and ensures even heat distribution.
Tip: Make sure the corn is completely dry before adding oil. Excess water will cause the corn to steam instead of searing on the grates.
Step 2: Sear on high heat
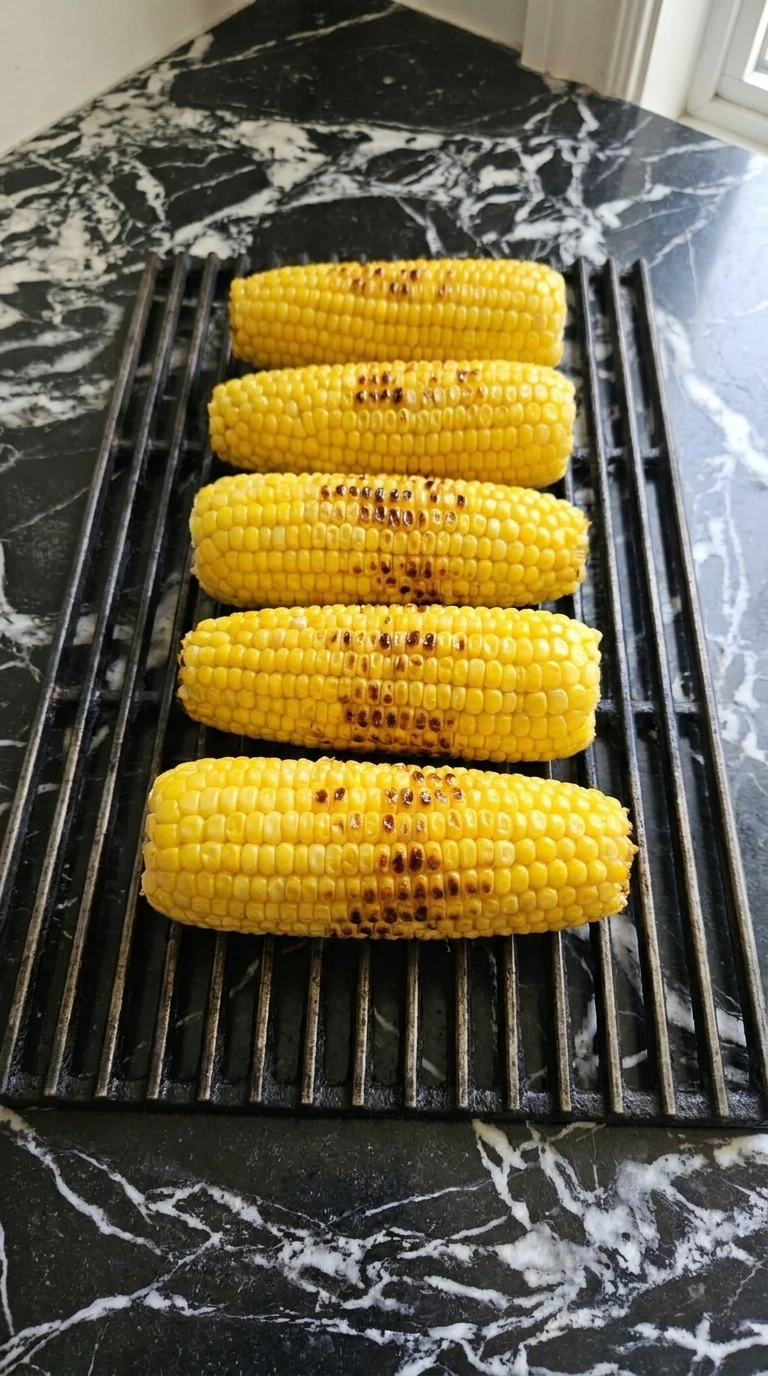
Place the cobs directly onto the grill grates over medium-high heat (about 400°F). Let them sit without moving for exactly 3 minutes to get those first deep marks. Use long metal tongs to rotate each cob one-quarter turn once you see the bottom kernels turning opaque and bright.
You’ll hear a distinct popping sound as the moisture inside the kernels heats up and expands. The smell of toasted corn should fill the air as the first brown spots appear. Go past 5 minutes without turning and the kernels will shrivel and become tough.
Grill at 400°F not 300°F, high heat creates the char quickly before the inside of the cob gets mushy.
Tip: If your grill has hot spots, move the thicker cobs to the center and the smaller ones to the cooler edges for even cooking.
Step 3: Rotate for even char
Continue rotating the 5 cobs every 2 to 3 minutes until all sides have patchy dark brown spots. Total grill time should be about 10 to 12 minutes depending on the thickness of your corn. Move the cobs to the cooler side of the grill if the char gets too dark before the kernels feel tender.
The corn is ready when the kernels look slightly plump and the char marks are scattered across the entire surface. You’ll see a light steam rising from the cobs when you lift them. Skip the rotation and one side will be burnt while the other stays raw.
Rotate every 2 minutes, the consistent movement prevents the sugars from carbonizing too deeply in one spot.
Tip: Use a glove or long tongs because the steam rising from the corn can get very hot during the final minutes.
Tips and Tricks
- Choose corn with bright green husks and damp silk because this indicates the kernels are still full of moisture.
- Preheat your grill for at least 15 minutes until the grates are hot enough to sear the corn instantly.
- Rub the oil on the corn with your bare hands to ensure every single kernel is covered with a thin film.
- Space the cobs at least 2 inches apart on the grill so the heat can circulate around the entire cob.
- Wait until the corn is off the heat to add the butter so the fat doesn’t flare up on the grill.
- Use a serrated knife if you plan to cut the kernels off the cob to avoid crushing the tender corn.
- Apply the sea salt right after oiling so it sticks to the kernels and seasons the corn as it heats.
- Add 1 tablespoon of lime juice and a sprinkle of cotija cheese for a Mexican street corn inspired twist.
- Dust with 1 teaspoon of chili powder instead of paprika for a spicy version that pairs well with burgers.
- Brush with a mix of honey and butter during the last 2 minutes for a sweet and sticky glaze.
Variations to Try
- avocado oil: grapeseed oil — Grapeseed oil has a similarly high smoke point and neutral flavor, so it won’t burn on the hot grates.
- salted butter: vegan butter — Use a 1:1 ratio for a dairy-free version but the flavor will be slightly more oily and less creamy.
- fresh cilantro: flat leaf parsley — If you don’t like cilantro, parsley provides the same green look but with a much milder, peppery taste.
Storage Tips
Store the grilled corn in a sealed plastic bag or airtight glass container in the refrigerator for up to 4 days. If you won’t eat it by then, you can freeze the kernels for up to 3 months.
To reheat, place the cobs in a pan with 2 tablespoons of water and cover tightly with foil. Bake at 350°F for about 10 minutes until the center is hot.
Check for a sour smell or slimy texture as signs of spoilage.
Grilled Corn
Ingredients
- 5 whole yellow sweet corn Husked and cleaned of all silk for a smooth eating surface.
- 2 tablespoons avocado oil Used to coat the corn before grilling because it handles high temperatures without smoking.
- 1 teaspoon sea salt Fine crystals used to enhance the natural sweetness of the kernels.
- 4 tablespoons salted butter Softened and used to coat the hot corn for a rich, creamy finish.
- 0.5 teaspoon paprika Dusted over the buttered corn for a mild earthy flavor and bright color.
- 2 tablespoons fresh cilantro Finely chopped to add a burst of freshness to the smoky corn.
Instructions
- Place the 5 husked yellow sweet corn cobs into a large clear glass mixing bowl and drizzle with 2 tablespoons of avocado oil. Use your hands to rub the oil over every kernel until the cobs are slick and shiny. Sprinkle 1 teaspoon of sea salt over them while turning the cobs so the seasoning sticks to the oil. You’ll see the corn turn a deeper, more yellow as the oil coats the surface. The oil shouldn’t be dripping off but every cob must have a thin, even layer. (I used to use butter for this step but it burned too fast, avocado oil has a much higher smoke point.) Rub the oil at room temperature, this prevents the seasoning from clumping in one spot and ensures even heat distribution.
- Place the cobs directly onto the grill grates over medium-high heat (about 400°F). Let them sit without moving for exactly 3 minutes to get those first deep marks. Use long metal tongs to rotate each cob one-quarter turn once you see the bottom kernels turning opaque and bright. You’ll hear a distinct popping sound as the moisture inside the kernels heats up and expands. The smell of toasted corn should fill the air as the first brown spots appear. Go past 5 minutes without turning and the kernels will shrivel and become tough. Grill at 400°F not 300°F, high heat creates the char quickly before the inside of the cob gets mushy.

- Continue rotating the 5 cobs every 2 to 3 minutes until all sides have patchy dark brown spots. Total grill time should be about 10 to 12 minutes depending on the thickness of your corn. Move the cobs to the cooler side of the grill if the char gets too dark before the kernels feel tender. The corn is ready when the kernels look slightly plump and the char marks are scattered across the entire surface. You’ll see a light steam rising from the cobs when you lift them. Skip the rotation and one side will be burnt while the other stays raw. Rotate every 2 minutes, the consistent movement prevents the sugars from carbonizing too deeply in one spot.
Notes
Nutrition
Frequently Asked Questions
Yes, you can grill corn in the husks for about 15 to 20 minutes at 375°F. However, you won’t get those beautiful charred marks directly on the kernels like you do with this husked method. It tends to steam the corn more than grill it.
You can store leftover cobs in an airtight container in the fridge for up to 4 days. If you want to freeze it, I suggest cutting the kernels off the cob first and storing them in a freezer bag for up to 3 months.
Tough corn usually happens when it’s cooked for too long at a low temperature which dries out the starch. Make sure your grill is at a solid 400°F and don’t exceed 12 minutes of total cooking time to keep them juicy.
Reheat the cobs in a 350°F oven for about 10 minutes with a splash of water and a cover of foil. This creates enough steam to moisten the kernels without making them rubbery like a microwave might do.
Frozen corn on the cob works but you must thaw it completely and pat it very dry before oiling. It won’t have the same crisp snap as fresh summer corn because the freezing process breaks down some of the cell walls.
Let Me Know
If you make this on a weekend afternoon with music playing, the way I do, you’ll understand why it’s been in our family rotation for years now. The little trick I mentioned about using high heat for a fast char is honestly the difference between okay and really good.
Tag me on Instagram if you make it, I love seeing what you cook. And Liam says hi (he ate almost two whole cobs of this when I tested it, which is the highest endorsement you’ll get from a 5-year-old).
Corn is actually a member of the grass family and always has an even number of rows on every cob.