Christmas Cookies
When you’re greedy like me and want proper buttery flavor in every bite, not just a faint whiff of “vaguely tastes like vanilla …. maybe? ”, making festive Christmas Cookies suddenly becomes harder than it sounds. I really thought it would be simple: roll out my favorite sugar cookie dough, cut it into shapes, and bake them.
But every option had problems. The delicate star points mostly melted away while baking or puffed up into blobs if the dough got too warm. In thinner versions, the edges burned before the center cooked, and mixing extra flour in stopped the cookie being soft. Adding icing on top just ran off unless it was thick enough to glue your teeth together.

After a few attempts, I figured out how to get that perfect balance of crisp edges and a soft melt-in-your-mouth center. If you love festive baking, you can also try making my Chocolate Cupcakes for your holiday dessert table.
The Secret to This Recipe
Creaming the butter and granulated sugar for three full minutes builds a strong network of microscopic air pockets. This mechanical leavening keeps the texture incredibly soft without requiring excess baking powder.
Rolling the dough flat before chilling ensures the gluten relaxes fully so your cutouts won’t shrink or warp in the oven. Baking at 350°F instead of a higher heat setting prevents the outer edges from browning before the interior sets.
If you want more fun dessert options for the holidays, take a look at our easy Oreo Dirt Cups which kids always love.
Shopping List

- Land O Lakes Unsalted Butter: Softened to room temperature to allow proper creaming with the sugar.
- white granulated sugar: Aerates the butter and provides a classic sweet profile.
- large egg: Brings the dough together and provides structure for cutting shapes.
- McCormick Vanilla Extract: Adds a rich aromatic backdrop that complements the sweet butter.
- Gold Medal All Purpose Flour: Provides the essential structure needed to hold crisp shape cutouts.
- baking powder: Offers just enough lift to keep the crumb soft without losing shape definition.
- fine sea salt: Balances the sweetness and enhances the natural buttery notes.
What You’ll Use
- Electric hand mixer: An electric hand mixer incorporates enough air into the butter and sugar for a tender cookie — mixing by hand can lead to dense and heavy dough.
- Aluminum sheet pan: A light-colored aluminum sheet pan distributes oven heat evenly so cookie bottoms do not burn — thin dark pans hot-spot and scorch the dough.
- Rolling pin: A heavy wooden rolling pin provides consistent pressure to create a uniform quarter-inch thickness across the entire batch of dough.
How to
Step 1: Cream the butter and sugar

Place the softened Land O Lakes Unsalted Butter and white granulated sugar into a large clear glass mixing bowl. Fit your electric hand mixer with the standard beaters and run it on medium-high speed (about 6 on a 10-dial) for exactly 3 minutes. Scrape the bowl down with a rubber spatula halfway through to make sure everything incorporates smoothly.
You’ll watch the yellow butter turn a pale cream color while the texture becomes light and fluffy. You shouldn’t smell any friction heat but rather a clean sweet aroma. (I tried rushing this step my first year and the heavy cookies never rose correctly.
Give it the full 3 minutes. ) Miss this timing window and the sugar won’t aerate the butter properly. Creaming builds the tiny air pockets for a tender cookie.
Tip: Make sure your butter is truly at room temperature. It should yield to gentle thumb pressure without being greasy or melting.
Step 2: Mix the wet and dry ingredients

Add the large egg and McCormick Vanilla Extract into the creamed butter mixture. Beat on medium speed for 60 seconds until completely smooth. Turn the mixer to low speed and slowly shake in the Gold Medal All Purpose Flour, baking powder, and fine sea salt over 2 minutes.
Stop mixing the second the white patches vanish. The wet creamed mass quickly transforms into a cohesive and thick dough that pulls away from the glass walls. You’ll smell a rich vanilla perfume rising from the bowl.
The dough should feel soft but not wet or sticky to your fingertips. Overmix past the 2-minute mark and the gluten develops too much. Short mixing times ensure the cookies stay melt-in-your-mouth soft.
Tip: Sift the dry ingredients together before adding them to prevent tiny clumps of baking powder in your final dough.
Step 3: Roll and chill the dough
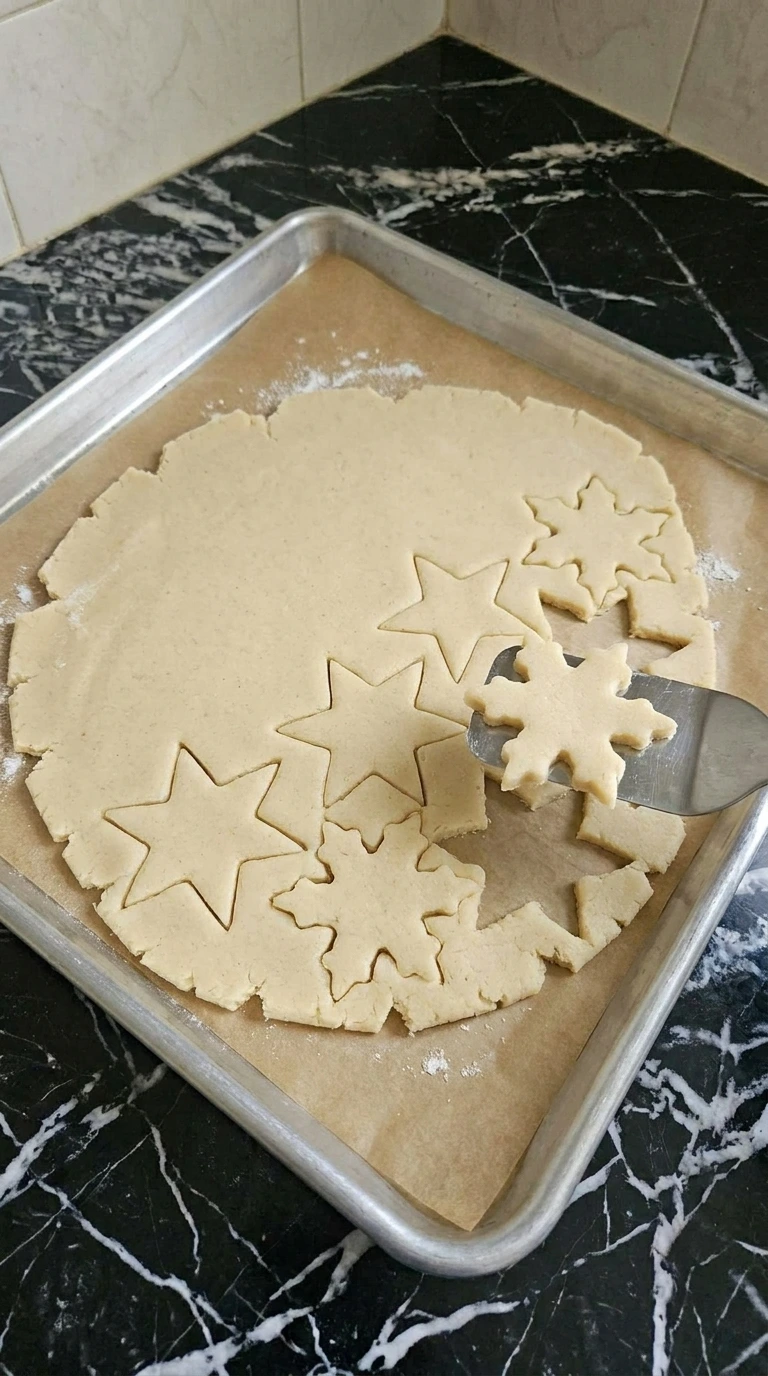
Divide the dough into two equal portions and place one piece on a sheet of parchment paper. Roll the dough out to exactly a quarter-inch thickness using a heavy rolling pin. Slide the entire parchment sheet with the flat dough onto a flat baking sheet pan and chill at 35°F in your refrigerator for 45 minutes.
The soft dough becomes firm and cold to the touch while retaining its smooth pale surface. You won’t see any color change but the texture stiffens completely. (My first batch went into the oven without chilling and the shapes turned into giant blobs.
The fridge rest fixes that entirely. ) Skip this chilling window and the butter melts instantly when baking. Cold dough keeps your festive shapes perfectly sharp.
Tip: Rolling the dough before chilling is much easier than trying to roll a rock-hard block of cold dough straight from the fridge.
Step 4: Cut the festive shapes

Press your steel snowflake and star cutters firmly into the chilled dough sheet. Space your cuts close together to minimize waste but leave a tiny gap between shapes. Gently lift the surrounding scraps away from the cutouts using your fingers, then space the shapes 1 inch apart on the parchment-lined sheet pan.
You’ll see clean and sharp cookie edges shaped like stars and snowflakes resting naturally on the brown paper. The dough remains cool and stiff while you handle it. Work quickly before the kitchen warmth softens the edges.
Let the dough warm up too much and the cutouts will warp as you lift them. Keeping things cold preserves the intricate points.
Tip: Dip your cookie cutters in a little extra flour before pressing into the dough to prevent sticking.
Step 5: Bake until barely golden
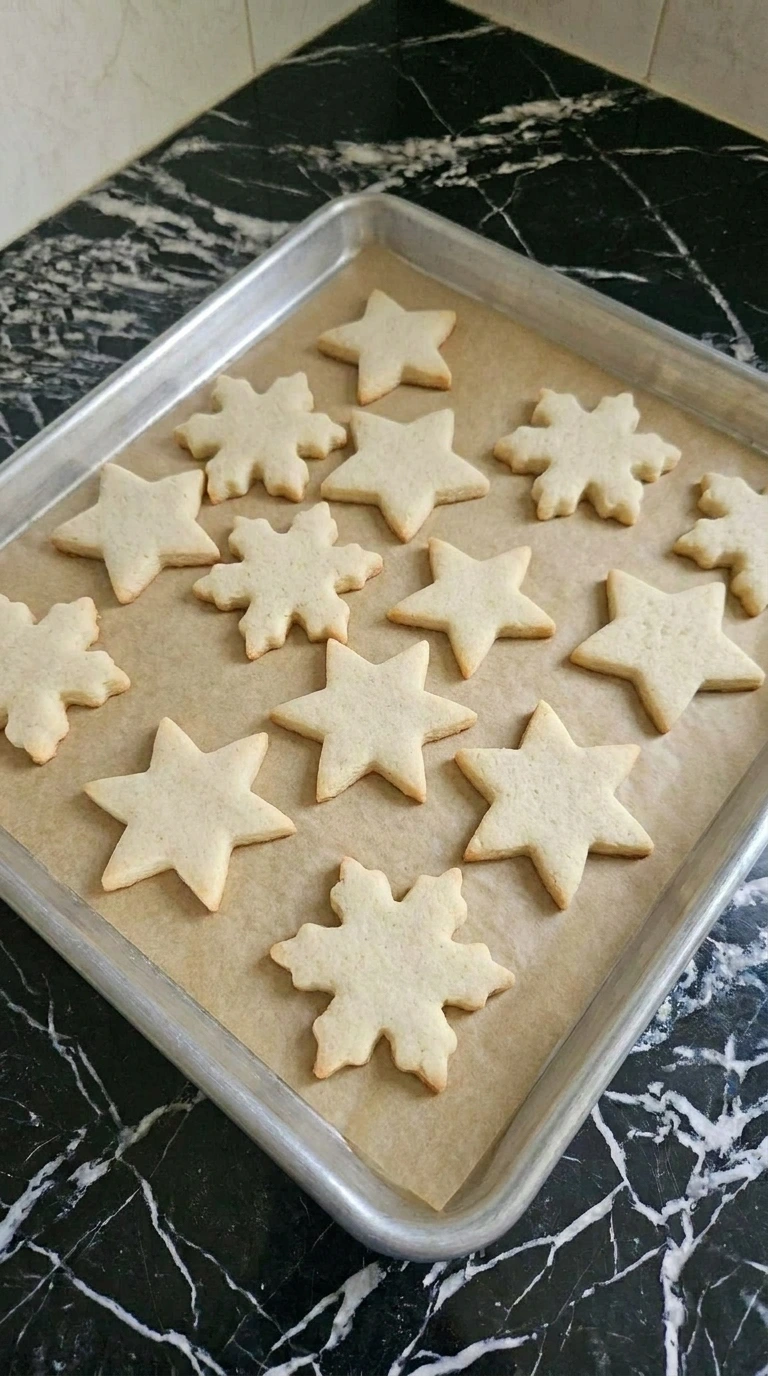
Slide the sheet pan into the center rack of your 350°F preheated oven. Bake for 10 to 12 minutes without opening the oven door early. Watch through the glass window around minute 10 to check the edges.
You’ll see the pale dough puff slightly and the matte surface sets completely. The edges turn a very light golden hue while the centers stay pale white. A rich buttery scent will fill your kitchen right when they are finished.
Go past 12 minutes and the bottom scorches into a bitter crust. Baking at 350°F stops the sugars from burning before the center sets.
Tip: Every oven runs slightly different so check your cookies at the 9-minute mark to ensure they don’t overbake.
Step 6: Decorate with icing

Allow the cookies to cool completely for 30 minutes on a wire rack. Pipe glossy royal icing in festive colors over the surface and scatter sparkling sugar crystals or silver dragées on top. Let the decorated treats sit undisturbed for 2 hours at room temperature so the icing sets firm.
The matte baked cookies are now covered with glossy red, green, and white patterns. The sugar crystals capture the light and look like fresh winter snow. (I tried icing a warm cookie once and the decoration dissolved into a messy glaze.
Wait for the cool down. ) Decorate while the cookie is warm and the icing slides right off the surface. A cold surface ensures the decorations stick perfectly.
Tip: Use gel food coloring instead of liquid drops to get deep reds and greens without thinning your icing.
Chef’s Notes
- Roll your cookie dough between two sheets of parchment paper to avoid adding extra flour that makes the cookies dry.
- Chill the cut-out shapes on the baking sheet for 10 minutes right before baking to lock in the sharp edges.
- Measure your flour using the spoon-and-level method because scooping directly from the bag packs too much flour into the cup.
- Cool the cookies completely on a flat wire rack before applying any icing so the decorations don’t melt.
- Keep your cookie shapes roughly the same size on each baking sheet so they all cook at the exact same rate.
- Use gel colorings rather than liquid drops to achieve deep holiday reds and greens without ruining your icing consistency.
- Add 1 teaspoon of ground cinnamon and a pinch of nutmeg to the flour blend for a warm spiced holiday twist.
- Mix in 1 tablespoon of fresh orange zest into the butter mixture for a bright citrus aroma that cuts the sweetness.
- Dip half of each baked star cookie into melted dark chocolate and top with crushed peppermint candies for a festive look.
Variations to Try
- Land O Lakes Unsalted Butter: Earth Balance Vegan Baking Sticks — Works well for a dairy-free swap but the cookies will bake slightly faster and have a lighter buttery note.
- Gold Medal All Purpose Flour: King Arthur Measure for Measure Gluten-Free Flour — Use the exact same amount but the dough will feel slightly more tacky and require an extra 10 minutes of chilling.
- large egg: Aquafaba (3 tablespoons) — Use 3 tablespoons of whipped chickpea liquid to keep it egg-free though the final cookie will be slightly crispier.
How to Store & Reheat
Keep your decorated cookies in an airtight plastic or glass container at room temperature for up to 7 days. Do not refrigerate them because the humidity inside the fridge will soften the crisp icing and make the colors bleed.
If you want to freeze them, it is best to freeze the undecorated baked cookies wrapped tightly in plastic wrap inside a freezer bag for up to 3 months. To thaw frozen cookies, leave them on your kitchen counter at room temperature for about 1 hour before opening the bag.
This prevents condensation from forming directly on the baked surfaces. Watch for stale odors or soft soggy textures as clear signs that moisture has ruined the batch.
Christmas Cookies
Ingredients
- 1 cup Land O Lakes Unsalted Butter Softened to room temperature to allow proper creaming with the sugar.
- 1 cup white granulated sugar Aerates the butter and provides a classic sweet profile.
- 1 large egg Brings the dough together and provides structure for cutting shapes.
- 1 teaspoon McCormick Vanilla Extract Adds a rich aromatic backdrop that complements the sweet butter.
- 3 cups Gold Medal All Purpose Flour Provides the essential structure needed to hold crisp shape cutouts.
- 1.5 teaspoons baking powder Offers just enough lift to keep the crumb soft without losing shape definition.
- 0.5 teaspoon fine sea salt Balances the sweetness and enhances the natural buttery notes.
Instructions
- Place the softened Land O Lakes Unsalted Butter and white granulated sugar into a large clear glass mixing bowl. Fit your electric hand mixer with the standard beaters and run it on medium-high speed (about 6 on a 10-dial) for exactly 3 minutes. Scrape the bowl down with a rubber spatula halfway through to make sure everything incorporates smoothly. You’ll watch the yellow butter turn a pale cream color while the texture becomes light and fluffy. You shouldn’t smell any friction heat but rather a clean sweet aroma. (I tried rushing this step my first year and the heavy cookies never rose correctly. Give it the full 3 minutes.) Miss this timing window and the sugar won’t aerate the butter properly. Creaming builds the tiny air pockets for a tender cookie.
- Add the large egg and McCormick Vanilla Extract into the creamed butter mixture. Beat on medium speed for 60 seconds until completely smooth. Turn the mixer to low speed and slowly shake in the Gold Medal All Purpose Flour, baking powder, and fine sea salt over 2 minutes. Stop mixing the second the white patches vanish. The wet creamed mass quickly transforms into a cohesive and thick dough that pulls away from the glass walls. You’ll smell a rich vanilla perfume rising from the bowl. The dough should feel soft but not wet or sticky to your fingertips. Overmix past the 2-minute mark and the gluten develops too much. Short mixing times ensure the cookies stay melt-in-your-mouth soft.

- Divide the dough into two equal portions and place one piece on a sheet of parchment paper. Roll the dough out to exactly a quarter-inch thickness using a heavy rolling pin. Slide the entire parchment sheet with the flat dough onto a flat baking sheet pan and chill at 35°F in your refrigerator for 45 minutes. The soft dough becomes firm and cold to the touch while retaining its smooth pale surface. You won’t see any color change but the texture stiffens completely. (My first batch went into the oven without chilling and the shapes turned into giant blobs. The fridge rest fixes that entirely.) Skip this chilling window and the butter melts instantly when baking. Cold dough keeps your festive shapes perfectly sharp.

- Press your steel snowflake and star cutters firmly into the chilled dough sheet. Space your cuts close together to minimize waste but leave a tiny gap between shapes. Gently lift the surrounding scraps away from the cutouts using your fingers, then space the shapes 1 inch apart on the parchment-lined sheet pan. You’ll see clean and sharp cookie edges shaped like stars and snowflakes resting naturally on the brown paper. The dough remains cool and stiff while you handle it. Work quickly before the kitchen warmth softens the edges. Let the dough warm up too much and the cutouts will warp as you lift them. Keeping things cold preserves the intricate points.

- Slide the sheet pan into the center rack of your 350°F preheated oven. Bake for 10 to 12 minutes without opening the oven door early. Watch through the glass window around minute 10 to check the edges. You’ll see the pale dough puff slightly and the matte surface sets completely. The edges turn a very light golden hue while the centers stay pale white. A rich buttery scent will fill your kitchen right when they are finished. Go past 12 minutes and the bottom scorches into a bitter crust. Baking at 350°F stops the sugars from burning before the center sets.
- Allow the cookies to cool completely for 30 minutes on a wire rack. Pipe glossy royal icing in festive colors over the surface and scatter sparkling sugar crystals or silver dragées on top. Let the decorated treats sit undisturbed for 2 hours at room temperature so the icing sets firm. The matte baked cookies are now covered with glossy red, green, and white patterns. The sugar crystals capture the light and look like fresh winter snow. (I tried icing a warm cookie once and the decoration dissolved into a messy glaze. Wait for the cool down.) Decorate while the cookie is warm and the icing slides right off the surface. A cold surface ensures the decorations stick perfectly.

Notes
Nutrition
Frequently Asked Questions
This common mistake happens when the butter in the dough gets too warm before baking. If you skip the 45-minute refrigerator chilling step, the fat melts instantly in the oven and causes spreading. Always bake the dough while it is completely cold to the touch.
You can easily prepare this dough up to three days in advance. Wrap the dough disk tightly in plastic wrap and store it at 35°F in your refrigerator. Let it sit on the counter for 10 minutes before rolling so it doesn’t crack.
Stored in an airtight glass container at room temperature, these cookies remain wonderfully soft for up to 7 days. Make sure the royal icing has dried completely for 2 hours before stacking them. Place parchment paper between layers to prevent sticking.
Yes, you can freeze un-iced baked cookies for up to 3 months. Wrap them carefully in layers of plastic wrap and place them inside a heavy-duty freezer bag. Thaw them completely on the counter before adding your fresh royal icing decorations.
Crumbly dough usually means too much flour was packed into your measuring cups. Mix in 1 tablespoon of cold milk at a time using your hands until the dough holds together. Avoid overworking the dough during this fix to keep it tender.
A Final Note
Every time I make this I think about the first time I tried it, nervous about screwing it up, convinced I’d need more experience. Turns out it’s one of those dishes that forgives you for being a beginner.
You can mess up the timing like I did those first three attempts and it still turns out good. If you try it, leave me a comment below, I read every single one.
And if you enjoyed this, check out some of my other recipes that use similar techniques like my holiday Red White Blue Cupcakes.
Did you know people have been cutting sugar cookies into fun holiday shapes since 16th-century Europe? It’s true. Back then, they’d hang these super elaborate biscuits right on the Christmas tree as decorations.