Loaded Baked Potatoes
Some nights you just want something warm, filling, and low effort. This is that dinner. Crisp skin, soft center, and all the toppings tucked right into every bite.
I make these when I don’t feel like cooking a full spread but still want something that feels complete. If you want something lighter on the side, this Grilled Chicken Salad (https://leagueofcooking. com/?
p=3219) pairs really well. Once you get the potato timing right, everything else is just layering. Cheese melts, bacon adds crunch, and that cool sour cream pulls it all together.
Why You Will Love This
Baking at 425°F dries the potato skin fast while the inside steams, which gives you that crisp outside and fluffy center. Mixing the filling while it’s still around 200°F lets the butter and cheese melt naturally without overworking the starch. That timing is what keeps it light instead of dense.
What You Will Need
- russet potatoes: large, starchy potatoes that bake up fluffy inside with sturdy skins
- olive oil: thin coating to help the skins crisp and blister in the oven
- kosher salt: coarse grains that stick to the skin and season evenly
- black pepper: freshly ground for a subtle heat
- unsalted butter: softened so it melts quickly into the hot potato
- sour cream: cool and tangy for contrast against the hot filling
- sharp cheddar cheese, shredded: bold cheese that melts smoothly with a slight bite
- cooked bacon: crispy pieces for salty crunch
- green onions: thin slices for a fresh, mild onion finish
- garlic powder: fine seasoning that blends easily into the filling
Kitchen Equipment
Method
Step 1: Measure and gather everything

Set everything out at room temperature, about 68°F, and give yourself a full 5 minutes to organize. Spread the potatoes and toppings out on a platter so nothing overlaps. Use a quick reach-and-check motion to confirm you didn’t miss anything. Look closely here. The cheese should be loose, not clumped, and the bacon should look crisp with jagged edges. If you skip this and start cooking, you’ll be scrambling later while the potatoes cool too fast.
Tip: Group toppings in the order you’ll use them so assembly moves faster.
Step 2: Cut and prep the toppings

Slice the green onions into thin rounds using a steady rocking motion for about 1 to 2 minutes. Keep the blade moving forward and down, not straight chopping. Then chop the bacon into mixed sizes so you get both small bits and larger chunks. You should see bright green rings and hear a slight crunch from the bacon as you cut. If you go too fine, everything blends together and you lose that contrast in each bite.
Tip: Wipe your knife between cuts so the onions stay clean and sharp-looking.
Step 3: Coat and season the potato skins

Preheat your oven to 425°F and give it at least 10 minutes to fully heat. Rub each potato with olive oil using your hands in a circular motion for about 30 seconds each, then sprinkle with salt and pepper. The skins should look lightly glossy, not dripping. You’ll feel the salt catch on the surface. Too much oil and the skins turn soft, too little and they stay dull instead of crisp.
Tip: Set potatoes directly on the oven rack for better air circulation and crisping.
Step 4: Split the softened potatoes

Bake at 425°F for 50 to 60 minutes, then check at minute 55 by gently squeezing with a towel. Once they give easily, cut each potato lengthwise with a firm downward motion. Press the sides inward to open them up. You should see steam rise and a fluffy interior. Wait too long after baking and the steam escapes, leaving the inside slightly firm instead of soft.
Tip: Make a shallow cut first, then deepen it so you don’t tear the skin.
Step 5: Mix the creamy filling into the centers
While the centers are still hot, around 200°F, add butter, garlic powder, sour cream, cheese, salt, and pepper. Use a fork and fold with a gentle J-shaped motion for 60 to 90 seconds. You want it creamy with a few chunks. The butter should melt into glossy streaks and the cheese should soften slightly. Overmix it and it turns gluey fast. (I used to mash it smooth, but it always felt heavy.)
Tip: Work one potato at a time so each stays hot enough to melt properly.
Step 6: Layer on cheese and bacon

Within 2 minutes of mixing, scatter the remaining cheese and bacon over the hot potatoes. Let them sit for 3 to 5 minutes so the heat softens the cheese. Drop the toppings loosely with your fingers. You should see the cheese start to slump while the bacon stays crisp. If the potatoes cool too much, the cheese won’t melt and just sits on top.
Tip: Press a few cheese pieces gently into the filling so they melt deeper inside.
Step 7: Finish with melting, slight browning, and cool toppings
Place the potatoes in a 400°F oven for 5 to 7 minutes. Check at minute 6 for small golden spots forming on the cheese. You’ll see light bubbling and smell a warm, toasty dairy note. Pull them out and immediately add sour cream and green onions. Leave them too long and the cheese firms up instead of staying soft.
Tip: Use the middle oven rack so the tops brown evenly without burning.
Step 8: Plate and garnish for serving
Transfer the potatoes to a plate while they’re still hot, around 160°F inside, within 2 minutes of finishing. Use a spatula to lift carefully so the toppings stay in place. The cheese should still be soft and the sour cream just starting to melt at the edges. Wait too long and everything settles, losing that fresh contrast.
Tip: Warm your serving plates slightly so the potatoes stay hot longer.
Pro Tips
- Use large russets for a fluffy center and enough room for toppings.
- Mix just until combined so the filling stays light, not dense.
- Scatter toppings loosely so they look natural and not packed down.
- Save a little topping for the final layer so everything looks fresh.
Make It Your Own
- sour cream: Greek yogurt — slightly tangier and thicker, but still works well
- cheddar cheese: Monterey Jack — melts smoother but has a milder flavor
- bacon: turkey bacon — less rich and crisp, but still adds texture
- butter: plant-based butter — works for dairy-free, but flavor is a bit lighter
- russet potatoes: sweet potatoes — sweeter and softer, changes the overall feel of the dish
- green onions: chives — milder and more delicate, similar finish, also great with Healthy Avocado Toast (https://leagueofcooking.com/healthy-avocado-toast/)
Storing Leftovers
Store leftovers in the fridge for up to 4 days. Keep them covered so the potatoes don’t dry out. Reheat at 375°F for 12 to 15 minutes until warmed through. The microwave works in about 2 minutes, but the skins won’t stay crisp. You can freeze them, but the texture gets softer after thawing.
Loaded Baked Potatoes
Ingredients
- 4 large russet potatoes
- 2 tablespoons olive oil
- 1 1/2 teaspoons, divided kosher salt
- 3/4 teaspoon, divided black pepper
- 4 tablespoons unsalted butter
- 3/4 cup, plus more for topping sour cream
- 1 1/2 cups sharp cheddar cheese, shredded
- 6 strips, chopped cooked bacon
- 3 , thinly sliced green onions
- 1/2 teaspoon garlic powder
Instructions
-
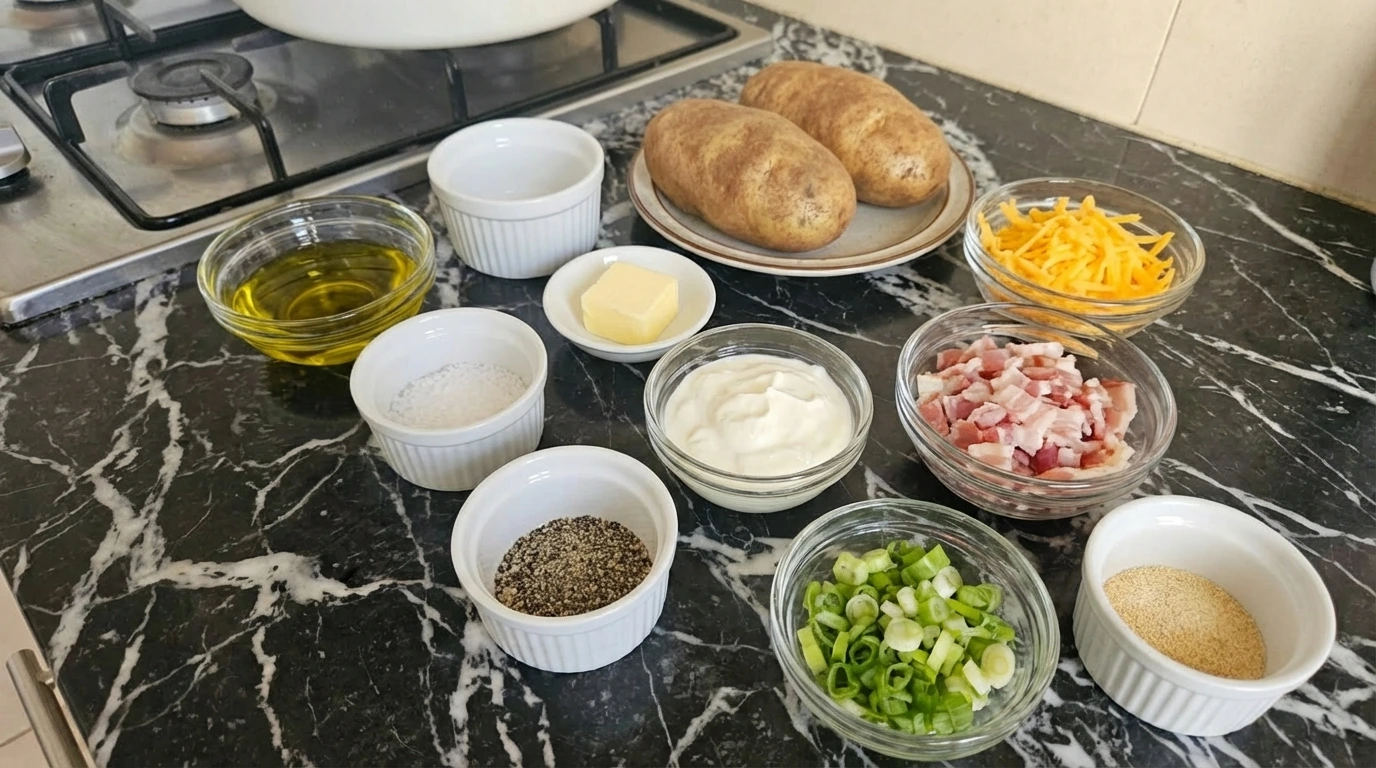
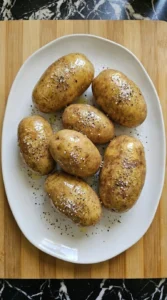
Set the whole russet potatoes onto a white stoneware serving platter and surround them with small bowls of measured olive oil, salt, pepper, butter, sour cream, shredded cheddar, chopped bacon, sliced green onions, and garlic powder. Nothing is perfectly lined up, and the bowls sit with a casual, slightly uneven spacing. The ingredients still look completely separate at this stage. The potatoes are dusty and raw, the cheddar is fluffy and loose in the bowl, and the bacon pieces look crisp and jagged, ready to be added later.

-
Slice the green onions into thin little rounds and chop the bacon into rough, uneven pieces, then return them to small bowls on the same white stoneware serving platter. The cut pieces look more varied now, with some larger bits and some tiny crumbles for a homemade feel. This is the first clear visual change in the recipe. Whole ingredients become ready-to-use toppings, and the platter starts to look more like an active prep scene instead of a collection of untouched ingredients.

-
Rub the potatoes with olive oil and sprinkle them with most of the salt and a little black pepper right on the platter. The skins go from dry and dusty to lightly glossy, with seasoning clinging in uneven patches and a few salt crystals gathering more heavily in some spots than others. They still look raw, but now they have a finished outer coating that promises better texture later. The potatoes are no longer matte and plain. they look slick, seasoned, and ready for the next stage.
-
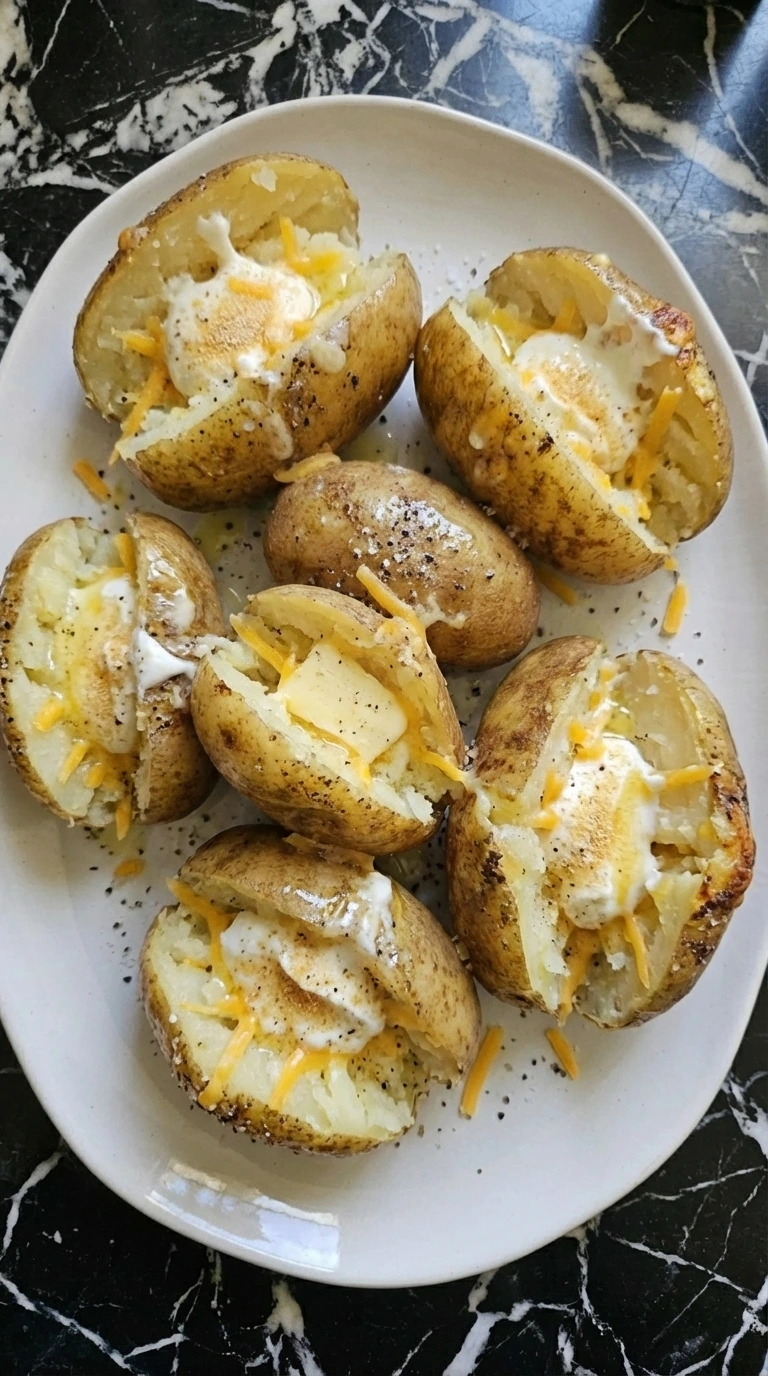
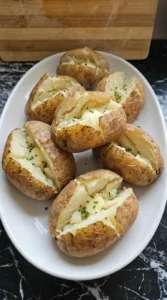
Now the potatoes appear fully cooked without any cooking equipment in view. Their skins are lightly wrinkled and slightly browned, and when each one is cut open lengthwise on the platter, the centers look steamy, fluffy, and tender with rough, natural edges. Press the sides gently so the middles open wider. The visual shift is big here: the potatoes have gone from firm and slick to softened and yielding, with golden spots on the skins and pale, cloudlike interiors ready to hold the filling.
-
Add butter, garlic powder, a few spoonfuls of sour cream, part of the cheddar, and the remaining salt and pepper directly into the open potato centers. Then mash and fold the filling right inside each potato so the fluffy insides become creamier, smoother, and slightly richer in color. The mixture should not look perfectly blended. Some bits stay chunkier, some butter streaks remain glossy as they soften, and the cheddar begins to disappear into the potato in uneven pockets, making the centers look looser and more plush.
-
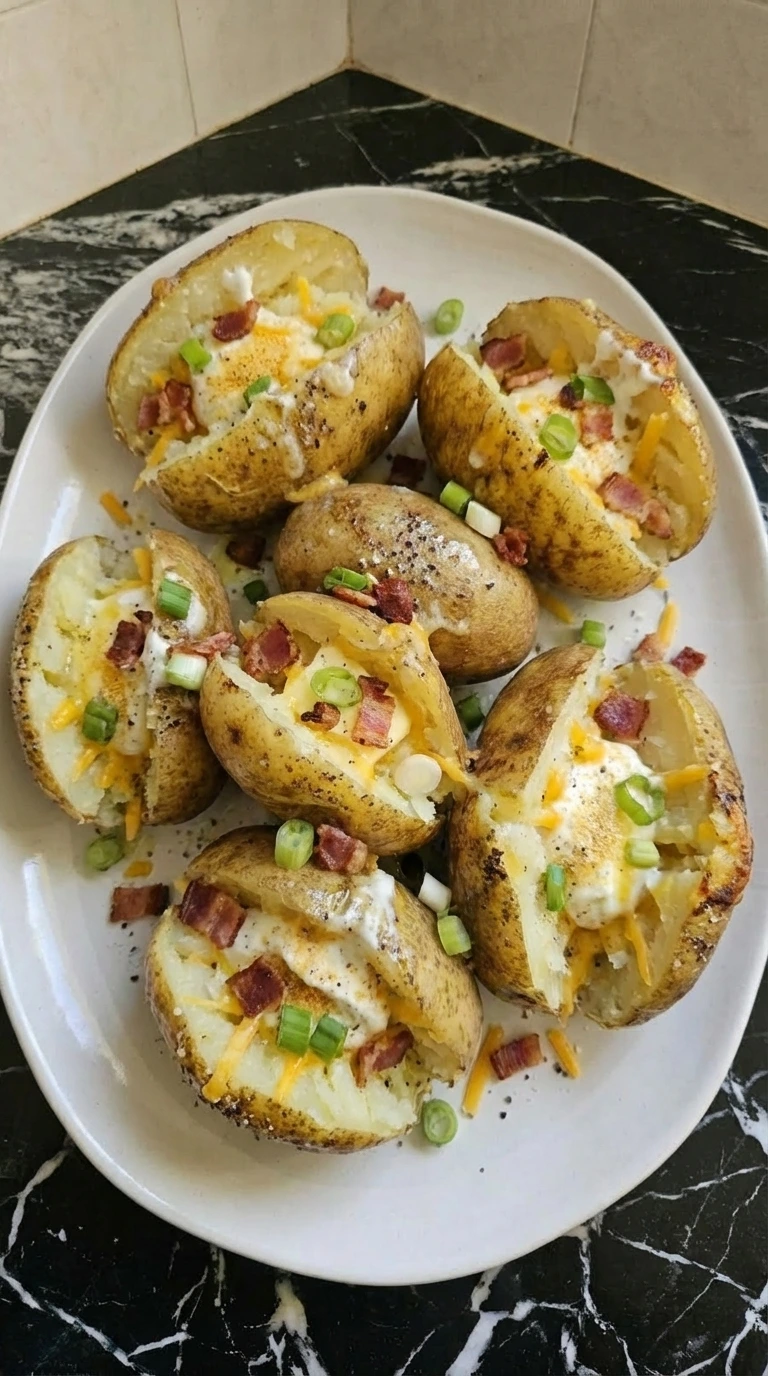
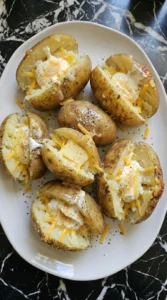
Scatter the rest of the shredded cheddar over the opened potatoes and follow with chopped bacon. The toppings land casually, not evenly, with some cheese falling into the cracks, some gathering in loose mounds, and some bacon pieces slipping to the sides. At this point the potatoes look fuller and more loaded. The cheddar begins to soften against the warm filling, clinging in irregular strands and patches, while the bacon adds darker, crisp pops across the pale creamy centers.
-
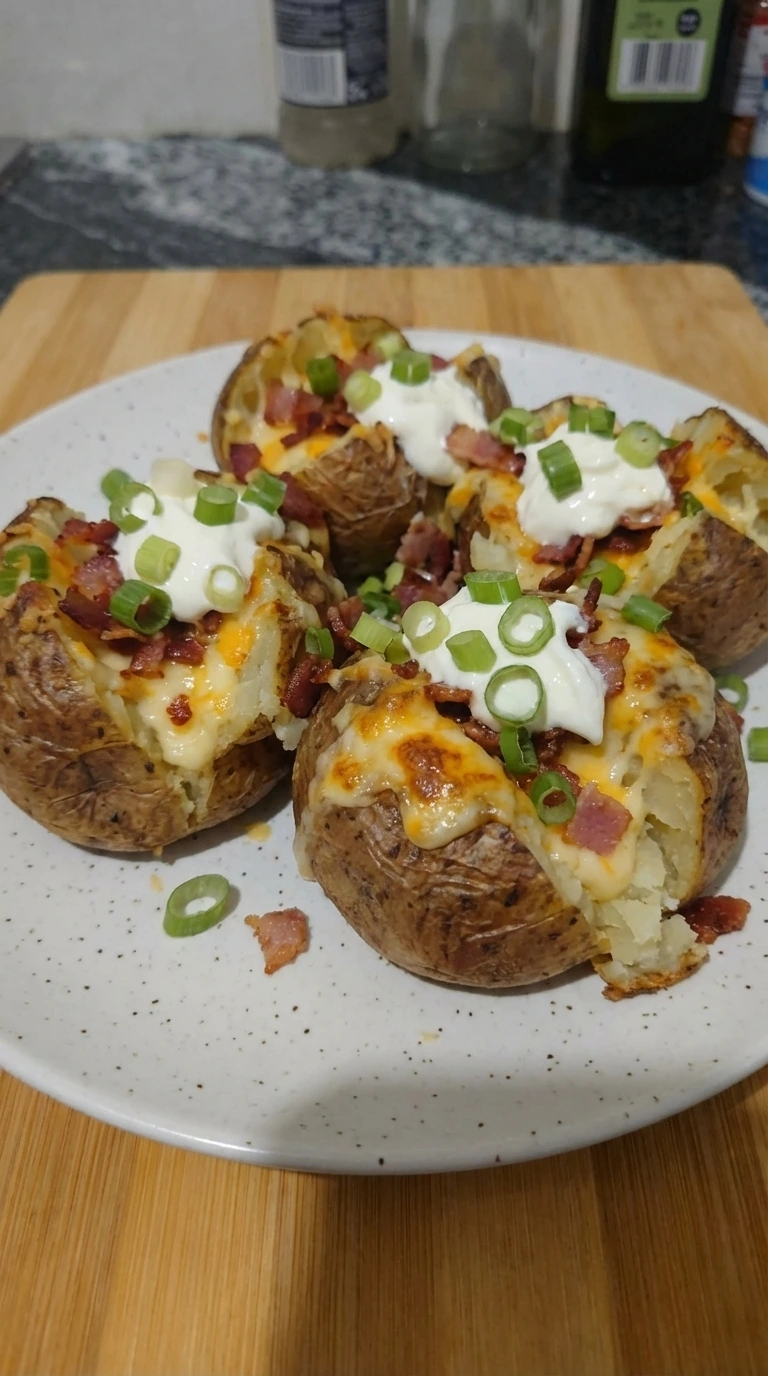
The cheddar now looks visibly melted in uneven areas, with a few lightly browned spots where it has settled over the hot potato. The filling underneath appears softer and more cohesive, while the bacon stays crisp and peeks through the melted cheese in scattered clusters. Add small dollops of sour cream and a loose scatter of sliced green onions over the top. The contrast becomes more vivid here: white sour cream against golden cheese, bright green onion slices across the surface, and no two potatoes looking exactly alike.

-
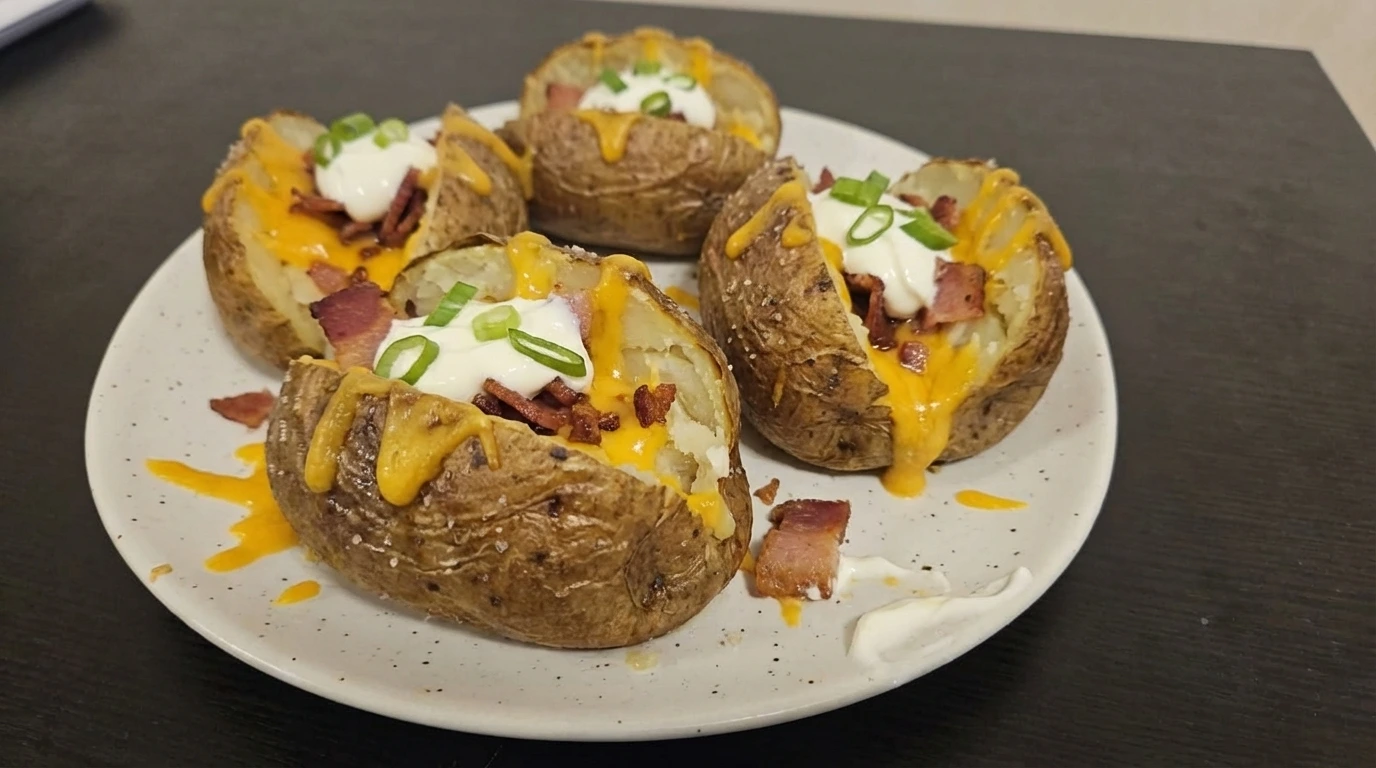
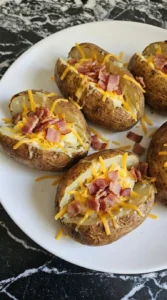
Transfer the fully finished loaded baked potatoes to a speckled white dinner plate for serving. The skins look browned and a little craggy, the centers are fluffy but creamy, the cheese sits in irregular melted pools, and the bacon and green onions are scattered with natural randomness. This final plated dish looks fully cooked, cozy, and ready to eat. Nothing is too neat: a little sour cream slides into one crack, some cheese gathers more heavily on one potato than another, and the overall look is rich, golden, and homemade.

Notes
Questions I Get Asked
It’s usually too much oil or not enough heat. Stick to a thin coating and bake at 425°F. If the oven isn’t fully preheated, the skins steam instead of crisping.
Yes, bake the potatoes first and store them whole. Reheat at 375°F for about 15 minutes, then split and fill. Doing it this way keeps the inside fluffy.
They should give easily when squeezed with a towel. A knife should slide in without resistance. When opened, the inside should look steamy and soft.
You can, but the cheese won’t get that slight melt and browning. That extra 5 to 7 minutes at 400°F really helps the texture.
Wrap Up
These loaded baked potatoes are simple, cozy, and always satisfying. Once you get the timing down, they’re hard to mess up.
If you want something lighter alongside, try this Quinoa Veggie Bowl (https://leagueofcooking. com/?
p=3234).
Russet potatoes expand so much when baked because their high starch content traps steam, which is what creates that fluffy interior.