Raspberry Breakfast Bars
This is the kind of thing I wish I’d learned sooner. The first time I made these bars was for a rushed Sunday breakfast in 2021, when the fridge was nearly empty, and I baked them almost 10 minutes too long. They were still the best thing on the table somehow. That’s when I realized raspberry breakfast bars are far more forgiving than most people admit. Since then I’ve made them for holiday brunches and random Tuesday mornings when friends dropped by.
I also brought a batch to a potluck where three people asked for the recipe. They’re fruity and buttery but not heavy. And the oat crumble keeps every bite sturdy enough to eat without a fork. The leftovers travel well too, so they often end up in lunch boxes the next morning. The bright raspberry layer tastes fresh even when you use frozen fruit.
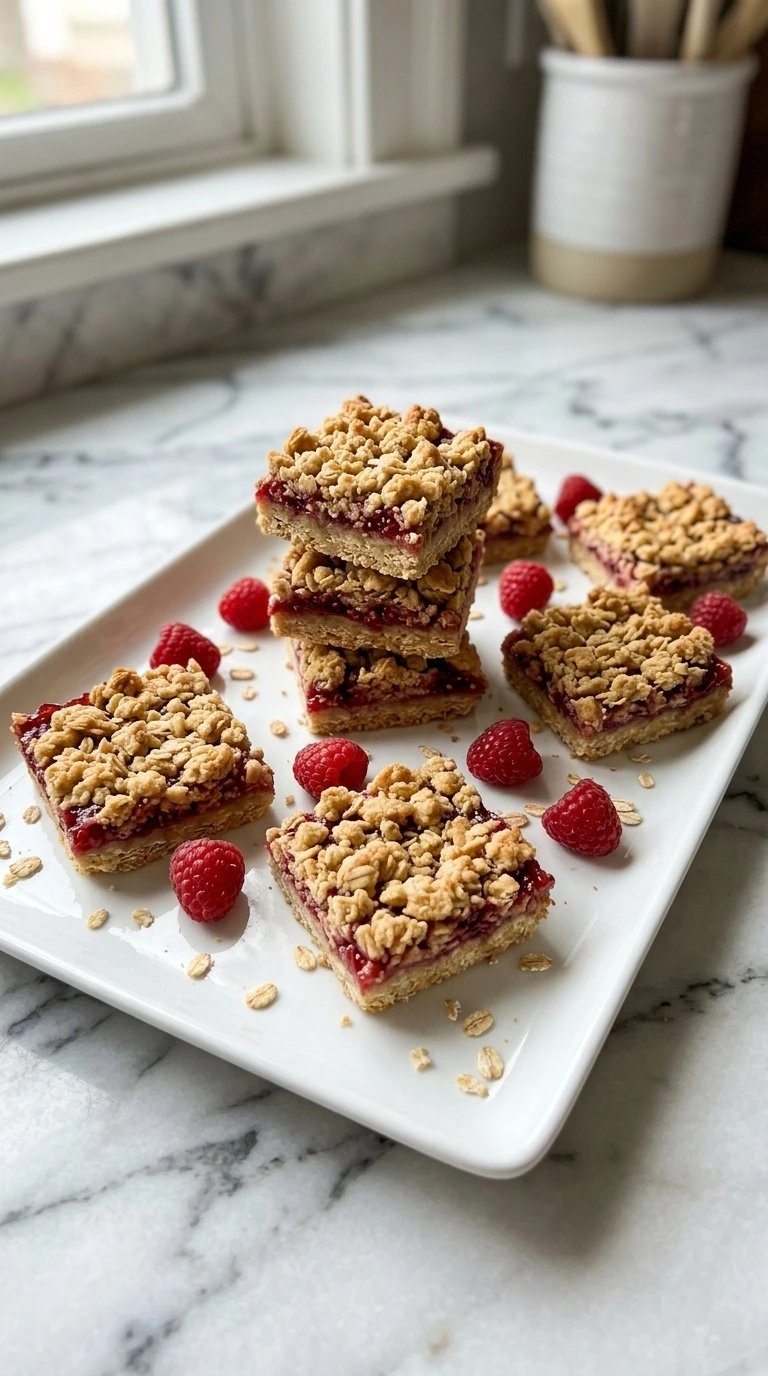
So you can make these bars year-round without waiting for berry season. The base stays firm while the center remains soft and jammy. If you love a berry-filled breakfast, try our Blueberry Muffins next. Both recipes give you real fruit flavor in every bite and they’re practical for busy mornings.
Why This Recipe Works
Par-baking the oat base at 350°F for eight minutes dries its surface before the raspberry filling touches it. That thin barrier keeps the bottom firm while the center stays soft and prevents berry juice from soaking into the oats. Cornstarch thickens the juices near boiling, so the ruby layer holds after a full 60-minute cooling period.
The crumble stays coarse because melted butter binds the flour without developing much gluten. Irregular gaps also let berry steam escape during baking instead of softening the whole topping. This keeps the top from merging into one dense sheet.
Pair a bar with our Mango Smoothie for a cool breakfast that balances the warm oat texture.
Ingredients

- Old-fashioned rolled oats: Use thick rolled flakes for visible texture and a sturdy crumble.
- White whole wheat flour: Spoon and level it so the base stays tender rather than dry.
- Light brown sugar: Pack it lightly to add moisture and a mild caramel note.
- Ground cinnamon: Adds warm flavor without overpowering the raspberries.
- Baking powder: Loosens the oat crumble so it doesn’t bake into a hard sheet.
- Fine sea salt: Balances the berry acidity and the sweetness in the oat layer.
- Unsalted butter: Melted and cooled to about 95°F before mixing.
- Large egg: Bring it to room temperature so it blends smoothly into the crumble.
- Pure vanilla extract: Rounds out the oats and softens the sharp edge of the berries.
- Frozen raspberries: Keep them frozen until cooking so their juices release gradually.
- Pure maple syrup: Sweetens the filling while keeping its raspberry flavor bright.
- Fresh lemon: Zest it finely and squeeze 2 tablespoons of juice.
- Cornstarch: Whisk it into the liquid before heating to prevent gummy lumps.
- Water: Use cool water to dissolve the cornstarch into a smooth slurry.
- Fresh raspberries: Keep them whole and dry for serving with the sliced bars.
Tools You’ll Need
- 9×9-inch light-colored metal baking pan: A light-colored square pan browns the oat base evenly and keeps the bars thick — a dark pan can scorch the corners before the center sets.
- 2-quart heavy-bottomed saucepan: A heavy base spreads heat across the raspberry filling so the sugars don’t catch — a thin saucepan can create burnt spots within minutes.
- Large clear glass mixing bowl: A 4-quart bowl leaves enough room to fold coarse crumbs without crushing them — a smaller bowl encourages overmixing and dense topping.
- Balloon whisk: A medium balloon whisk blends the dry ingredients and cornstarch slurry smoothly — a fork can leave starch lumps that turn gummy.
- Rubber spatula: A flexible heat-safe spatula scrapes the saucepan and folds the crumble gently — a rigid spoon can mash the clusters too finely.
- Instant-read thermometer: A fast thermometer confirms the melted butter has cooled near 95°F — hotter butter can partly cook the egg and create greasy pockets.
- Parchment paper: A 12-inch-wide sheet creates 2-inch lifting handles around the slab — foil can tear the soft raspberry edges during removal.
- Sharp chef’s knife: An 8-inch sharp blade cuts through the cooled layers in one motion — a dull knife drags filling across the oat base.
- Measuring cups and spoons: A complete dry and liquid set keeps the oat ratio accurate — guessed measurements can leave the base greasy or crumbly.
How to Make It
Step 1: Cook the raspberry filling
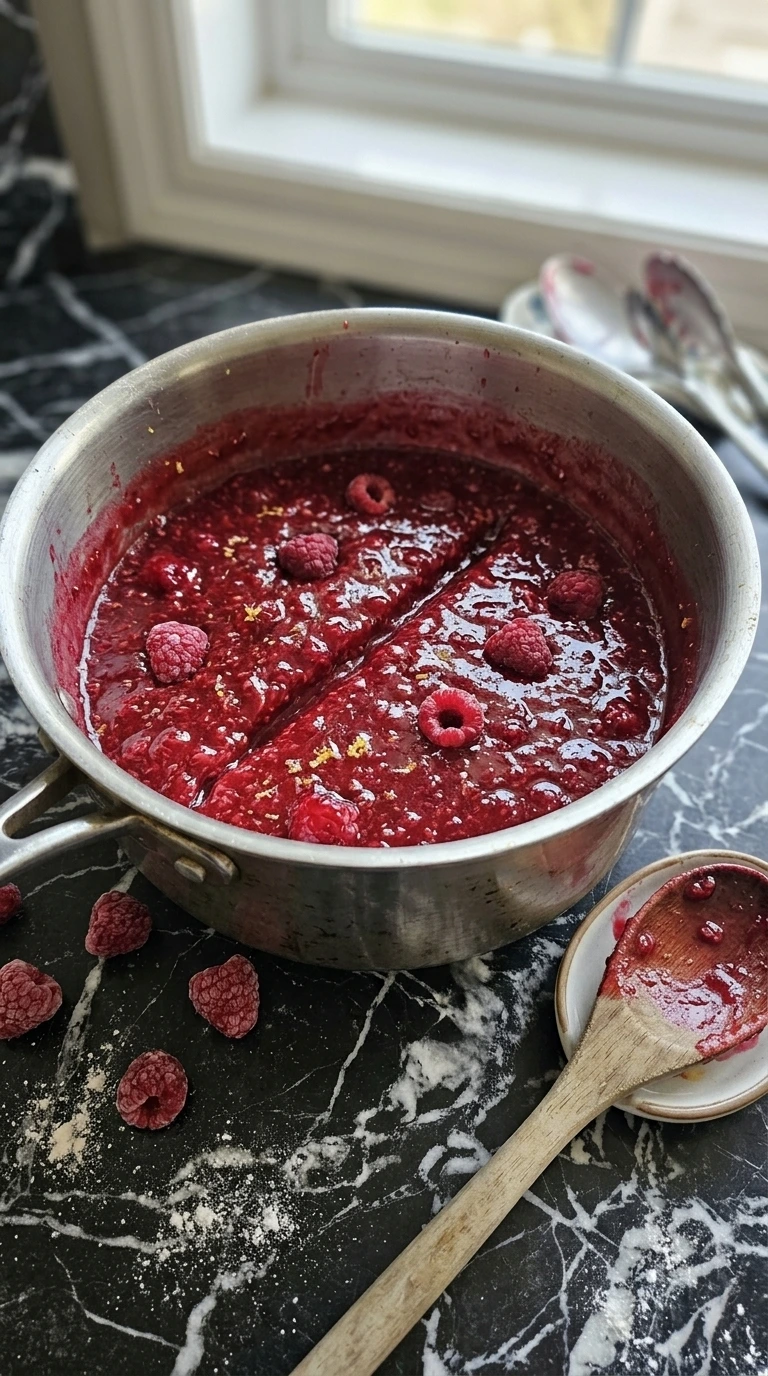
Set a heavy saucepan over medium-low heat, about 4 on a 10-dial. Add 3 cups frozen raspberries and 1/3 cup maple syrup with the lemon zest. Cook for 4 minutes while pressing only half the berries with a rubber spatula. Stir every 30 seconds so the fruit warms evenly without catching.
Next, whisk cornstarch with water and lemon juice until smooth. Pour it in and simmer for 3 to 4 minutes while scraping the bottom. The filling should look glossy and leave a clear trail for two seconds. Go past 4 minutes and the fruit turns stiff after cooling.
Cool for 10 minutes at 70°F room temperature. This brief simmer activates the starch without turning the berries into candy.
Tip: Use a light-colored saucepan so you can spot any darkening before the raspberry sugars scorch.
Step 2: Mix the oat crumble

Preheat the oven to 350°F. Whisk rolled oats and white whole wheat flour with brown sugar and cinnamon. Add baking powder and fine sea salt. Pour in the melted butter once it cools to 95°F.
Then add 1 large egg and 2 teaspoons vanilla. Fold for 2 to 3 minutes with broad strokes. The mixture should form moist clusters when squeezed but still fall apart at the edges. Scrape the bowl once halfway through so no dry flour hides underneath.
Stop when the crumbs vary from pea-size to walnut-size. Overmixing past 3 minutes makes the topping dense. (My first batch looked smoother, it baked into a hard sheet. ) Gentle folding preserves coarse crumbs that bake into a tender topping.
Tip: Reserve the largest crumble clusters for the top because they brown more evenly than fine crumbs.
Step 3: Press and par-bake the oat base

Line a 9×9-inch light-colored metal pan with parchment and leave 2-inch handles. Press two-thirds of the crumble into an even 1/2-inch base. Use firm downward pressure and work from the corners inward. Keep the layer level so the filling sits evenly.
Bake at 350°F for exactly 8 minutes. Rotate the pan once at minute 4. The base should lose its wet shine and turn pale gold at the outer 1/2 inch. It won’t feel crisp yet.
That’s expected. Bake past 10 minutes and the bottom hardens before the final bake. (I used to skip this stage, the raspberry layer soaked straight through. ) The short par-bake seals the base before the wet filling arrives.
Tip: A flat-bottomed 1/3-cup measure packs the corners more evenly than your fingertips.
Step 4: Layer the filling and crumble

Keep the oven at 350°F. Spoon all the cooled raspberry filling over the warm base within 4 minutes. Spread it to within 1/4 inch of every edge. Work from the center toward the corners with short gentle strokes.
Scatter the remaining crumble in irregular clusters. Leave small ruby gaps visible between the crumbs. Don’t press the topping down. The pan should show three distinct textures.
You’ll see a compact pale base and a glossy ruby center with rough beige clusters above. If the filling reaches the metal edge, it can burn and glue the bars to the pan. Work while the base stays warm but not steaming. Leaving gaps lets steam escape and keeps the crumble crisp.
Tip: Drop the topping from 4 inches above the pan to keep the clusters loose and uneven.
Step 5: Bake until the crumble turns golden
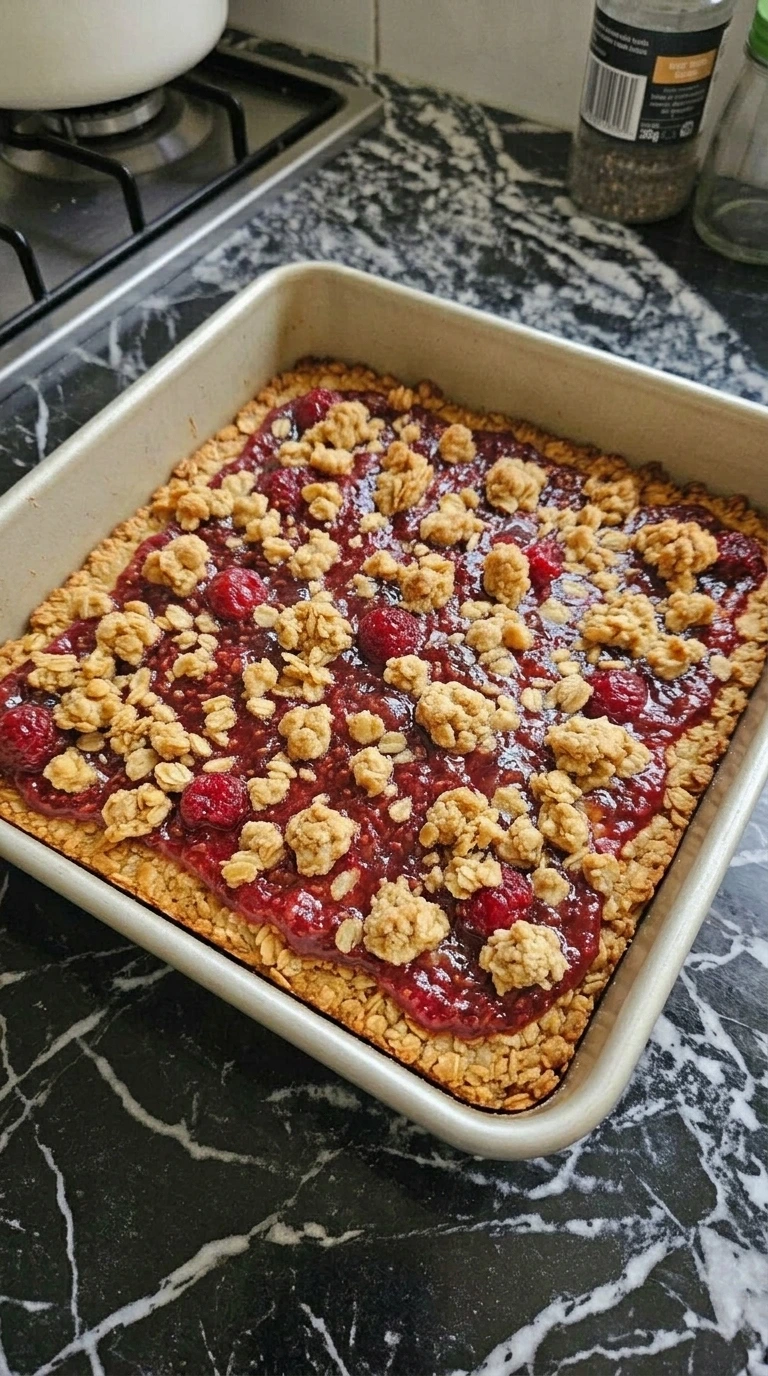
Bake the layered pan at 350°F for 24 to 28 minutes. Rotate it 180 degrees at minute 15. Don’t open the oven again before minute 24. The center needs steady heat so the fruit can bubble through the small gaps.
Check at minute 24 and add 2 minutes if needed. The highest crumble peaks should turn deep golden while the lower crumbs stay light amber. You’ll see slow ruby bubbles near two or three gaps. Remove the pan before the edges darken brown.
Go past 30 minutes and the filling loses its bright flavor. (A 375°F test batch browned before the center settled. ) Moderate heat browns the oats before the raspberry layer dries out.
Tip: Set the pan on the middle rack because the lower rack can overbrown the oat base.
Step 6: Cool, slice and serve

Cool the pan for 45 minutes at 70°F room temperature. Lift the slab out and wait 15 minutes more. Cut it into 9 slightly irregular squares with one firm downward motion per cut. Keep the squares close in size but don’t chase perfect edges.
Wipe the blade between cuts. Serve each bar with 1 or 2 fresh raspberries. The layers should stay separate and the center should look jammy rather than runny. Fine crumbs will fall from the rough top.
That’s part of the homemade texture. Slice before 60 minutes and the filling can smear across the oat base. The finished bar should feel sturdy but tender. Full cooling lets the starch set so the layers slice cleanly.
Tip: For sharper cuts, chill the cooled slab for 20 minutes before slicing and return it to room temperature for serving.
Tips for Success
- Measure the flour by spooning it into the cup and leveling it, or use 120 grams to avoid a dry base.
- Keep frozen raspberries frozen until the saucepan is hot, because thawed fruit releases extra water before the starch can thicken it.
- Cool the filling for 10 minutes before layering so it doesn’t melt the butter in the par-baked oat base.
- Press the base with a flat 1/3-cup measure and focus on the four corners where loose crumbs often create weak slices.
- Leave a 1/4-inch border around the raspberry filling so bubbling fruit doesn’t caramelize against the metal pan.
- Check the bars at minute 24 and remove them when two or three ruby bubbles rise through the crumble gaps.
- Wait the full 60 minutes before cutting, then wipe the knife after every slice to keep the three layers distinct.
- Replace 1/4 teaspoon of the vanilla with almond extract for a raspberry-almond version with a stronger bakery aroma.
- Fold 1/3 cup mini dark chocolate chips into the reserved topping for small bittersweet pockets across the golden crumble.
- Replace 1 cup of frozen raspberries with 1 cup frozen blueberries and simmer the filling 1 minute longer.
- Add 1/2 cup chopped pecans to the topping and reduce the rolled oats by 1/2 cup for a nutty crunch.
Substitutions & Variations
- Unsalted butter: Use 3/4 cup refined coconut oil — Use a 1 to 1 swap. The bars become slightly crumblier and less buttery, while unrefined coconut oil adds a noticeable coconut flavor.
- White whole wheat flour: Use 1 cup certified gluten-free 1-to-1 baking flour — Choose a blend with xanthan gum. The base will feel more delicate, so cool it for 90 minutes before slicing. For a softer baked breakfast, try our Pumpkin Muffins.
- Large egg: Use 1 tablespoon ground flaxseed mixed with 3 tablespoons water — Rest the mixture for 10 minutes before adding it. The bars will be softer and slightly more fragile, so chill them for 20 minutes before cutting.
- Frozen raspberries: Use 3 cups fresh raspberries — Cook the filling for 2 minutes less because fresh berries release juice faster. Keep the same cornstarch amount or the center may spread.
- Pure maple syrup: Use 1/3 cup mild honey — The filling becomes sweeter and a little firmer. Reduce the lemon juice by 1 teaspoon if your honey tastes sharply floral.
- Light brown sugar: Use 1/2 cup coconut sugar — The oat layers will look darker and taste toastier. Add 1 tablespoon water to the crumble if it won’t hold when squeezed.
Storage Tips
Store cooled bars in a shallow airtight container for up to 4 days in the refrigerator. Place parchment between layers so the crumble doesn’t stick to the raspberry filling. For freezing, wrap each bar tightly after a 1-hour flash freeze. Then place them in a freezer bag for up to 2 months.
Label the bag with the date because the berry flavor fades first. Reheat refrigerated bars at 300°F for 8 to 10 minutes. A microwave works in 15-second bursts, but it softens the crumble. Thaw frozen bars overnight before reheating for the most even texture.
When serving, let chilled bars stand for 20 minutes. Discard any bar with a fermented smell, fuzzy spots or leaking liquid around the raspberry layer. Those signs mean the fruit has started spoiling.
Raspberry Breakfast Bars
Ingredients
- 2 cups Old-fashioned rolled oats Use thick rolled flakes for visible texture and a sturdy crumble.
- 1 cup White whole wheat flour Spoon and level it so the base stays tender rather than dry.
- 1/2 cup Light brown sugar Pack it lightly to add moisture and a mild caramel note.
- 1 teaspoon Ground cinnamon Adds warm flavor without overpowering the raspberries.
- 1 teaspoon Baking powder Loosens the oat crumble so it doesn’t bake into a hard sheet.
- 1/2 teaspoon Fine sea salt Balances the berry acidity and the sweetness in the oat layer.
- 3/4 cup Unsalted butter Melted and cooled to about 95°F before mixing.
- 1 large Large egg Bring it to room temperature so it blends smoothly into the crumble.
- 2 teaspoons Pure vanilla extract Rounds out the oats and softens the sharp edge of the berries.
- 3 cups Frozen raspberries Keep them frozen until cooking so their juices release gradually.
- 1/3 cup Pure maple syrup Sweetens the filling while keeping its raspberry flavor bright.
- 1 medium Fresh lemon Zest it finely and squeeze 2 tablespoons of juice.
- 2 tablespoons Cornstarch Whisk it into the liquid before heating to prevent gummy lumps.
- 2 tablespoons Water Use cool water to dissolve the cornstarch into a smooth slurry.
- 12 Fresh raspberries Keep them whole and dry for serving with the sliced bars.
Instructions
- Set a heavy saucepan over medium-low heat, about 4 on a 10-dial. Add 3 cups frozen raspberries and 1/3 cup maple syrup with the lemon zest. Cook for 4 minutes while pressing only half the berries with a rubber spatula. Stir every 30 seconds so the fruit warms evenly without catching. Next, whisk cornstarch with water and lemon juice until smooth. Pour it in and simmer for 3 to 4 minutes while scraping the bottom. The filling should look glossy and leave a clear trail for two seconds. Go past 4 minutes and the fruit turns stiff after cooling. Cool for 10 minutes at 70°F room temperature. This brief simmer activates the starch without turning the berries into candy.

- Preheat the oven to 350°F. Whisk rolled oats and white whole wheat flour with brown sugar and cinnamon. Add baking powder and fine sea salt. Pour in the melted butter once it cools to 95°F. Then add 1 large egg and 2 teaspoons vanilla. Fold for 2 to 3 minutes with broad strokes. The mixture should form moist clusters when squeezed but still fall apart at the edges. Scrape the bowl once halfway through so no dry flour hides underneath. Stop when the crumbs vary from pea-size to walnut-size. Overmixing past 3 minutes makes the topping dense. (My first batch looked smoother, it baked into a hard sheet.) Gentle folding preserves coarse crumbs that bake into a tender topping.

- Line a 9×9-inch light-colored metal pan with parchment and leave 2-inch handles. Press two-thirds of the crumble into an even 1/2-inch base. Use firm downward pressure and work from the corners inward. Keep the layer level so the filling sits evenly. Bake at 350°F for exactly 8 minutes. Rotate the pan once at minute 4. The base should lose its wet shine and turn pale gold at the outer 1/2 inch. It won’t feel crisp yet. That’s expected. Bake past 10 minutes and the bottom hardens before the final bake. (I used to skip this stage, the raspberry layer soaked straight through.) The short par-bake seals the base before the wet filling arrives.

- Keep the oven at 350°F. Spoon all the cooled raspberry filling over the warm base within 4 minutes. Spread it to within 1/4 inch of every edge. Work from the center toward the corners with short gentle strokes. Scatter the remaining crumble in irregular clusters. Leave small ruby gaps visible between the crumbs. Don’t press the topping down. The pan should show three distinct textures. You’ll see a compact pale base and a glossy ruby center with rough beige clusters above. If the filling reaches the metal edge, it can burn and glue the bars to the pan. Work while the base stays warm but not steaming. Leaving gaps lets steam escape and keeps the crumble crisp.
- Bake the layered pan at 350°F for 24 to 28 minutes. Rotate it 180 degrees at minute 15. Don’t open the oven again before minute 24. The center needs steady heat so the fruit can bubble through the small gaps. Check at minute 24 and add 2 minutes if needed. The highest crumble peaks should turn deep golden while the lower crumbs stay light amber. You’ll see slow ruby bubbles near two or three gaps. Remove the pan before the edges darken brown. Go past 30 minutes and the filling loses its bright flavor. (A 375°F test batch browned before the center settled.) Moderate heat browns the oats before the raspberry layer dries out.

- Cool the pan for 45 minutes at 70°F room temperature. Lift the slab out and wait 15 minutes more. Cut it into 9 slightly irregular squares with one firm downward motion per cut. Keep the squares close in size but don’t chase perfect edges. Wipe the blade between cuts. Serve each bar with 1 or 2 fresh raspberries. The layers should stay separate and the center should look jammy rather than runny. Fine crumbs will fall from the rough top. That’s part of the homemade texture. Slice before 60 minutes and the filling can smear across the oat base. The finished bar should feel sturdy but tender. Full cooling lets the starch set so the layers slice cleanly.

Notes
Nutrition
Reader Questions
Yes. Bake the slab up to 24 hours before serving and cool it for 60 minutes before covering. Keep it uncut at room temperature overnight, then slice it in the morning so the edges stay neat and the crumble loses less moisture.
The cornstarch probably didn’t reach a steady simmer or the filling stopped cooking too soon. Simmer it for 3 to 4 minutes after adding the slurry, then look for a spatula trail that stays visible for two seconds.
Use the same 3-cup amount, but shorten the first cooking stage by about 2 minutes. Fresh berries collapse faster and may need only 1 tablespoon water in the slurry if they look especially juicy.
Double every ingredient and divide the mixture between two 9×9-inch pans. Bake both at 350°F and switch their rack positions at minute 15, then start checking for golden crumble peaks at minute 28.
Freeze fully cooled bars in a single layer for 1 hour, then wrap each piece and store them for up to 2 months. Thaw overnight in the refrigerator and warm at 300°F for 8 minutes to refresh the crumble.
Serve one bar with plain Greek yogurt and 1 or 2 fresh raspberries for a fuller breakfast. For brunch, add a cold fruit drink and keep the bars at room temperature for 20 minutes so the oat layers soften slightly.
Before You Go
This is the kind of recipe I wish I had found years ago. It would’ve saved me so many rushed breakfast mornings.
But now that I have it, I make it all the time because the par-baked oat base stays crisp under the jammy raspberry layer. If you enjoyed this, try our Blueberry Muffins or Mango Smoothie and leave a comment or tag your batch because I read every one and it really makes my day.
Raspberries already have natural pectin, so the fruit layer thickens as it cools, while the cornstarch gives it a little extra help.