Teriyaki Chicken
The first bite of this Teriyaki Chicken had me reaching for another piece before I’d even sat down! You guys, the sauce is that good. When my mom tasted it, she said it was better than the chicken we’d ordered from our favorite takeout place. And I have to agree! What started as a quick dinner experiment turned into one of my favorite meals. The chicken has golden edges and a thick sweet and savory glaze that clings to every bite.
I’ve always loved making chicken dinners because there’s so much you can do with a few simple ingredients. This easy teriyaki chicken gets its flavor from soy sauce and honey with fresh ginger and garlic. Nothing complicated. I usually make enough for four servings because leftovers are great for lunch the next day. And if you’re into quick chicken dinners like I am, you’ll also love my Easy Lemon Garlic Butter Chicken Bites. They have a different flavor but they’re just as fun to make. I love serving this teriyaki chicken recipe over warm jasmine rice with a few fresh green onions on top.
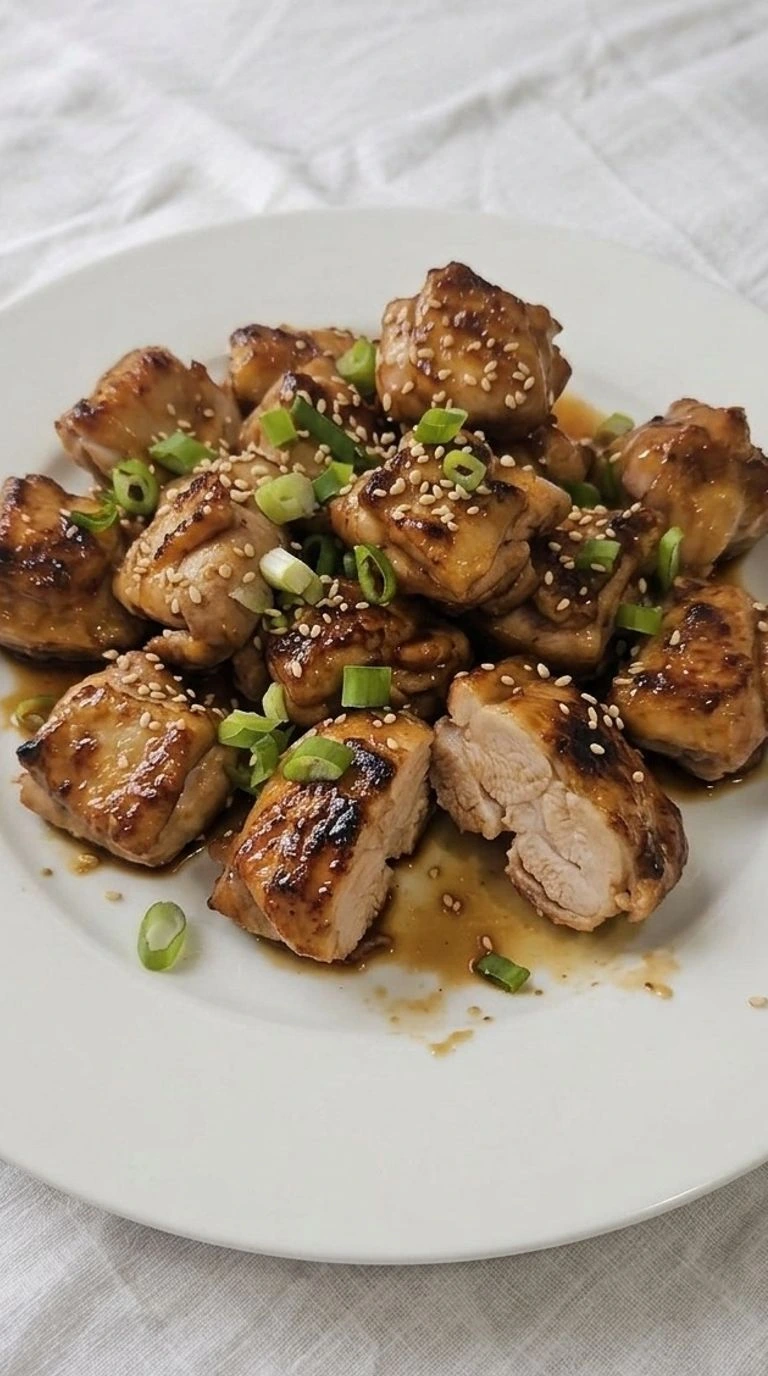
It’s also great with steamed broccoli or tucked into meal prep containers for the week. Sometimes I’ll make extra sauce because everyone wants a little more on their rice. And the best part? You don’t need a long marinade or a bunch of hard-to-find ingredients to get that rich flavor. Just a good pan and a little patience while the sauce turns thick and shiny.
Why This Recipe Works
The best Teriyaki Chicken gets its flavor from two stages of cooking. Searing the thigh pieces near 400°F creates golden edges before the sweet sauce goes into the skillet.
Because honey can burn at high heat, adding it later protects the glaze and keeps the meat juicy. Then a brief simmer with cornstarch turns the sauce thick enough to coat each piece without a long boil.
That balance of heat and timing makes a big difference. If you enjoy this way of cooking chicken, try our Sheet Pan Chicken Thighs and Veggies for Busy Weeknights for another dinner with golden edges and tender meat.
Ingredients

- Boneless skinless chicken thighs: Pat dry and cut into roughly 1-inch pieces. The dark meat stays juicy while the edges develop a golden crust.
- Regular soy sauce: Use regular soy sauce for a savory base with enough salt to balance the sweet honey.
- Honey: Use pourable honey to sweeten the sauce and help create a sticky glaze.
- Unseasoned rice vinegar: Adds mild acidity that balances the sweetness without bringing extra sugar or salt.
- Toasted sesame oil: Adds a rich nutty aroma to the sauce. A small amount is enough because the flavor is strong.
- Fresh garlic cloves: Peel and finely mince to spread the garlic flavor evenly through the sauce.
- Fresh ginger root: Peel and finely grate to add a warm and slightly sharp flavor to the glaze.
- Cornstarch: Mix with cold water to form a smooth slurry that thickens the sauce during the final simmer.
- Cold water: Combine with cornstarch before adding it to the skillet to prevent dry starch lumps.
- Avocado oil: Use for searing because its high smoke point works well with a hot skillet.
- Green onions: Thinly slice the green and pale sections for a fresh finishing garnish.
- Toasted white sesame seeds: Scatter over the finished chicken for a light nutty crunch and contrast against the dark glaze.
Kitchen Equipment
- 12-inch cast iron skillet: A heavy 12-inch skillet holds enough chicken for even searing and retains heat well. Use a thick stainless steel skillet if needed because thin pans can scorch the honey glaze.
- Medium mixing bowl: A 2-quart mixing bowl gives you room to blend the sauce without spills. Choose a stable bowl with enough depth for brisk whisking.
- Small mixing bowl: A small bowl with at least 1/2 cup capacity holds the cornstarch slurry. A narrow cup also works if you can stir the bottom to remove lumps.
- Whisk: A small stainless steel whisk blends honey into soy sauce and smooths the slurry. A fork works for small batches but takes more stirring.
- Sharp chef’s knife: An 8-inch chef’s knife cuts boneless chicken thighs into even pieces. Choose a sharp blade because a dull knife can slip on raw meat.
- Cutting board: A sturdy nonporous cutting board provides a safe place to cut raw chicken. Choose one that fits in your sink or dishwasher for thorough cleaning.
- Silicone spatula or kitchen tongs: Heat-resistant tongs turn the chicken while a silicone spatula helps coat each piece in sauce. Choose tools rated for at least 450°F.
- Instant-read food thermometer: A digital thermometer checks that the largest chicken pieces reach 165°F. Choose a thin probe with a quick response for accurate readings.
- Measuring cups and spoons: Standard measuring cups and spoons keep the soy sauce and honey ratio consistent. Choose clearly marked sizes because excess soy sauce can make the glaze too salty.
How to Make It
Step 1: Cut the Chicken into Bite-Sized Pieces
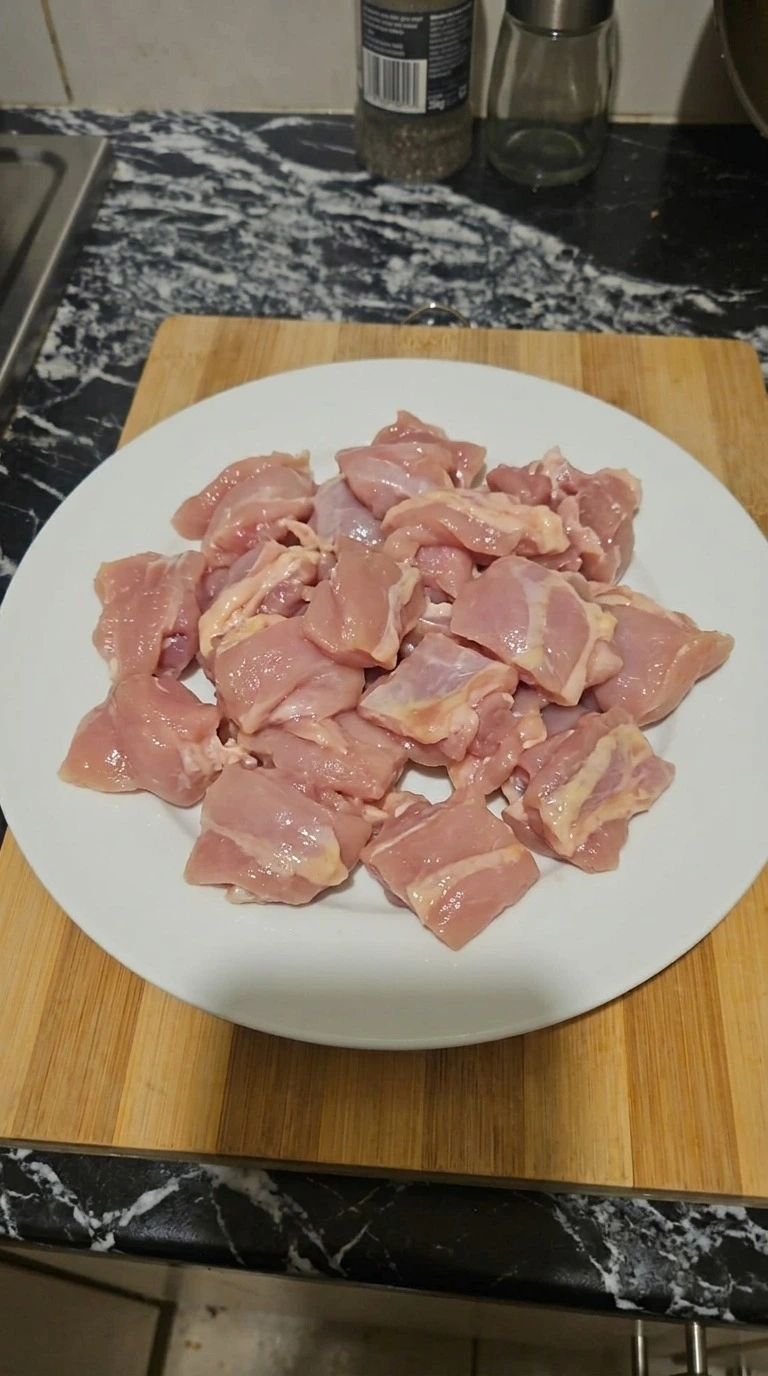
Start with 1. 5 pounds of boneless skinless chicken thighs and pat them dry with paper towels. Then cut the meat into roughly 1-inch pieces with a sharp knife. Keep the chunks close in size but don’t worry if some are a little uneven.
Those smaller edges will turn golden when they hit the hot pan. Trim away any large pieces of fat while leaving a little behind for flavor. Set the cut chicken on a clean plate and keep it chilled if you aren’t cooking right away. This should take about 5 minutes.
Next, check that the pieces look pale pink and feel slightly tacky rather than wet. If they’re dripping with moisture, pat them once more. Too much water makes them steam instead of sear. Keep the chicken refrigerated at 40°F or below until cooking because cold storage limits bacterial growth.
Tip: Choose thighs with a little natural fat instead of heavily trimmed pieces. That extra fat helps the chicken stay juicy during the hot sear.
Step 2: Whisk the Ginger Garlic Teriyaki Sauce

Pour 1/3 cup of regular soy sauce into a medium mixing bowl and add 1/4 cup of honey. Next, add 2 tablespoons of unseasoned rice vinegar and 1 teaspoon of toasted sesame oil. Finely mince 3 garlic cloves and grate 1 tablespoon of fresh ginger before adding both to the bowl. Whisk for about 60 to 90 seconds until the honey blends into the soy sauce and the mixture looks smooth.
In a separate small bowl, mix 1 tablespoon of cornstarch with 2 tablespoons of cold water until no dry lumps remain. Keep this slurry aside for the last stage. The sauce should look dark brown and fluid with tiny flecks of ginger and garlic floating throughout. It won’t be thick yet.
That’s normal. If the honey stays in a sticky lump, the glaze will taste uneven. Mixing at room temperature helps the honey blend without heating the sauce too soon.
Tip: Use unseasoned rice vinegar rather than seasoned rice vinegar. The seasoned kind contains added sugar and salt that can throw off the glaze.
Step 3: Sear the Chicken Until Golden
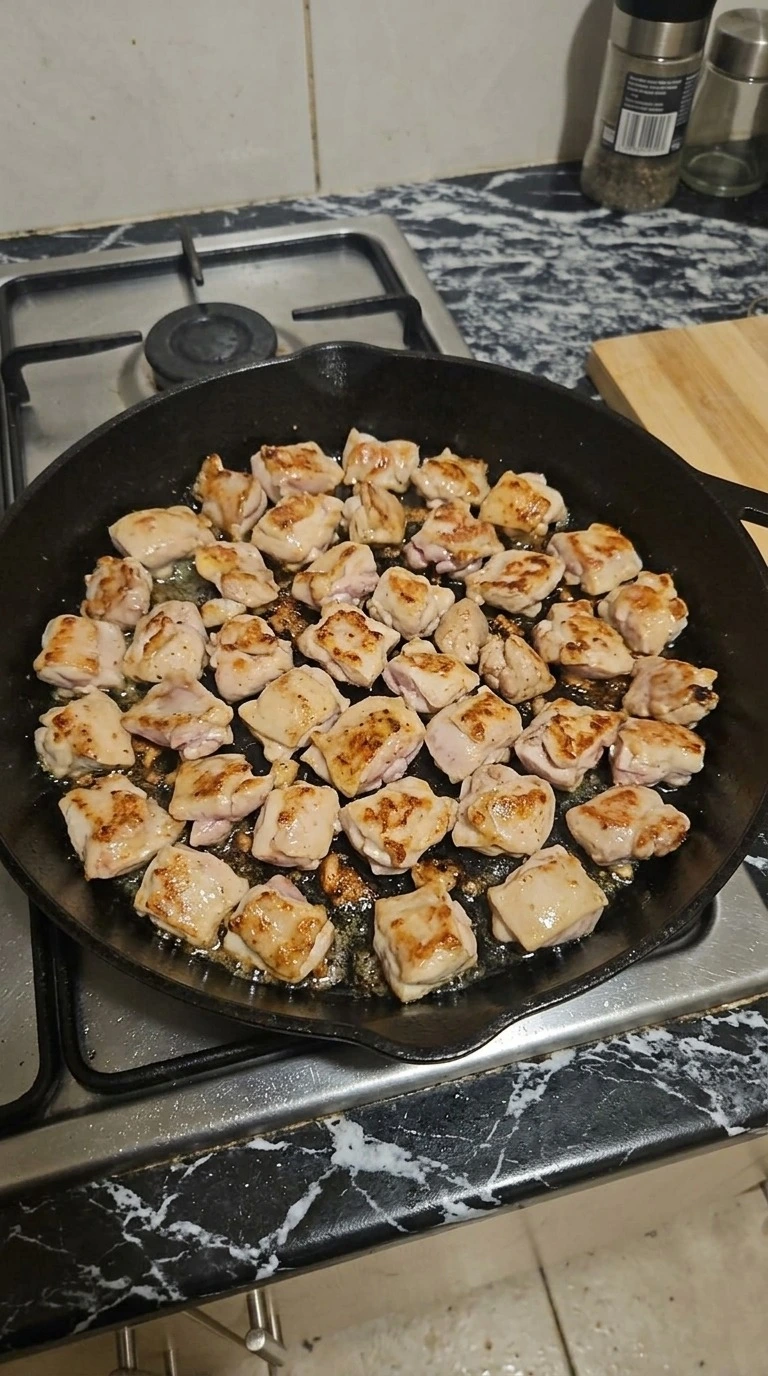
Set a 12-inch cast iron skillet over medium-high heat and let it reach about 400°F at the cooking surface. Add 1 tablespoon of avocado oil and swirl it across the base. Next, place the cut chicken into the skillet in a loose single layer. Work in two batches if the pieces won’t fit without crowding.
Let the first side sear undisturbed for 2 to 3 minutes before turning each piece. Then cook for another 3 to 4 minutes while turning the chunks to expose their pale sides. Aim for deep golden patches without burning the edges. You’ll hear a steady sizzle as the meat browns.
The outside should look golden while the thickest pieces approach 165°F in the center. Don’t rush the sear. Crowding traps moisture and leaves the meat gray. This high heat builds the browned crust that gives the glaze more flavor.
Tip: If the pan develops dark sticky spots before the chicken browns, lower the heat slightly and remove any burnt residue between batches.
Step 4: Simmer the Chicken in the Sticky Teriyaki Glaze

Lower the skillet to medium-low heat at about 300°F on the cooking surface. Pour the prepared soy and honey mixture over the seared chicken and turn the pieces to coat them. Let the sauce bubble gently for 3 to 4 minutes while stirring every 30 seconds. Then stir the cornstarch slurry once more and pour it into the simmering liquid.
Keep turning the chicken for another 1 to 2 minutes as the glaze becomes thick and glossy. Check the largest piece with a food thermometer. It must reach 165°F before serving. The sauce should cling to each piece instead of running straight off.
You’ll smell warm garlic and ginger as the glaze thickens. (I found that adding the sauce too early made the honey darken before the meat had a good crust. ) Don’t let it boil hard or the sugars may scorch. Gentle heat thickens the starch without burning the glaze.
Tip: If the glaze becomes thicker than you like, loosen it with 1 tablespoon of water at a time until it flows slowly around the chicken.
Step 5: Plate the Chicken and Add the Fresh Garnish

Turn off the heat once the chicken reaches 165°F and let the glaze settle for 2 minutes. Meanwhile, thinly slice 2 green onions and measure 2 teaspoons of toasted white sesame seeds. Transfer one quarter of the glazed chicken to a white serving plate and spoon about 1 tablespoon of the sauce over it. Spread the pieces into a loose pile instead of stacking them tightly.
Then add one quarter of the sliced onions and sesame seeds. Serve the remaining portions the same way. The glaze will thicken slightly as the chicken rests. The finished pieces should have dark golden edges and a rich brown coating with small green and white flecks on top.
Cut one larger piece to reveal a fully opaque and juicy center. Don’t leave the chicken in a hot skillet for too long after cooking. A brief rest keeps the meat juicy and stops the glaze from turning too sticky.
Tip: Serve each portion with warm jasmine rice or steamed broccoli. Spoon any remaining glaze over the rice just before eating.
Pro Tips
- Pat the chicken dry before searing because surface moisture slows browning. Give the pieces 2 to 3 minutes undisturbed on their first side.
- Choose boneless skinless chicken thighs with a little visible fat. That fat helps the 1-inch pieces stay tender during the hot sear.
- Use a heavy 12-inch skillet and avoid piling the meat into one crowded layer. Cook in two batches if the pieces overlap.
- Mix the sauce up to 24 hours ahead and refrigerate it in a sealed container. Keep the cornstarch slurry separate until cooking.
- Don’t add the honey-based sauce while the skillet is near 400°F. Lower the heat first because the sugars can scorch before the glaze thickens.
- For deeper ginger flavor, grate 1 tablespoon of fresh ginger just before mixing the sauce. Fresh ginger gives a brighter aroma than dried powder.
- Check the largest chicken chunk with a thermometer and stop cooking once it reaches 165°F. Small pieces can dry out if you keep simmering them.
- Finish each serving with a little of the remaining glaze and 1/2 teaspoon of toasted white sesame seeds. Add the green onions last for a fresh bite.
- For spicy teriyaki chicken, add 1 to 2 teaspoons of sriracha to the soy and honey mixture before cooking for a gentle heat.
- For a citrus version, stir 1 tablespoon of fresh orange juice and 1/2 teaspoon of finely grated orange zest into the glaze. Reduce the water in the slurry by 1 tablespoon to offset the extra juice.
- For a gluten-free dinner, replace regular soy sauce with 1/3 cup of certified gluten-free tamari and serve the chicken over jasmine rice with steamed broccoli.
- For teriyaki chicken and vegetables, sauté 1 cup of broccoli florets and 1 sliced red bell pepper separately for 4 to 6 minutes. Fold them into the finished glaze just before serving.
Substitutions & Variations
- Regular soy sauce: Use 1/3 cup of certified gluten-free tamari instead. Tamari gives the glaze a rich savory flavor with slightly less sharpness. Choose certified gluten-free tamari if needed and check the other packaged ingredients for gluten. If you’re looking for another chicken dinner, try our Sheet Pan Chicken Thighs and Veggies for Busy Weeknights.
- Boneless skinless chicken thighs: Replace 1.5 pounds of chicken thighs with 1.5 pounds of boneless skinless chicken breast. Chicken breast gives you leaner pieces with a firmer bite. Cut them into 1-inch chunks and start checking the center after 4 minutes of searing. Cook to 165°F and avoid extra simmering because breast meat dries out faster.
- Honey: Replace 1/4 cup of honey with 1/4 cup of pure maple syrup. Maple syrup keeps the sauce dairy-free and egg-free while adding a mild caramel flavor. The glaze may seem thinner at first, so let it simmer for an extra 30 to 60 seconds after adding the cornstarch slurry. Use maple syrup for a honey-free version.
- Unseasoned rice vinegar: Use 2 tablespoons of apple cider vinegar instead. Apple cider vinegar has a sharper fruit flavor but still balances the honey. Keep the same amount and don’t use seasoned rice vinegar without reducing the added sweetness. The finished glaze will taste slightly tangier.
- Cornstarch: Replace 1 tablespoon of cornstarch with 2 teaspoons of arrowroot starch. Mix the arrowroot with the same 2 tablespoons of cold water. It creates a glossy sauce but can turn thin if boiled too long. Add it near the end and simmer gently for 30 to 60 seconds until the glaze clings to the chicken.
Storage Instructions
Let your Teriyaki Chicken cool briefly and transfer leftovers into shallow airtight containers within 2 hours of cooking. Store them in the refrigerator at 40°F or colder for 3 to 4 days. Keep a little of the glaze with each portion because it helps protect the chicken from drying out. You can also freeze individual portions in freezer-safe containers or tightly sealed freezer bags for up to 3 months.
Press excess air out of the bags and label them with the date. For the best texture, thaw frozen portions overnight in the refrigerator instead of leaving them on the counter. To reheat, place the chicken in a skillet over medium-low heat with 1 to 2 tablespoons of water. Cover and warm for 4 to 6 minutes while stirring until the center reaches 165°F.
You can also microwave a portion in a covered microwave-safe dish in 30-second intervals and stir between rounds. Discard leftovers that develop a sour smell or slimy texture, and don’t taste questionable food to check whether it’s safe.
Teriyaki Chicken
Ingredients
Method
- Start with 1.5 pounds of boneless skinless chicken thighs and pat them dry with paper towels. Then cut the meat into roughly 1-inch pieces with a sharp knife. Keep the chunks close in size but don’t worry if some are a little uneven. Those smaller edges will turn golden when they hit the hot pan. Trim away any large pieces of fat while leaving a little behind for flavor. Set the cut chicken on a clean plate and keep it chilled if you aren’t cooking right away. This should take about 5 minutes. Next, check that the pieces look pale pink and feel slightly tacky rather than wet. If they’re dripping with moisture, pat them once more. Too much water makes them steam instead of sear. Keep the chicken refrigerated at 40°F or below until cooking because cold storage limits bacterial growth.

- Pour 1/3 cup of regular soy sauce into a medium mixing bowl and add 1/4 cup of honey. Next, add 2 tablespoons of unseasoned rice vinegar and 1 teaspoon of toasted sesame oil. Finely mince 3 garlic cloves and grate 1 tablespoon of fresh ginger before adding both to the bowl. Whisk for about 60 to 90 seconds until the honey blends into the soy sauce and the mixture looks smooth. In a separate small bowl, mix 1 tablespoon of cornstarch with 2 tablespoons of cold water until no dry lumps remain. Keep this slurry aside for the last stage. The sauce should look dark brown and fluid with tiny flecks of ginger and garlic floating throughout. It won’t be thick yet. That’s normal. If the honey stays in a sticky lump, the glaze will taste uneven. Mixing at room temperature helps the honey blend without heating the sauce too soon.

- Set a 12-inch cast iron skillet over medium-high heat and let it reach about 400°F at the cooking surface. Add 1 tablespoon of avocado oil and swirl it across the base. Next, place the cut chicken into the skillet in a loose single layer. Work in two batches if the pieces won’t fit without crowding. Let the first side sear undisturbed for 2 to 3 minutes before turning each piece. Then cook for another 3 to 4 minutes while turning the chunks to expose their pale sides. Aim for deep golden patches without burning the edges. You’ll hear a steady sizzle as the meat browns. The outside should look golden while the thickest pieces approach 165°F in the center. Don’t rush the sear. Crowding traps moisture and leaves the meat gray. This high heat builds the browned crust that gives the glaze more flavor.

- Lower the skillet to medium-low heat at about 300°F on the cooking surface. Pour the prepared soy and honey mixture over the seared chicken and turn the pieces to coat them. Let the sauce bubble gently for 3 to 4 minutes while stirring every 30 seconds. Then stir the cornstarch slurry once more and pour it into the simmering liquid. Keep turning the chicken for another 1 to 2 minutes as the glaze becomes thick and glossy. Check the largest piece with a food thermometer. It must reach 165°F before serving. The sauce should cling to each piece instead of running straight off. You’ll smell warm garlic and ginger as the glaze thickens. (I found that adding the sauce too early made the honey darken before the meat had a good crust.) Don’t let it boil hard or the sugars may scorch. Gentle heat thickens the starch without burning the glaze.

- Turn off the heat once the chicken reaches 165°F and let the glaze settle for 2 minutes. Meanwhile, thinly slice 2 green onions and measure 2 teaspoons of toasted white sesame seeds. Transfer one quarter of the glazed chicken to a white serving plate and spoon about 1 tablespoon of the sauce over it. Spread the pieces into a loose pile instead of stacking them tightly. Then add one quarter of the sliced onions and sesame seeds. Serve the remaining portions the same way. The glaze will thicken slightly as the chicken rests. The finished pieces should have dark golden edges and a rich brown coating with small green and white flecks on top. Cut one larger piece to reveal a fully opaque and juicy center. Don’t leave the chicken in a hot skillet for too long after cooking. A brief rest keeps the meat juicy and stops the glaze from turning too sticky.

Notes
Frequently Asked Questions
Yes! You can cut the chicken and mix the sauce up to 24 hours before cooking. Keep them in separate sealed containers in the refrigerator at 40°F or colder. When you’re ready for dinner, sear the meat in a hot skillet and add the glaze near the end. This keeps the sauce from thickening too early and gives you fresher golden edges.
Store leftovers in a shallow airtight container in the refrigerator for 3 to 4 days. Refrigerate the chicken within 2 hours of cooking or within 1 hour if the room is above 90°F. The sauce may turn thicker as it cools because the cornstarch continues to set. Add a small splash of water when reheating to bring back its smooth texture.
Yes, but the flavor will change. Replace the 1/3 cup of regular soy sauce with the same amount of coconut aminos for a soy-free option. Coconut aminos taste sweeter and less salty, so reduce the honey from 1/4 cup to 3 tablespoons. Taste the sauce before adding it to the chicken and adjust the sweetness if needed.
The sauce may stay thin if the cornstarch slurry wasn’t mixed well or the glaze didn’t simmer long enough. Stir 1 teaspoon of cornstarch into 1 tablespoon of cold water and add it to the bubbling sauce. Cook gently for another 1 to 2 minutes while stirring. Don’t add dry cornstarch straight into the skillet because it can form lumps.
Absolutely! Use 3 pounds of boneless skinless chicken thighs and double every sauce ingredient. You’ll get about 8 servings instead of 4. Sear the meat in several batches using the same 12-inch skillet because crowding creates steam instead of a golden crust. Once all the chicken reaches 165°F, combine it with the doubled glaze in a large pan.
Warm jasmine rice is my favorite because it absorbs the extra glaze without competing with the ginger and garlic. Plan on about 3/4 cup of cooked rice per person and add steamed broccoli or snap peas. You can also serve the chicken over brown rice for a nuttier flavor. Finish with green onions and toasted sesame seeds just before eating.
Yes! Let the chicken cool promptly and divide it into individual freezer-safe containers with some glaze in each portion. Freeze for up to 3 months for the best texture. Thaw overnight in the refrigerator and reheat gently with 1 to 2 tablespoons of water. Make sure the center reaches 165°F before serving because the sauce can heat faster than the meat.
Final Thoughts
The first time that glossy sauce clung to the chicken, I knew this Teriyaki Chicken would become a regular dinner at our house. I used to think a good teriyaki chicken recipe needed hours of marinating, but this easy teriyaki chicken gets so much flavor from a quick sear and a few simple ingredients.
It’s one of those meals that makes me excited about cooking even after a busy day. If you try it, leave me a comment below because I love hearing how your dinners turn out!
Teriyaki gets its name from two Japanese words. Teri refers to the glossy shine of the sauce while yaki describes grilling or cooking over heat. Traditional Japanese teriyaki often uses soy sauce and mirin with sugar or sake. This homemade version uses honey and rice vinegar for a similar sweet and savory balance. That sticky finish isn’t just for looks. It’s part of what makes teriyaki so recognizable.