Garlic Butter Lobster Tails
Holiday dinners always make me think about serving something a little more special, and Garlic Butter Lobster Tails are one recipe I really wanted to share. I’ve made plenty of chicken and beef dinners for the blog, but lobster deserves a spot too. It looks like something you’d order at a nice seafood restaurant, yet you don’t need much time to make it at home. This recipe takes inspiration from classic seafood cooking and keeps things simple with fresh garlic, melted butter and lemon. If you’ve never cooked lobster before, these easy garlic butter lobster tails are a good place to start because the oven handles most of the work.
And if you already love buttery seafood, you might also enjoy my Garlic Butter Shrimp Pasta for another dinner with that rich garlic flavor. When people think about lobster tails, they often picture an expensive holiday meal or a dish that’s too hard to make without restaurant equipment. But it’s much easier than it looks. The main thing is knowing how to cut the shell and when to stop cooking so the meat stays soft instead of turning rubbery. That’s where this garlic butter lobster tails recipe makes a difference.
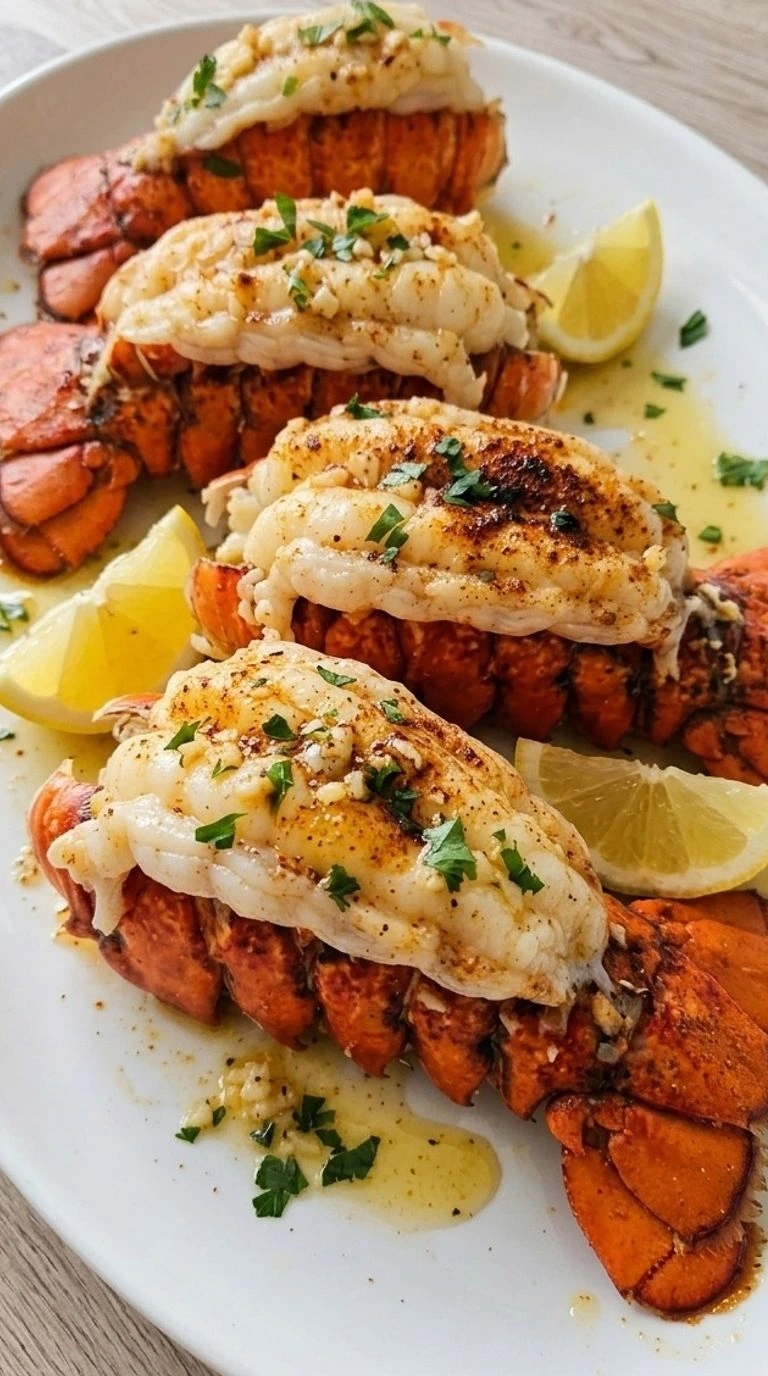
I especially like serving this dish for Christmas dinner when I want something that feels festive without spending hours in the kitchen. The garlic smells wonderful as the butter warms, and the lemon keeps everything from tasting too heavy. It’s a lovely choice for a family meal or a quiet holiday dinner for two couples. Plus, the bright red shells make the whole plate look beautiful without much effort.
Why This Recipe Works
The Science Behind It starts with how lobster meat reacts to heat. At 425°F, the shell heats up fast while the raised meat cooks from the hot air around it. Pulling the meat above the shell helps it cook more evenly and gives the butter more surface to cling to.
The goal is 145°F in the thickest part because too much heat makes lobster proteins tighten and lose their soft texture. Garlic also needs a little care. Letting it soften in melted butter over low heat draws out its flavor without turning it bitter.
Then the lemon cuts through the richness and makes the lobster taste sweeter.
Ingredients
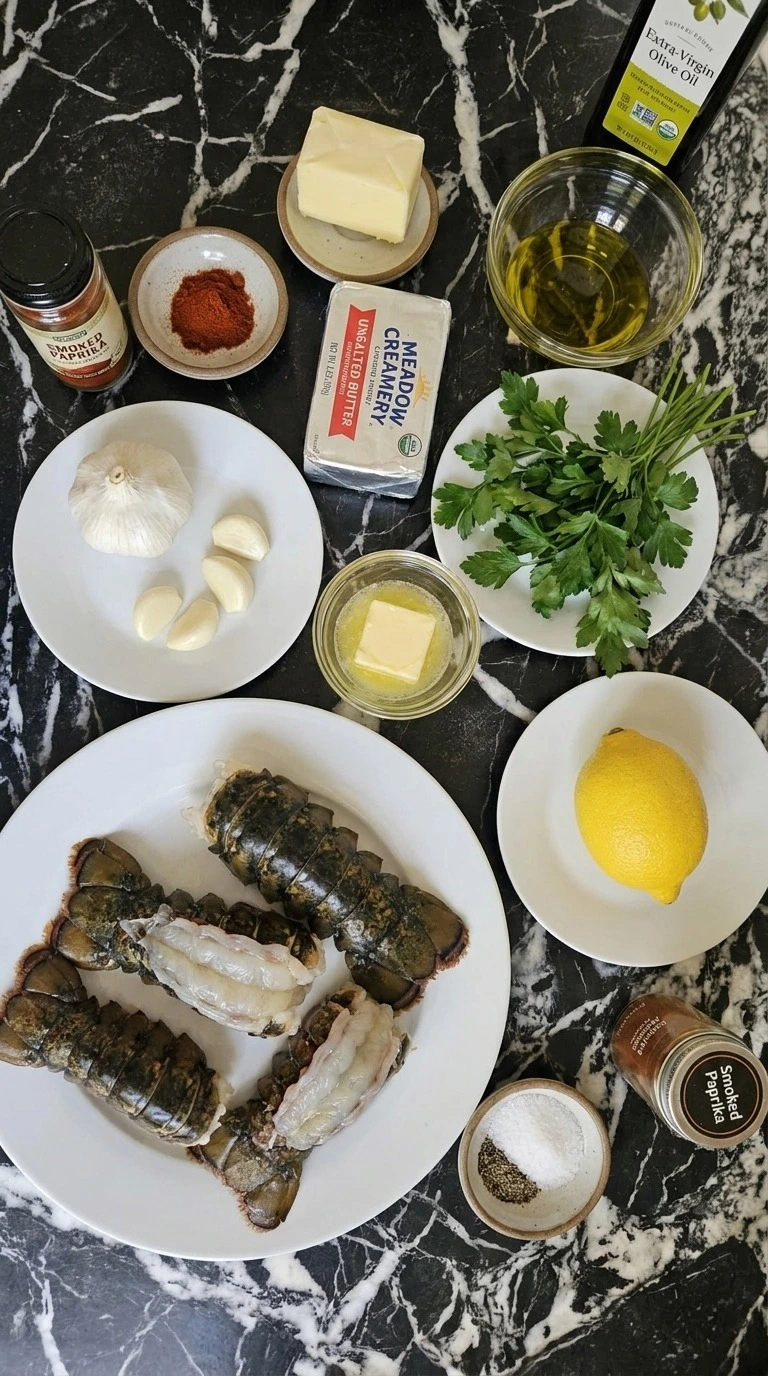
- Cold-water lobster tails: Fully thawed and kept cold before cooking. Cut each upper shell lengthwise and lift the meat above the shell while keeping it attached at the fan.
- Unsalted butter: Melted gently to create the rich garlic sauce. Reserve about 2 tablespoons of the finished mixture for serving.
- Fresh garlic cloves: Peeled and finely minced so they soften quickly and spread through the butter without leaving large pieces.
- Fresh lemon: Juice enough to measure 1 tablespoon for the butter sauce and cut the remaining lemon into 4 wedges for serving.
- Smoked paprika: Stirred into the melted butter for a mild smoky flavor and a warm orange-gold color.
- Fine sea salt: Mixed into the garlic butter to season the sweet lobster meat without overpowering its natural flavor.
- Black pepper: Freshly ground and mixed into the butter for a gentle peppery finish.
- Extra-virgin olive oil: Lightly brushed over the raw lobster meat before adding garlic butter to help spread the coating across the surface.
- Fresh flat-leaf parsley: Finely chopped and stirred into the reserved garlic butter after baking for a fresh herbal finish and a little green color.
Kitchen Equipment
- Kitchen shears: Use sturdy food-safe shears with sharp stainless steel blades to cut the hard lobster shells without tearing the meat. A weak pair of household scissors may bend or slip.
- Rimmed baking sheet: A heavy 13 by 18 inch metal baking sheet holds four tails with space between them and catches melted butter. A thin or rimless tray can warp or allow the sauce to spill.
- Parchment paper: Use oven-safe parchment rated for at least 425°F to keep the garlic butter from sticking to the baking sheet. Avoid wax paper because it isn’t safe for oven baking.
- Small saucepan: A heavy-bottomed 1-quart saucepan melts the butter gently and gives the garlic enough room to cook without scorching. A thin pan needs closer attention because it develops hot spots.
- Silicone spatula: Choose a heat-safe spatula rated above 425°F to move the minced garlic through the melted butter. A rigid spoon works too but may leave small bits of garlic on the pan bottom.
- Pastry brush: A 1 to 2 inch silicone pastry brush spreads the butter across the raised lobster meat and into its folds. A small spoon works if you don’t have one but gives less even coverage.
- Instant-read thermometer: A digital thermometer with a narrow probe checks the thickest part of the lobster without touching the shell. Choose one that reads within a few seconds because slow readings can lead to overcooking.
- Four white dinner plates: Use plates around 10 to 11 inches wide so each lobster tail has room for its lemon wedge and sauce. Smaller plates may let the butter run over the rim.
How to Make It
Step 1: Cut and butterfly the lobster tails
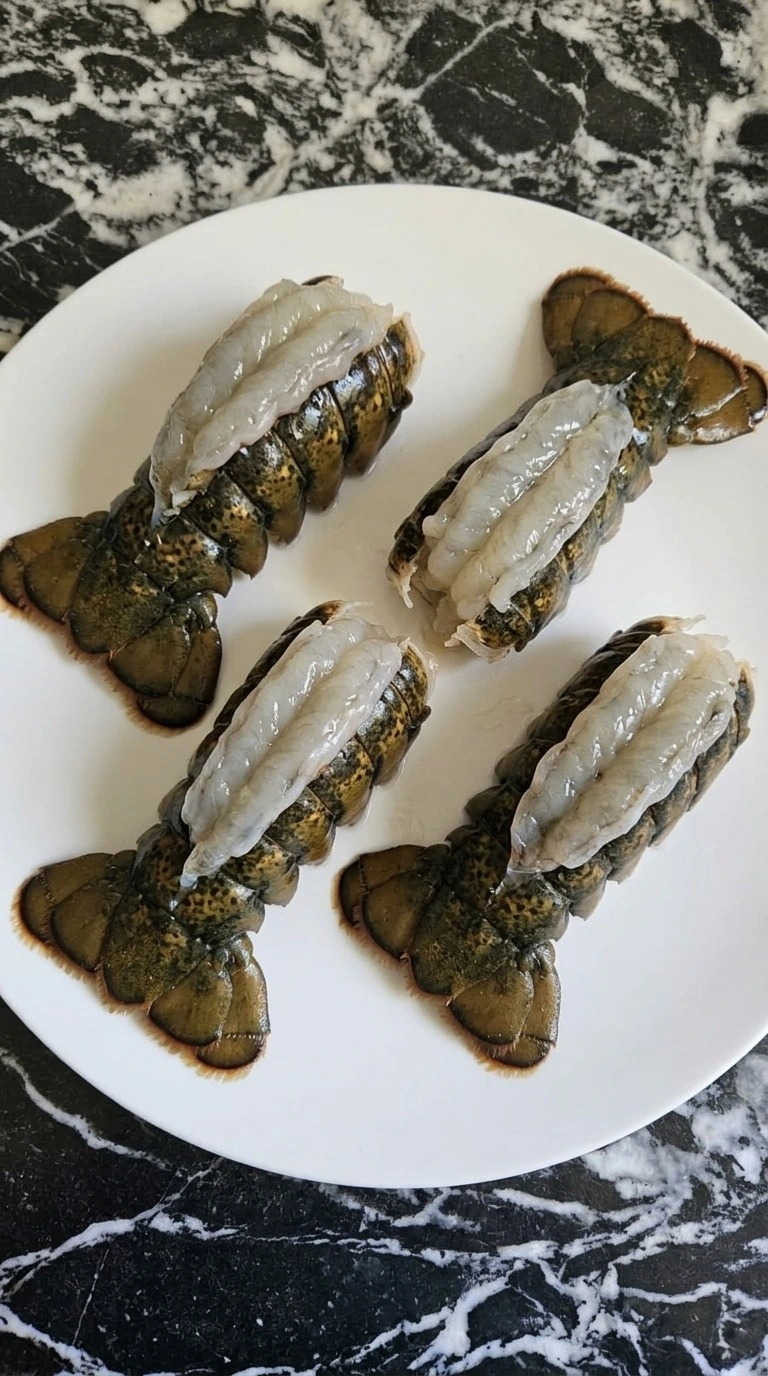
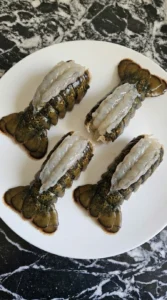
Start with 4 fully thawed cold-water lobster tails that each weigh about 5 to 6 ounces. Keep the shells facing up and use kitchen shears to cut down the center of each hard upper shell. Stop just before the tail fan. Then gently spread the shell apart with your fingers and loosen the meat from the sides while keeping it attached at the tail end.
Lift the meat through the opening and rest it on top of its shell. This should take about 5 to 7 minutes for all four tails. Work with the lobster cold at 40°F or below until it’s time to bake. Next, check that the flesh sits above the shell without tearing into small pieces.
You’ll see pale translucent meat with a smooth and slightly wet surface. Don’t force the shell too far apart or it may split at the base. The tail fan should still hold the meat in place. Keep the meat attached because the shell supports it while it cooks.
Tip: Choose tails close to the same weight, ideally within 1 ounce of each other, so you won’t have to remove one much earlier than another.
Step 2: Melt the butter and stir in fresh garlic
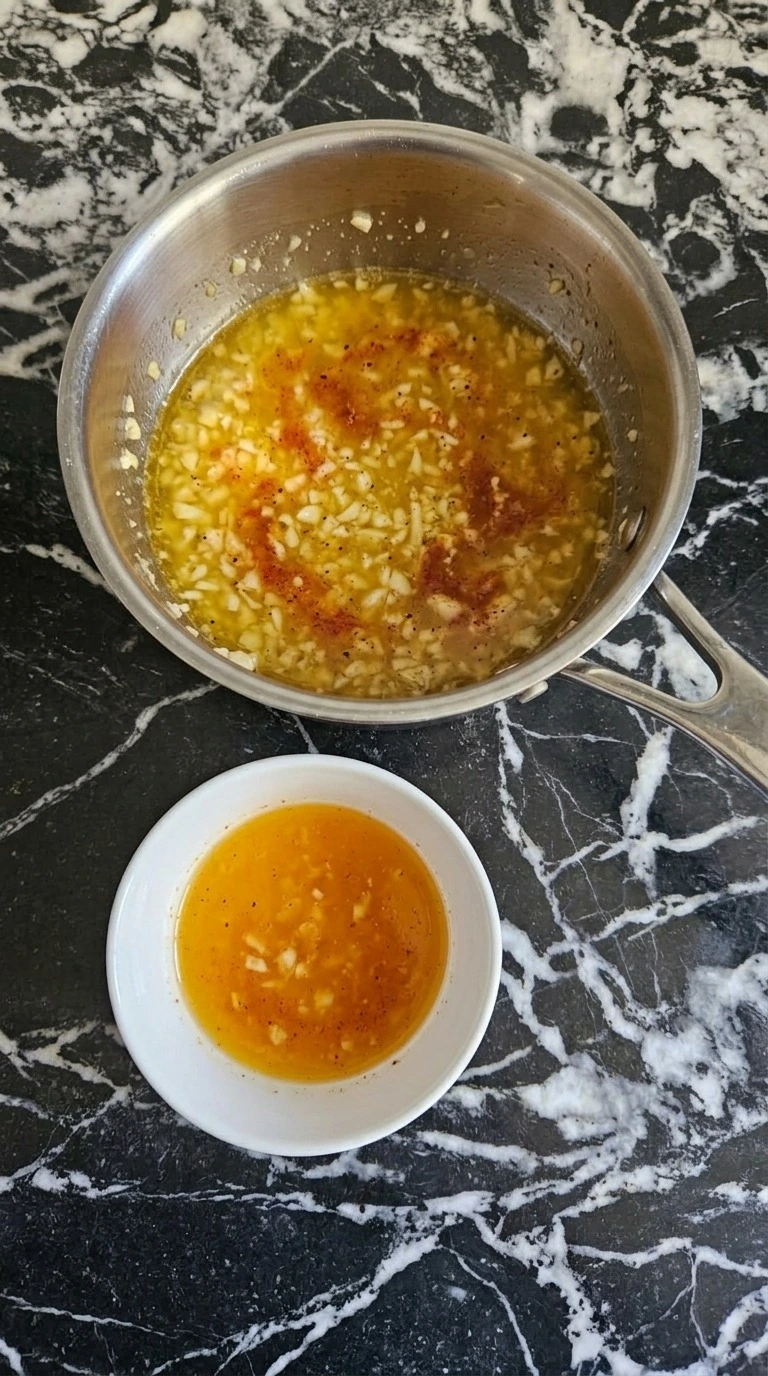
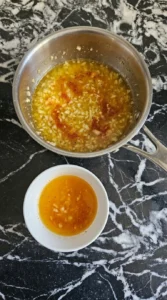
Place 6 tablespoons of unsalted butter in a small saucepan and set it over medium-low heat. Aim for a gentle heat of about 3 on a 10-setting dial. Let the butter melt for 2 to 3 minutes and then add 4 finely minced garlic cloves. Stir with a silicone spatula for 30 to 60 seconds until the garlic smells sweet and fragrant.
Remove the pan from the heat and mix in 1 tablespoon of fresh lemon juice, 1 teaspoon of smoked paprika, 1/2 teaspoon of fine sea salt and 1/4 teaspoon of freshly ground black pepper. Reserve about 2 tablespoons of the mixture in a separate clean bowl for serving. You’ll see tiny garlic pieces floating through the golden butter and the paprika will turn it a light orange color. The garlic should stay pale.
If it turns dark brown, the sauce can taste bitter. (I prefer adding the lemon off the heat because the flavor stays brighter. ) Use gentle heat because browned garlic can overpower the sweet lobster.
Tip: Mince the garlic into pieces about 1/8 inch wide so it spreads evenly across the lobster instead of gathering in large clumps.
Step 3: Brush the lobster meat with garlic butter
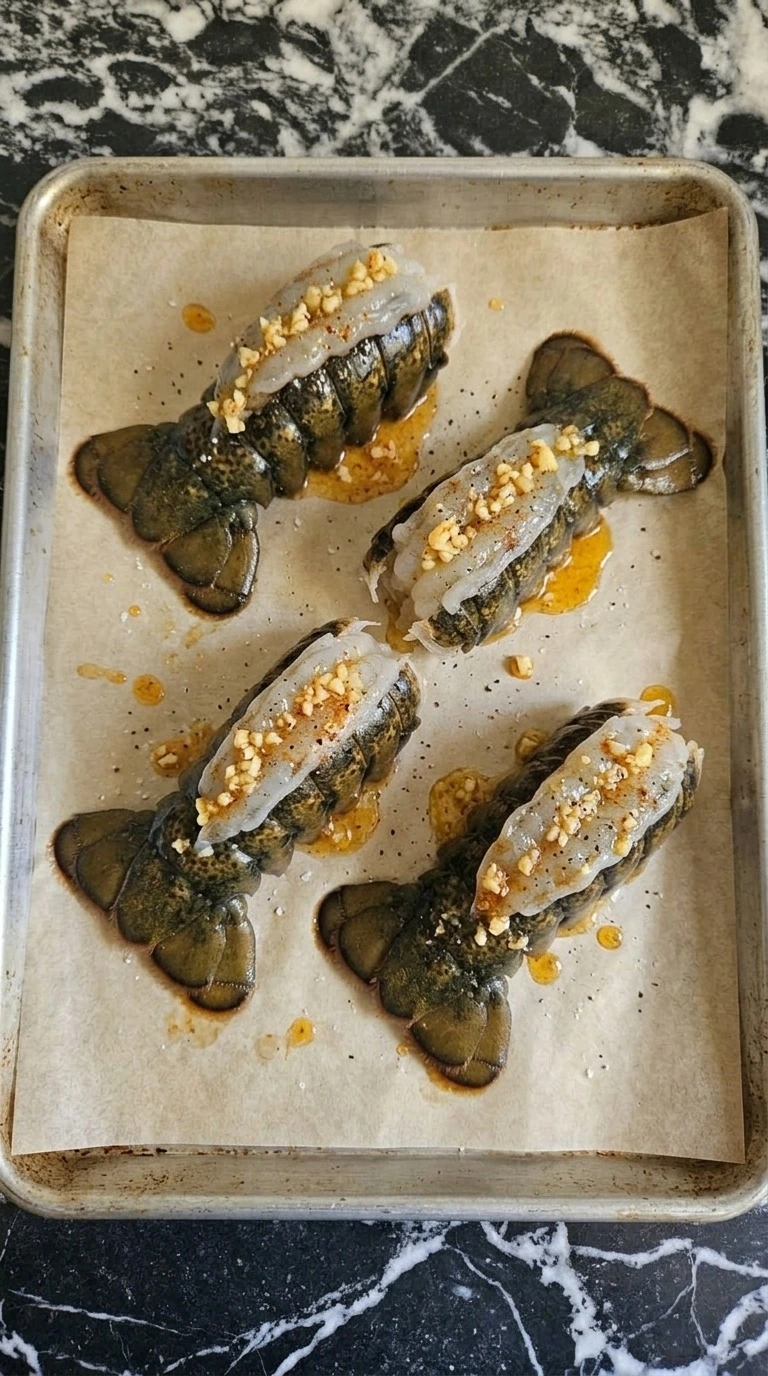
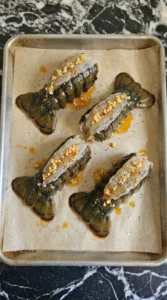
Set the oven to 425°F and line a rimmed baking sheet with parchment paper. Arrange the 4 butterflied lobster tails with a little room between their shells. Brush 1 tablespoon of extra-virgin olive oil lightly over the exposed meat. Then spoon or brush the warm garlic butter mixture over each tail while keeping the reserved serving butter separate.
Make sure the garlic reaches the deeper folds of the meat. This should take about 2 to 3 minutes once the tails are on the baking sheet. Keep the shells open so the heat can reach the thickest part of the lobster. At this stage, the pale meat will have a shiny orange-gold coating and small bits of garlic along its edges.
Some butter will collect inside the shells. That’s normal. But don’t pour so much in one spot that the garlic slides off the meat. Spread the coating evenly because exposed patches can dry faster in the oven.
Tip: Leave about 1 inch between neighboring shells on the baking sheet so hot air can reach their sides without crowding.
Step 4: Bake the lobster until the meat turns opaque
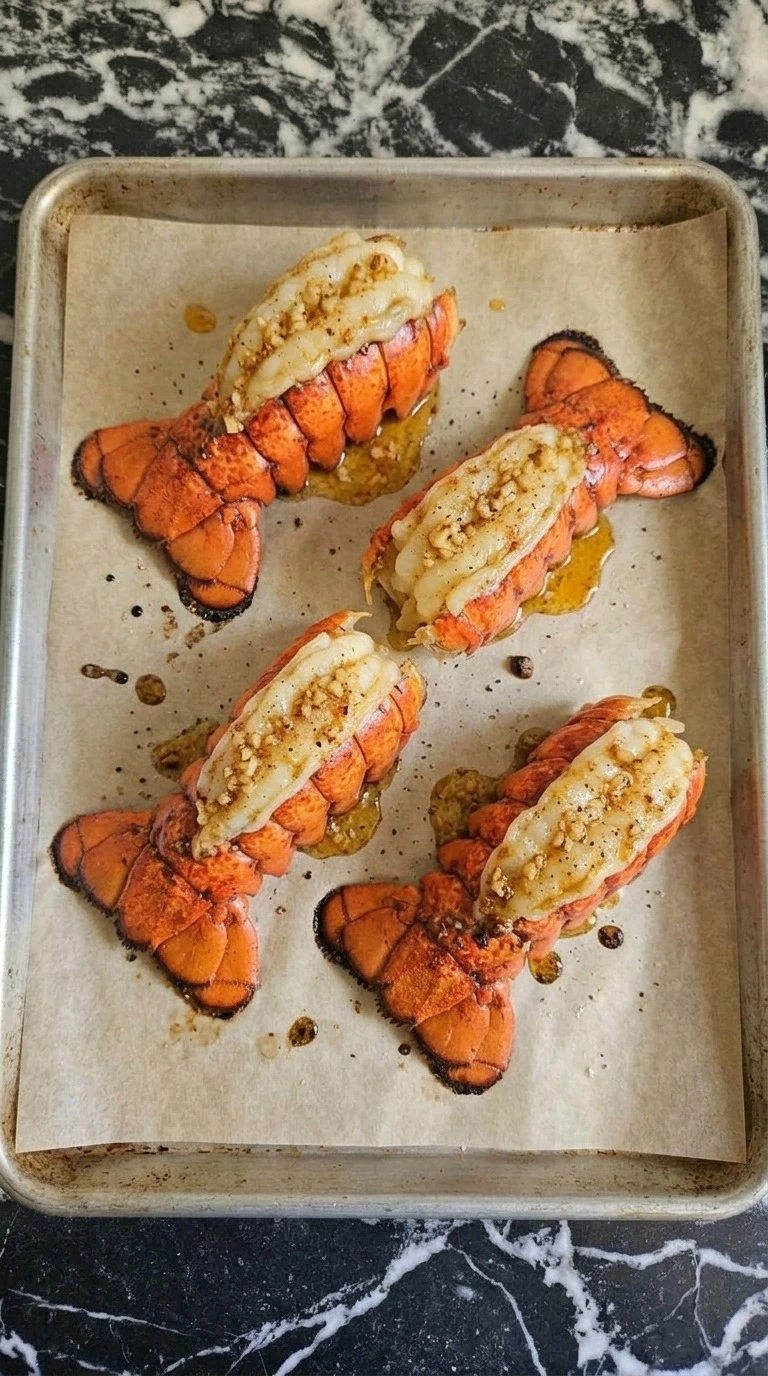
Slide the baking sheet onto the middle rack of the 425°F oven. Bake the 4 lobster tails for about 10 to 14 minutes depending on their thickness. At minute 9, check the thickest piece with an instant-read thermometer by placing the probe into the center of the meat without touching the shell. Keep baking until the center reaches 145°F.
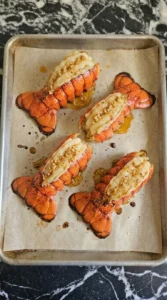
If one tail reaches that temperature first, remove it and let the others finish. The shells will turn bright orange-red as the pale meat becomes firm and opaque. Don’t keep baking just to make every edge deeply brown because lobster can turn tough fast. You’ll notice a buttery garlic smell and a few golden spots along the exposed ridges.
The meat should look solid white instead of glassy. If the center still looks translucent, check its temperature again after another minute or two. Stop at 145°F because extra oven time makes the meat dry and chewy.
Tip: Place the thermometer probe through the thickest side of the lobster rather than straight down from the top to avoid a false shell reading.
Step 5: Finish with lemon butter and serve
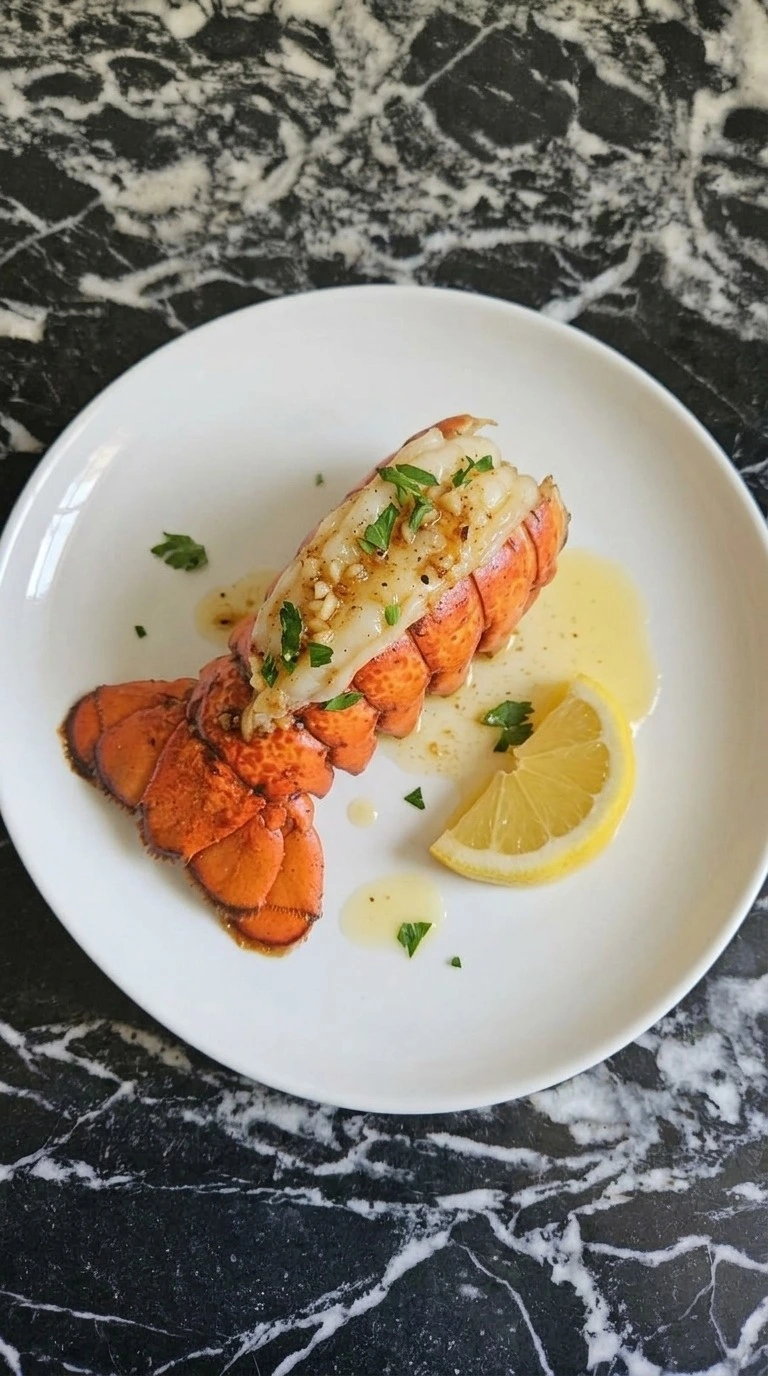
Remove the baking sheet from the oven and leave the lobster undisturbed for 2 minutes. Meanwhile, stir 2 tablespoons of freshly chopped flat-leaf parsley into the reserved garlic butter. Move one tail onto each of 4 white dinner plates and spoon a little of that warm butter over the exposed meat. Cut the remaining lemon into 4 wedges and place one beside each tail.
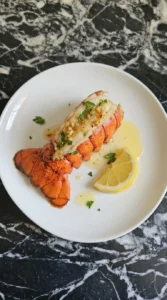
The garlic butter lobster tails should have bright shells and a soft center with just a little golden color around the edges. Serve while the butter is still fluid and the lobster is warm. Now the meat looks glossy with fresh green parsley scattered over the top. A few drops of lemon juice will bring out the sweet flavor.
Don’t leave the lobster on the hot baking sheet for another 10 minutes or the carryover heat may make the texture firmer. Serve soon because lobster tastes best before its butter cools and thickens.
Tip: Warm the serving plates to about 100°F before plating so the garlic butter stays fluid longer without further cooking the lobster.
Pro Tips
- Buy cold-water lobster tails weighing 5 to 6 ounces each and choose similar sizes. Matching weights help all four tails reach 145°F within a similar time.
- Thaw frozen lobster tails in the refrigerator for 12 to 24 hours before cooking. Don’t bake them while the thick center is still frozen because the outer meat can turn tough.
- Cut through the upper shell with kitchen shears but stop before the tail fan. Keeping that final section attached gives the raised meat support while it bakes.
- Use freshly minced garlic and warm it in butter for only 30 to 60 seconds. Remove it once it smells fragrant because dark garlic tastes bitter.
- Check the thickest part of each lobster tail with a narrow thermometer probe at minute 9. Don’t touch the shell because it can give a misleading reading.
- Keep about 1 inch between the four tails on a rimmed baking sheet. Crowding traps more moisture and can reduce the light golden color on the exposed meat.
- Reserve 2 tablespoons of garlic butter before brushing the raw lobster. Use a clean spoon for serving so the finishing sauce never contacts uncooked seafood.
- Add 2 tablespoons of freshly chopped flat-leaf parsley after baking and serve with lemon wedges. Fresh herbs and lemon balance the rich butter without covering the lobster’s sweetness.
- For a spicy garlic butter version, add 1/4 teaspoon of crushed red pepper flakes to the melted butter and finish each tail with a little extra fresh lemon juice.
- Make herb garlic butter lobster by replacing the smoked paprika with 1 teaspoon of fresh chopped thyme and 1 teaspoon of fresh chopped rosemary for a more earthy holiday flavor.
- For a dairy-free holiday dinner, replace the 6 tablespoons of unsalted butter with 6 tablespoons of dairy-free plant-based butter and follow the same baking method.
- Give the lobster a Cajun-style twist by replacing the smoked paprika with 1 teaspoon of salt-free Cajun seasoning and adding 1/8 teaspoon of cayenne pepper for extra warmth.
Substitutions & Variations
- Unsalted butter: Use 6 tablespoons of plant-based unsalted butter for a dairy-free version. Choose a firm plant-based butter with at least 75% fat for a rich sauce. It may release more water during baking and taste slightly less creamy. Check that the product is dairy-free.
- Fresh garlic cloves: Use 1 teaspoon of garlic powder instead of 4 fresh garlic cloves. Mix the powder into the melted butter off the heat rather than frying it. The sauce will taste milder and won’t have the little pieces of softened garlic that give this dish its homemade flavor. For another garlic butter dinner, try our Easy Lemon Garlic Butter Chicken Bites.
- Cold-water lobster tails: Use 4 warm-water lobster tails weighing 5 to 6 ounces each. Warm-water tails can work but their texture may be softer and their flavor less sweet. Look for firm flesh without gray spots or an ammonia smell. Keep the oven at 425°F and check each tail for 145°F internally rather than relying only on the clock.
- Smoked paprika: Replace 1 teaspoon of smoked paprika with 1 teaspoon of sweet Hungarian paprika. Sweet paprika keeps the orange-red color but removes the smoky edge. It’s a good option for a lighter holiday flavor. For an even milder version, use 1/2 teaspoon and let the lemon and garlic stand out.
- Fresh lemon: Use 1 tablespoon of bottled 100% lemon juice for the sauce and omit the fresh wedges. Bottled lemon juice gives the sauce acidity but lacks the bright aroma of fresh lemon. Start with 2 teaspoons and taste before adding the last teaspoon. This recipe is naturally gluten-free and egg-free when all packaged ingredients are verified.
Storage Instructions
Let leftover Garlic Butter Lobster Tails cool briefly and refrigerate them within 2 hours of cooking. Place the meat and shells in a shallow airtight container and keep the refrigerator at 40°F or below. For the best flavor and texture, enjoy them within 1 to 2 days. If you need longer storage, remove the meat from the shells and wrap it tightly before placing it in a freezer-safe container.
Freeze for up to 2 months for best quality. Thaw overnight in the refrigerator and don’t leave frozen lobster on the counter to defrost. To reheat, place the thawed lobster meat in a small covered baking dish with 1 teaspoon of fresh unsalted butter per tail. Warm at 275°F and begin checking after 8 minutes.
Continue only until the center reaches 165°F. Don’t use a very hot oven because the meat can become dry. If you notice a sour or ammonia-like smell, unusual discoloration or a slimy surface, throw the lobster away.
Garlic Butter Lobster Tails
Ingredients
Method
- Start with 4 fully thawed cold-water lobster tails that each weigh about 5 to 6 ounces. Keep the shells facing up and use kitchen shears to cut down the center of each hard upper shell. Stop just before the tail fan. Then gently spread the shell apart with your fingers and loosen the meat from the sides while keeping it attached at the tail end. Lift the meat through the opening and rest it on top of its shell. This should take about 5 to 7 minutes for all four tails. Work with the lobster cold at 40°F or below until it’s time to bake. Next, check that the flesh sits above the shell without tearing into small pieces. You’ll see pale translucent meat with a smooth and slightly wet surface. Don’t force the shell too far apart or it may split at the base. The tail fan should still hold the meat in place. Keep the meat attached because the shell supports it while it cooks.
- Place 6 tablespoons of unsalted butter in a small saucepan and set it over medium-low heat. Aim for a gentle heat of about 3 on a 10-setting dial. Let the butter melt for 2 to 3 minutes and then add 4 finely minced garlic cloves. Stir with a silicone spatula for 30 to 60 seconds until the garlic smells sweet and fragrant. Remove the pan from the heat and mix in 1 tablespoon of fresh lemon juice, 1 teaspoon of smoked paprika, 1/2 teaspoon of fine sea salt and 1/4 teaspoon of freshly ground black pepper. Reserve about 2 tablespoons of the mixture in a separate clean bowl for serving. You’ll see tiny garlic pieces floating through the golden butter and the paprika will turn it a light orange color. The garlic should stay pale. If it turns dark brown, the sauce can taste bitter. (I prefer adding the lemon off the heat because the flavor stays brighter.) Use gentle heat because browned garlic can overpower the sweet lobster.
- Set the oven to 425°F and line a rimmed baking sheet with parchment paper. Arrange the 4 butterflied lobster tails with a little room between their shells. Brush 1 tablespoon of extra-virgin olive oil lightly over the exposed meat. Then spoon or brush the warm garlic butter mixture over each tail while keeping the reserved serving butter separate. Make sure the garlic reaches the deeper folds of the meat. This should take about 2 to 3 minutes once the tails are on the baking sheet. Keep the shells open so the heat can reach the thickest part of the lobster. At this stage, the pale meat will have a shiny orange-gold coating and small bits of garlic along its edges. Some butter will collect inside the shells. That’s normal. But don’t pour so much in one spot that the garlic slides off the meat. Spread the coating evenly because exposed patches can dry faster in the oven.
- Slide the baking sheet onto the middle rack of the 425°F oven. Bake the 4 lobster tails for about 10 to 14 minutes depending on their thickness. At minute 9, check the thickest piece with an instant-read thermometer by placing the probe into the center of the meat without touching the shell. Keep baking until the center reaches 145°F. If one tail reaches that temperature first, remove it and let the others finish. The shells will turn bright orange-red as the pale meat becomes firm and opaque. Don’t keep baking just to make every edge deeply brown because lobster can turn tough fast. You’ll notice a buttery garlic smell and a few golden spots along the exposed ridges. The meat should look solid white instead of glassy. If the center still looks translucent, check its temperature again after another minute or two. Stop at 145°F because extra oven time makes the meat dry and chewy.
- Remove the baking sheet from the oven and leave the lobster undisturbed for 2 minutes. Meanwhile, stir 2 tablespoons of freshly chopped flat-leaf parsley into the reserved garlic butter. Move one tail onto each of 4 white dinner plates and spoon a little of that warm butter over the exposed meat. Cut the remaining lemon into 4 wedges and place one beside each tail. The garlic butter lobster tails should have bright shells and a soft center with just a little golden color around the edges. Serve while the butter is still fluid and the lobster is warm. Now the meat looks glossy with fresh green parsley scattered over the top. A few drops of lemon juice will bring out the sweet flavor. Don’t leave the lobster on the hot baking sheet for another 10 minutes or the carryover heat may make the texture firmer. Serve soon because lobster tastes best before its butter cools and thickens.
Notes
Frequently Asked Questions
Yes, you can butterfly the raw lobster tails up to 12 hours ahead and keep them covered in the refrigerator at 40°F or below. Mix the garlic butter separately and refrigerate it until needed. About 20 minutes before serving, coat the tails and bake at 425°F until the thickest part reaches 145°F. This way you’ll spend less time cooking while everyone is waiting for dinner.
Refrigerate leftover lobster within 2 hours of cooking and keep it in a sealed shallow container at 40°F or below. For the best texture, eat it within 1 to 2 days even though properly stored cooked seafood can often remain safe for 3 to 4 days. Don’t leave lobster sitting on the holiday table all evening. If it develops an ammonia smell or a slimy texture, discard it.
Yes. To make a dairy-free version, replace the 6 tablespoons of unsalted butter with the same amount of dairy-free plant-based butter. The sauce may be thinner but the garlic and lemon still give it plenty of flavor. The basic recipe contains no wheat or eggs, so it’s naturally gluten-free and egg-free when you use ingredients without cross-contact. Check packaged seasonings and butter substitutes if you’re cooking for someone with allergies.
Rubbery lobster usually means the meat spent too long under high heat. At 425°F, tails weighing 5 to 6 ounces often need about 10 to 14 minutes, but thickness makes a difference. Start checking at minute 9 and remove each tail once its thickest part reaches 145°F. The meat should look opaque and firm without becoming dry and tightly curled.
Absolutely. Use 8 lobster tails and double the sauce to 12 tablespoons of butter with 8 garlic cloves and 2 tablespoons of lemon juice. Spread the tails across two rimmed baking sheets with enough space between them. Bake at 425°F and rotate the sheets between oven racks halfway through if your oven heats unevenly. Check each tail separately because cooking times won’t necessarily increase when you double the quantity.
I like pairing the lobster with roasted vegetables and a simple side that catches the extra garlic butter. Our Garlic Parmesan Roasted Carrots are a good choice because their savory flavor works well with seafood. You could also serve 1/2 cup of cooked jasmine rice per person or add a fresh green salad. For a festive meal, plan one 5 to 6 ounce lobster tail for each guest.
Yes, although freshly baked lobster has a better texture. Remove the cooked meat from the shells and wrap individual portions tightly before placing them in a freezer-safe container for up to 2 months for best quality. Thaw overnight in the refrigerator. Reheat covered at 275°F with 1 teaspoon of fresh butter per tail until the meat reaches 165°F, checking after about 8 minutes. Don’t expect the same tender texture after freezing.
Final Thoughts
A dinner this special used to feel like something I’d only order at a restaurant. It would’ve saved me a lot of holiday stress if I’d known how simple Garlic Butter Lobster Tails could be. Now I love how the fresh garlic and lemon butter turn four lobster tails into a meal worth sharing.
And I think you’ll enjoy making them too. If you liked this garlic butter lobster tails recipe, try our Garlic Butter Shrimp Pasta or Garlic Parmesan Roasted Carrots next. And if you make these christmas garlic butter lobster tails, leave a comment and tell me how they turned out.
I read every one. Come back to it whenever you need easy garlic butter lobster tails.
Lobster shells turn bright red when heated because cooking changes the proteins that hold a natural pigment called astaxanthin. That pigment gives baked lobster its holiday color. The shell’s color tells you heat has changed it, but it doesn’t prove the meat is safe to eat. Use a thermometer to check that the thickest part reaches 145°F.