Mini Cheesecake Bites
A little buttery crunch underneath a soft and creamy cheesecake filling? Yes, please. These Mini Cheesecake Bites have everything I love about a classic cheesecake tucked into cute little portions with fresh berries on top. They’re rich and sweet without feeling too heavy, and they look so pretty on a holiday dessert platter. Plus, you don’t need a water bath or any fancy baking skills to pull them off. Hi!
Meet your new favorite party dessert. These easy mini cheesecake bites have a crunchy graham cracker base and a silky vanilla filling that tastes like the cheesecake you’d get from a good bakery. Except they’re homemade. And tiny. And dangerously easy to keep reaching for when you’re standing near the dessert table. If you love individual desserts with a little twist, our Apple Crisp Mini Cheesecake is another one to try.
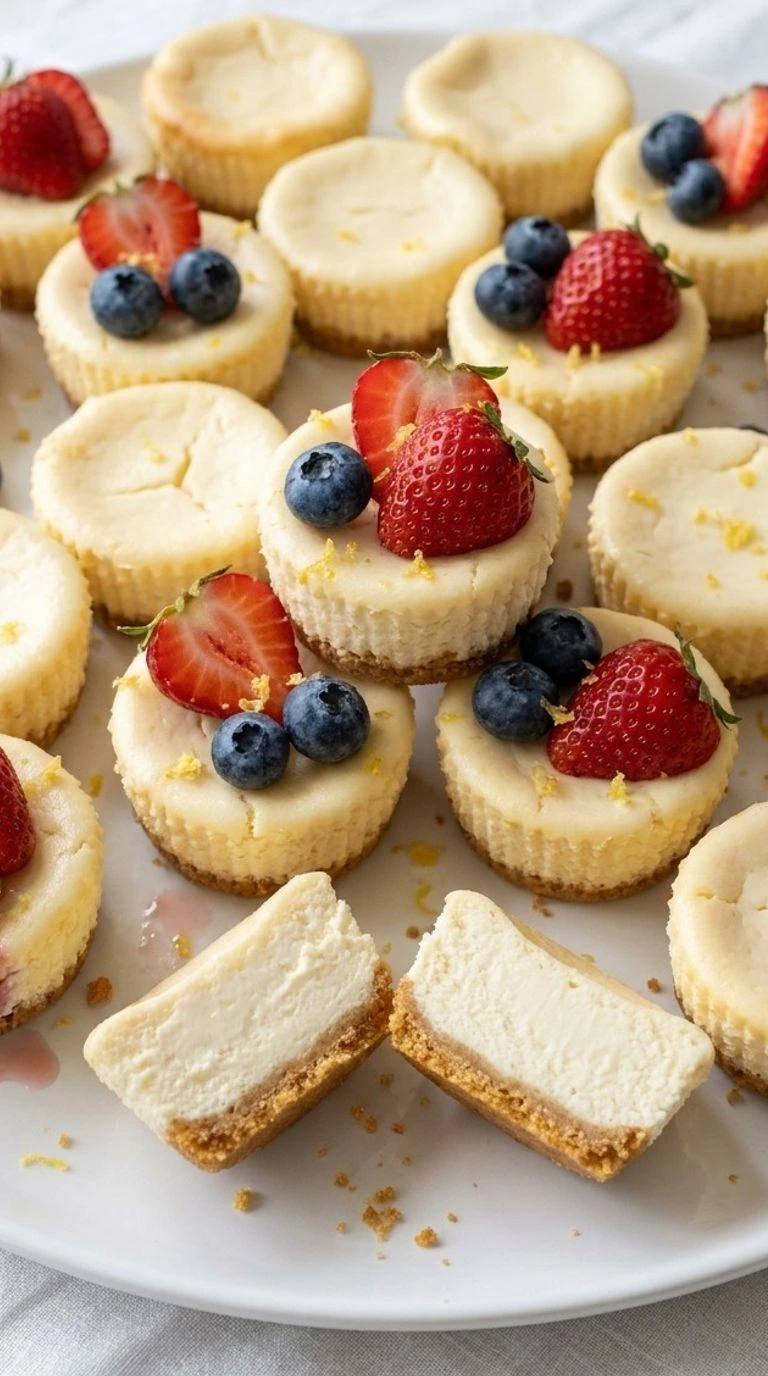
That’s right. We’re calling upon a block of cream cheese and a handful of pantry staples to make something that looks a whole lot fancier than it actually is. A few fresh berries give each bite a cheerful pop of color. And because these little cheesecakes need time to chill, you can make them the day before your celebration and forget about dessert until your guests arrive. That’s my kind of party planning.
Why This Recipe Works
The best thing about Mini Cheesecake Bites is how the crust and filling work together. Baking the honey graham cracker base for 5 minutes helps it hold up under the soft filling. Then a gentle 325°F bake sets the eggs without drying out the cream cheese.
That matters because these little cakes heat much faster than a full cheesecake. And the 2-hour chill is just as important as the oven time. It helps the filling firm up so each bite lifts cleanly from its liner.
If you enjoy fruit with cheesecake, try our Banana Cheesecake Bars for another creamy dessert.
Ingredients
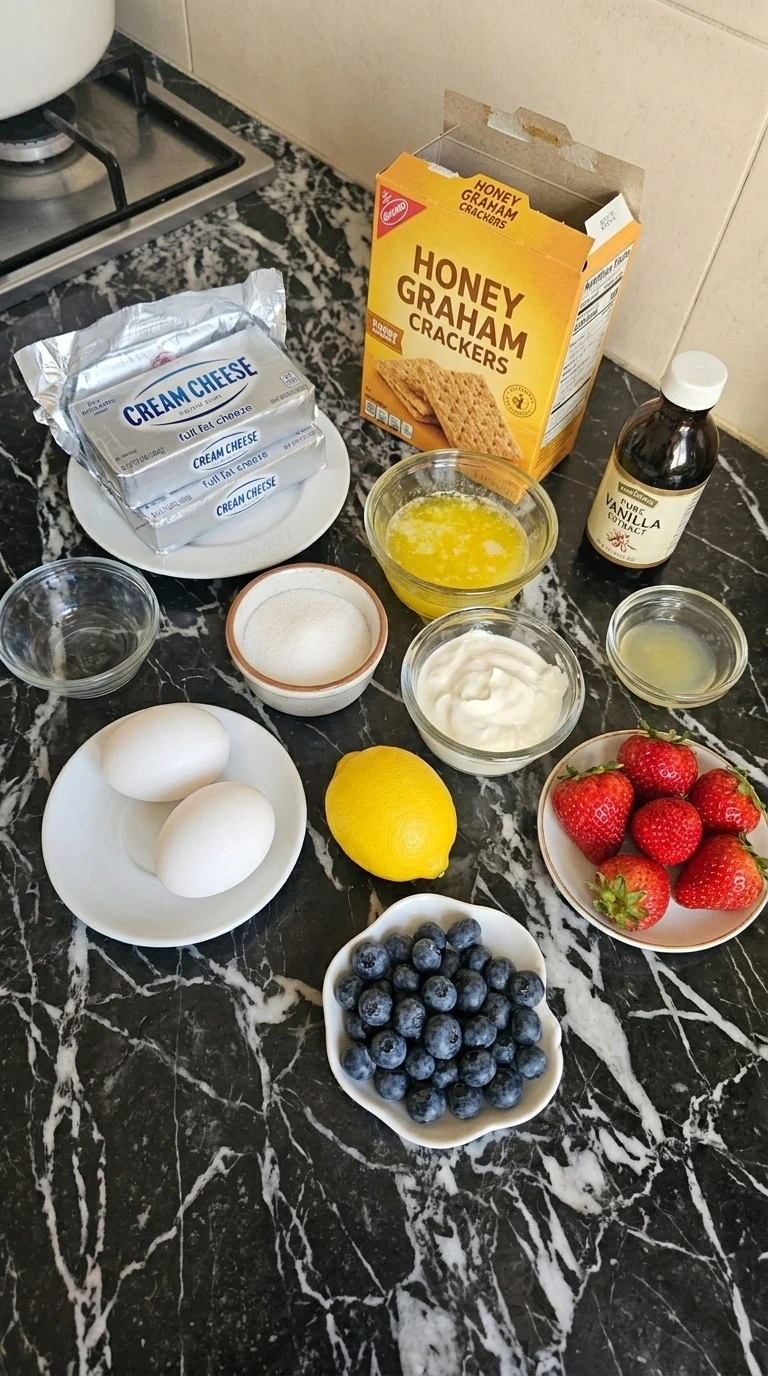
- honey graham cracker sheets: Crushed into approximately 1 cup of fine crumbs for a buttery and lightly crisp cheesecake base.
- unsalted butter: Melted and stirred into the graham cracker crumbs to bind the crust without adding excess salt.
- white granulated sugar: Use 1 tablespoon in the crust and 1/2 cup in the filling for gentle sweetness.
- full-fat block cream cheese: Two 8-ounce blocks softened before mixing to give the filling a dense and creamy texture.
- full-fat sour cream: Adds a little tang and helps soften the dense texture of the cream cheese.
- pure vanilla extract: Adds a warm vanilla flavor that brings out the sweetness of the filling.
- fresh lemon juice: Freshly squeezed to brighten the cream cheese flavor without making the filling taste strongly of lemon.
- large eggs: Brought close to room temperature and added one at a time to help the filling set during baking.
- fresh strawberries: Rinsed and thoroughly dried before cutting into 24 small pieces for a bright red garnish.
- fresh blueberries: Rinsed and dried for one juicy blueberry on each finished cheesecake bite.
- fresh lemon zest: Finely grated from the yellow outer peel of a fresh lemon for a fragrant finishing touch.
Kitchen Equipment
- 24-cup mini muffin pan: A standard 24-cup mini muffin pan creates even individual portions, and a sturdy nonstick metal pan heats more evenly than a thin disposable tray.
- Mini paper cupcake liners: Choose 24 liners designed for mini muffin cups with a base around 1.25 inches wide because oversized liners wrinkle and distort the crusts.
- Large mixing bowl: A bowl holding at least 3 quarts gives enough space to blend the filling without splashing, and a smooth interior makes scraping easier.
- Electric hand mixer: A hand mixer with adjustable low speed blends the cream cheese smoothly, while a powerful mixer used on high speed can add too much air.
- Rubber spatula: A flexible silicone spatula reaches the sides and base of the bowl so hidden lumps don’t remain in the filling.
- Measuring cups and spoons: Use clearly marked standard measuring cups and spoons for accurate portions because small changes in liquid or sugar affect the filling.
- Small measuring spoon: A narrow spoon with a flat back helps compress the crumb mixture inside each mini liner without pushing crumbs over the sides.
- Fine grater: A fine citrus grater removes thin strips of yellow lemon zest without the bitter white pith, and a coarse grater leaves pieces that taste too strong.
- Airtight storage container: Choose a shallow container wide enough for 24 small cheesecakes in a single layer because stacking can crush their soft tops.
How to Make It
Step 1: Mix and Press the Graham Cracker Crusts
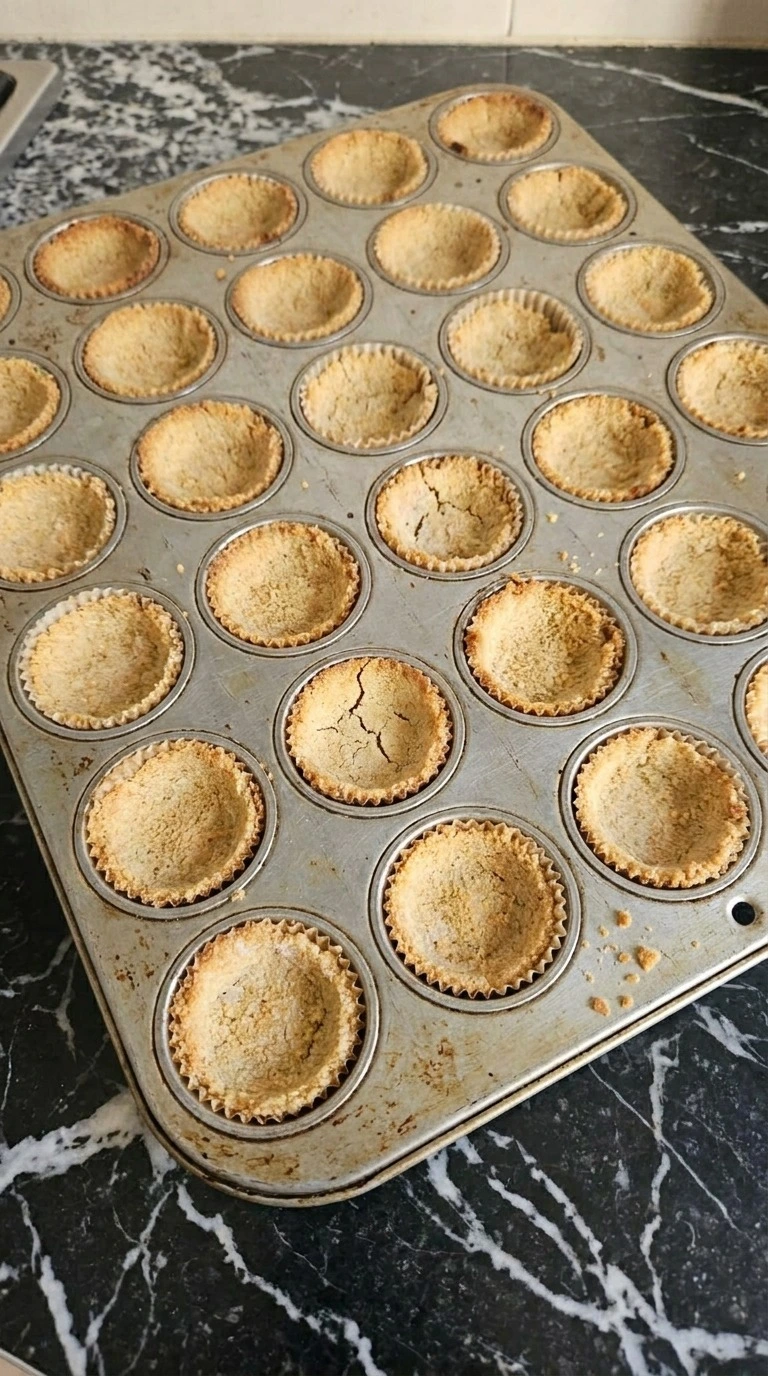
Heat your oven to 325°F and line a 24-cup mini muffin pan with paper liners. Crush 8 whole honey graham cracker sheets into fine crumbs until you have about 1 cup. Melt 3 tablespoons of unsalted butter and pour it over the crumbs. Then add 1 tablespoon of granulated sugar and stir with a fork for about 1 minute until every crumb looks lightly damp. Divide the mixture among the 24 liners and press each portion down firmly with the flat bottom of a small glass or measuring spoon.
Aim for an even layer about 1/4 inch thick. Bake for 5 minutes. Next, check the crusts. You’ll notice a light golden color and a warm toasted smell. They should hold together without looking wet.
Don’t bake them until dark brown or they’ll taste bitter beneath the filling. Let the crusts cool for 5 minutes while you mix the cheesecake base. A short prebake helps the butter bind the crumbs.
Tip: Use a narrow measuring spoon that fits inside each liner. A flat crust is much easier to fill than one with a raised center.
Step 2: Beat the Cream Cheese Filling Until Smooth
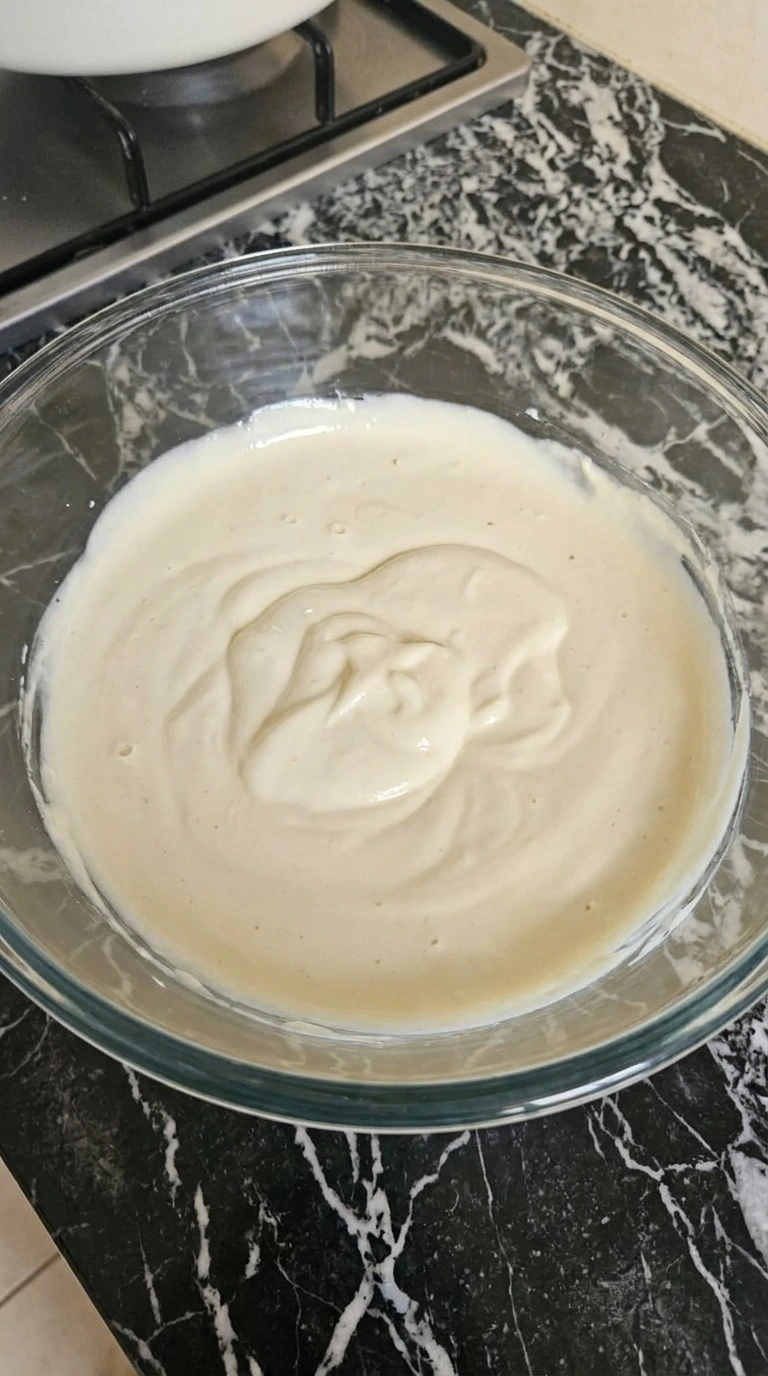
Place 16 ounces of softened full-fat cream cheese in a large mixing bowl. Beat on medium-low speed for 2 minutes until it looks smooth and thick. Next, add 1/2 cup of granulated sugar and mix for another minute. Scrape the bowl well with a rubber spatula so no lumps hide near the bottom. Add 1/4 cup of full-fat sour cream and 1 teaspoon of pure vanilla extract along with 1 teaspoon of fresh lemon juice.
Mix for 30 seconds. Finally, add 2 large eggs one at a time and beat on low speed for about 15 seconds after each addition. Stop as soon as the batter looks even. The filling should look pale ivory and glossy with no obvious cream cheese lumps. A few tiny air bubbles are fine.
However, don’t keep whipping once the eggs disappear. Too much air can make Mini Cheesecake Bites puff up and crack as they cool. Gentle mixing keeps the filling dense and creamy.
Tip: Set the cream cheese out for 45 to 60 minutes before mixing. Softened blocks blend more evenly and need less beating.
Step 3: Spoon the Filling Over the Crusts
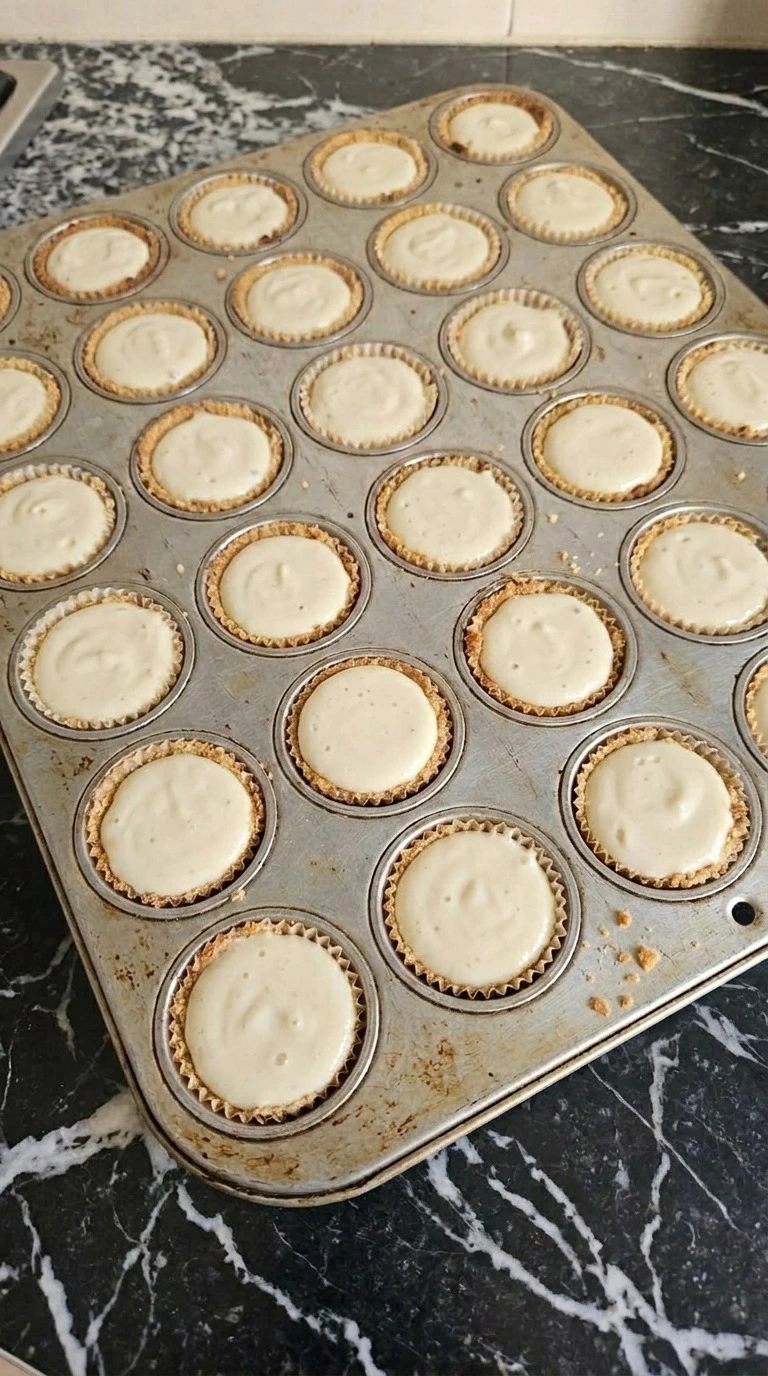
Once the prebaked crusts have cooled for 5 minutes, spoon the cheesecake filling into each of the 24 lined cups. Use about 1 1/2 tablespoons of batter per cup and divide any remaining filling evenly. Keep the batter just below the paper liner rim because the cheesecakes will puff slightly in the oven. If you prefer less mess, transfer the filling to a large piping bag and squeeze it gently into each cup.
Then tap the muffin pan lightly against the counter two or three times to settle the batter. Don’t hit it hard or the crumb bases may shift. You’ll see a smooth pale layer sitting neatly above each golden crust. Small swirls and slight differences in height are normal.
Keep the oven at 325°F and move straight to baking once the cups are filled. Leaving the batter out too long can make the crumb layers soggy. Even portions help each center set at the same rate.
Tip: Fill one liner first to check your portion size. This helps you spread the batter across all 24 cups without running short.
Step 4: Bake Until the Centers Gently Jiggle
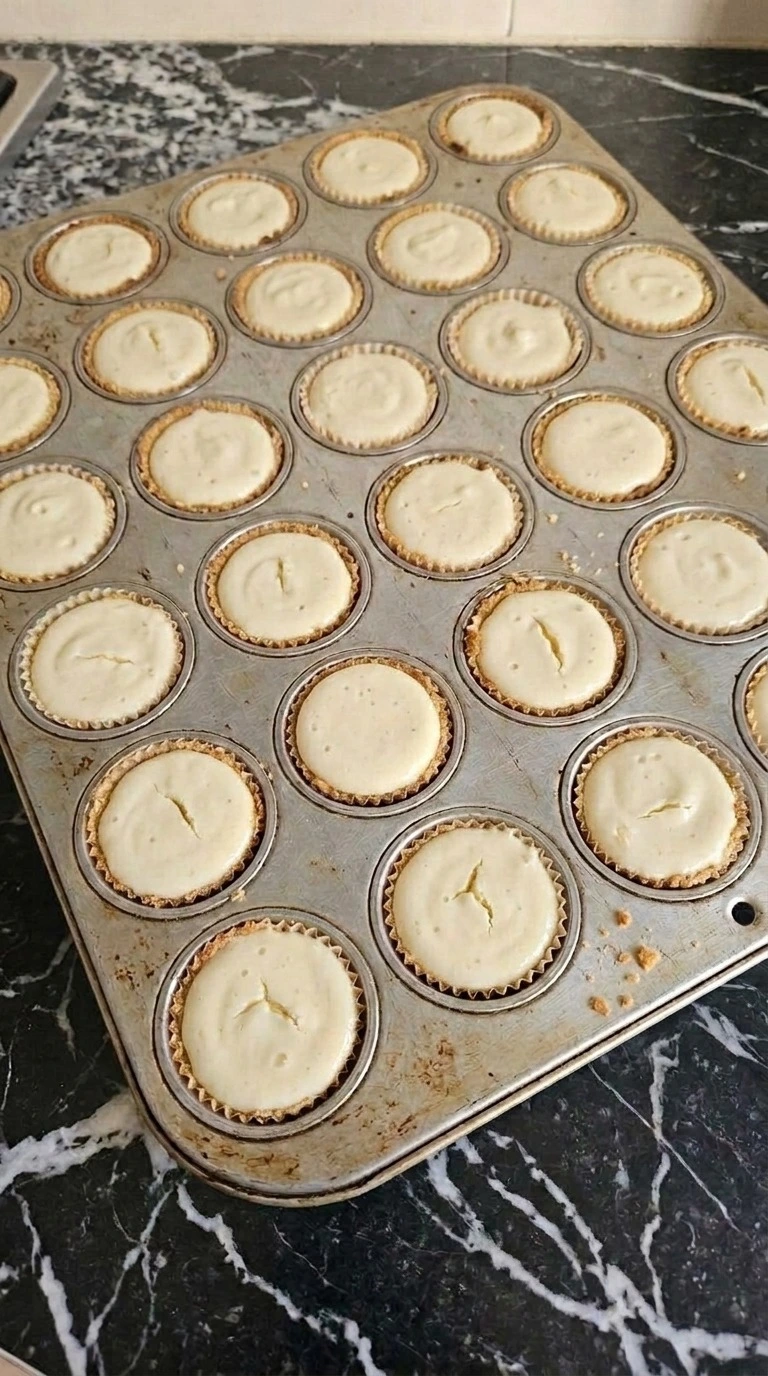
Slide the filled muffin pan onto the middle rack of your 325°F oven. Bake for 15 to 18 minutes and begin checking at minute 15. Gently move the pan from side to side and watch the centers. The edges should look set and slightly puffed while the middle of each cheesecake gives a small wobble. You shouldn’t see loose liquid sloshing under the surface.
(I tried leaving a batch in until every center looked firm. The tops cracked and the filling lost that soft texture I wanted. ) Remove the pan as soon as the edges hold their shape. Let it cool in the pan for 30 minutes. As they cool, the pale tops will settle slightly and the edges may turn a faint golden shade.
That’s normal. But baking beyond 18 minutes can leave dry centers and deep cracks. Mini Cheesecake Bites finish setting as they cool. Gentle heat protects the soft egg and cream cheese filling.
Tip: If your oven runs hot, check its temperature with an oven thermometer. Even a 15°F difference can affect these small portions.
Step 5: Chill and Finish with Fresh Berries
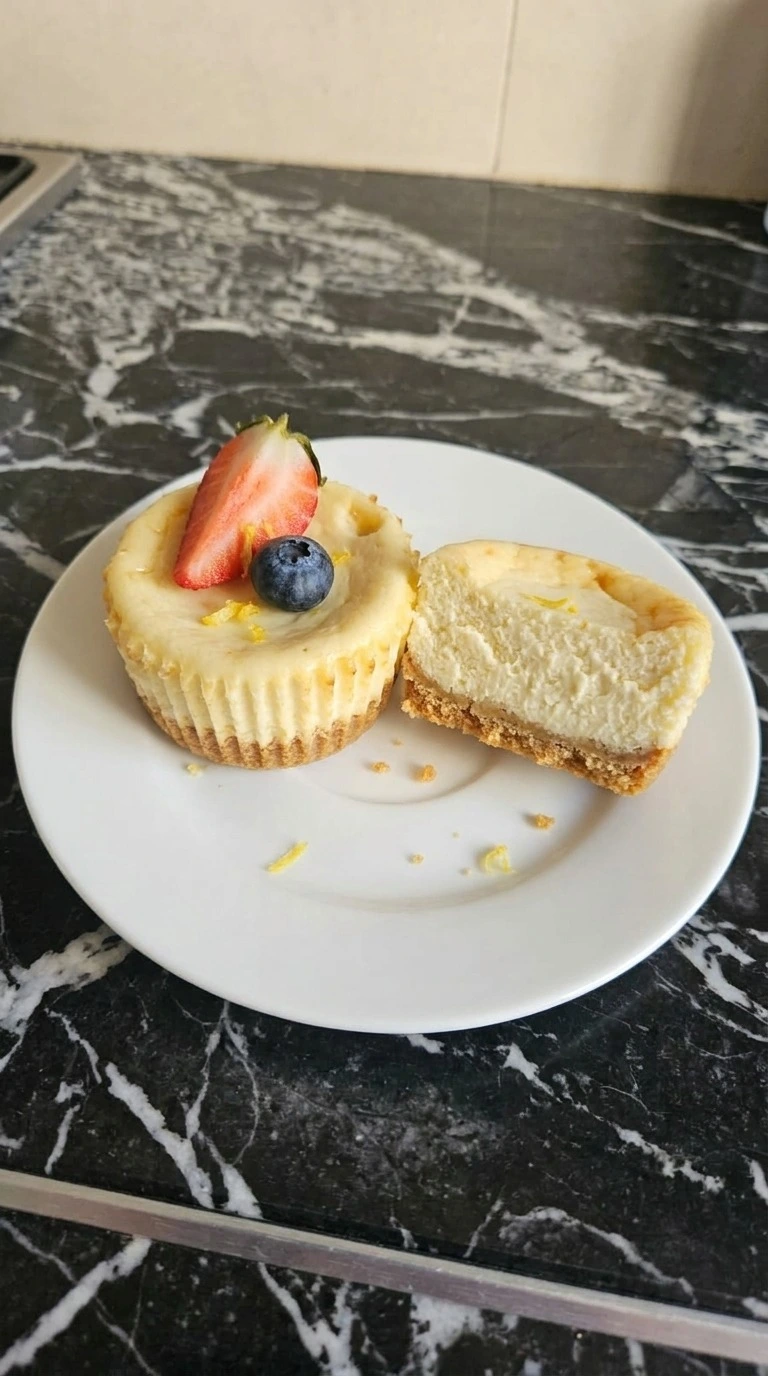
After the cheesecakes have cooled in their pan for 30 minutes, transfer them to a covered container and refrigerate for at least 2 hours. The filling will firm up while staying soft and creamy. Once cold, gently peel away the paper liners and set the cheesecakes on a large white serving plate. Rinse and dry 6 fresh strawberries and 24 fresh blueberries.
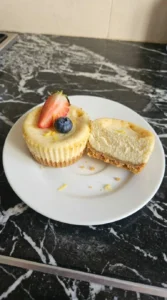
Cut the strawberries into halves or quarters depending on their size. Then place a strawberry piece and one blueberry on each cheesecake. Finish with 1 teaspoon of finely grated fresh lemon zest scattered lightly across the tops. Arrange the portions in loose groups rather than neat rows.
The chilled filling should hold its shape and feel smooth when you bite into it. You’ll see golden crust beneath each pale center and bright berry colors on top. Don’t add wet berries before chilling because their juice can stain the filling. Cold storage helps the custard hold its shape.
Tip: Pat the berries completely dry before topping. Even a few drops of water can leave pink streaks on the creamy surface.
Pro Tips
- Choose Philadelphia-style full-fat block cream cheese rather than whipped or spreadable cream cheese. Two 8-ounce blocks give the filling enough structure to hold its shape.
- Crush the 8 honey graham cracker sheets until most pieces resemble coarse sand. Large chunks make the tiny crusts harder to press evenly.
- Use a mini muffin pan with 24 standard-size cavities. Silicone cups can work, but support them with a baking tray so they don’t bend during transfer.
- Keep the mixer on low speed after adding the 2 large eggs. Stop once the yellow streaks disappear because extra air can cause cracks.
- Check the cheesecakes at minute 15 even if your oven usually runs true. Their edges should look set while the centers still move slightly.
- Plan at least 2 hours of fridge time before serving. Overnight chilling gives the filling a firmer bite and makes the paper liners easier to remove.
- Add the strawberry pieces and blueberries within 30 minutes of serving. This keeps their juice from spreading across the pale cheesecake tops.
- For a brighter finish, grate 1 teaspoon of fresh lemon zest just before serving. Avoid the white pith because it can taste bitter.
- Make chocolate cheesecake bites by folding 2 tablespoons of sifted unsweetened cocoa powder into the filling with the sugar, then replace the honey graham crackers with 1 cup of chocolate sandwich cookie crumbs.
- Create a raspberry swirl version by adding 1/4 teaspoon of seedless raspberry jam to each filled cup and drawing a toothpick through the surface once before baking.
- For a winter holiday version, replace the strawberries with 1/4 cup of pomegranate seeds and add a tiny pinch of finely grated orange zest to each chilled cheesecake.
- Make a lemon cheesecake variation by increasing the fresh lemon zest in the filling to 2 teaspoons and using 2 teaspoons of lemon juice instead of 1.
Substitutions & Variations
- honey graham cracker sheets: gluten-free graham-style crackers. Replace the 8 honey graham cracker sheets with enough gluten-free crackers to make 1 cup of fine crumbs. The crust may crumble more easily, so add 1 extra teaspoon of melted butter if the mixture feels dry.
- full-fat block cream cheese and full-fat sour cream: dairy-free cream cheese and thick dairy-free sour cream. Use 16 ounces of dairy-free cream cheese and 1/4 cup of thick dairy-free sour cream. Choose products designed for baking. The filling may set softer and taste slightly different, so chill for at least 4 hours before serving.
- large eggs: cornstarch and additional full-fat sour cream. For an egg-free version, replace the 2 eggs with 3 tablespoons of cornstarch and 1/4 cup of additional sour cream. The filling will be denser and less like classic cheesecake. Bake at 325°F until the centers set, then chill for 4 hours. This alternative hasn’t been tested with this exact recipe.
- full-fat sour cream: plain full-fat Greek yogurt. Replace the 1/4 cup of sour cream with an equal amount of thick plain full-fat Greek yogurt. The cheesecakes will taste a little tangier and may have a slightly firmer filling. If you enjoy other creamy desserts, try our Banana Cheesecake Bars for another fruit-friendly option.
- fresh strawberries and fresh blueberries: fresh raspberries or pomegranate seeds. Use 24 small fresh raspberries or about 1/4 cup of pomegranate seeds instead of the original berries. Raspberries add a tart flavor while pomegranate seeds bring a crisp bite. Add either topping just before serving to keep the cheesecake surfaces neat.
Storage Instructions
Mini Cheesecake Bites keep well in the refrigerator for up to 4 days when stored at 40°F or colder. Place them in a shallow airtight container and separate layers with parchment paper if needed. For the cleanest look, refrigerate the cheesecake portions without their fruit toppings and add the berries when serving. You can also freeze the plain cheesecakes for up to 2 months.
First, freeze them on a lined tray until firm. Then wrap each one and transfer them to a freezer-safe container to help prevent freezer burn. Don’t reheat these cheesecakes. Instead, thaw frozen portions in the refrigerator for 6 to 8 hours or overnight.
Let them stand at room temperature for about 10 minutes before serving if you prefer a softer texture. Add fresh berries after thawing. Discard any cheesecake with visible mold, an unusual sour smell or a slimy surface. Don’t taste it to check whether it’s safe.
Mini Cheesecake Bites
Ingredients
Method
- Heat your oven to 325°F and line a 24-cup mini muffin pan with paper liners. Crush 8 whole honey graham cracker sheets into fine crumbs until you have about 1 cup. Melt 3 tablespoons of unsalted butter and pour it over the crumbs. Then add 1 tablespoon of granulated sugar and stir with a fork for about 1 minute until every crumb looks lightly damp. Divide the mixture among the 24 liners and press each portion down firmly with the flat bottom of a small glass or measuring spoon. Aim for an even layer about 1/4 inch thick. Bake for 5 minutes. Next, check the crusts. You’ll notice a light golden color and a warm toasted smell. They should hold together without looking wet. Don’t bake them until dark brown or they’ll taste bitter beneath the filling. Let the crusts cool for 5 minutes while you mix the cheesecake base. A short prebake helps the butter bind the crumbs.
- Place 16 ounces of softened full-fat cream cheese in a large mixing bowl. Beat on medium-low speed for 2 minutes until it looks smooth and thick. Next, add 1/2 cup of granulated sugar and mix for another minute. Scrape the bowl well with a rubber spatula so no lumps hide near the bottom. Add 1/4 cup of full-fat sour cream and 1 teaspoon of pure vanilla extract along with 1 teaspoon of fresh lemon juice. Mix for 30 seconds. Finally, add 2 large eggs one at a time and beat on low speed for about 15 seconds after each addition. Stop as soon as the batter looks even. The filling should look pale ivory and glossy with no obvious cream cheese lumps. A few tiny air bubbles are fine. However, don’t keep whipping once the eggs disappear. Too much air can make Mini Cheesecake Bites puff up and crack as they cool. Gentle mixing keeps the filling dense and creamy.
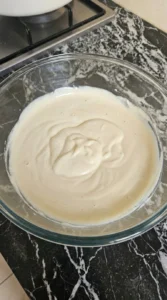
- Once the prebaked crusts have cooled for 5 minutes, spoon the cheesecake filling into each of the 24 lined cups. Use about 1 1/2 tablespoons of batter per cup and divide any remaining filling evenly. Keep the batter just below the paper liner rim because the cheesecakes will puff slightly in the oven. If you prefer less mess, transfer the filling to a large piping bag and squeeze it gently into each cup. Then tap the muffin pan lightly against the counter two or three times to settle the batter. Don’t hit it hard or the crumb bases may shift. You’ll see a smooth pale layer sitting neatly above each golden crust. Small swirls and slight differences in height are normal. Keep the oven at 325°F and move straight to baking once the cups are filled. Leaving the batter out too long can make the crumb layers soggy. Even portions help each center set at the same rate.
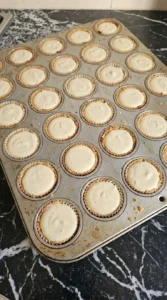
- Slide the filled muffin pan onto the middle rack of your 325°F oven. Bake for 15 to 18 minutes and begin checking at minute 15. Gently move the pan from side to side and watch the centers. The edges should look set and slightly puffed while the middle of each cheesecake gives a small wobble. You shouldn’t see loose liquid sloshing under the surface. (I tried leaving a batch in until every center looked firm. The tops cracked and the filling lost that soft texture I wanted.) Remove the pan as soon as the edges hold their shape. Let it cool in the pan for 30 minutes. As they cool, the pale tops will settle slightly and the edges may turn a faint golden shade. That’s normal. But baking beyond 18 minutes can leave dry centers and deep cracks. Mini Cheesecake Bites finish setting as they cool. Gentle heat protects the soft egg and cream cheese filling.
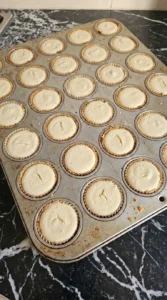
- After the cheesecakes have cooled in their pan for 30 minutes, transfer them to a covered container and refrigerate for at least 2 hours. The filling will firm up while staying soft and creamy. Once cold, gently peel away the paper liners and set the cheesecakes on a large white serving plate. Rinse and dry 6 fresh strawberries and 24 fresh blueberries. Cut the strawberries into halves or quarters depending on their size. Then place a strawberry piece and one blueberry on each cheesecake. Finish with 1 teaspoon of finely grated fresh lemon zest scattered lightly across the tops. Arrange the portions in loose groups rather than neat rows. The chilled filling should hold its shape and feel smooth when you bite into it. You’ll see golden crust beneath each pale center and bright berry colors on top. Don’t add wet berries before chilling because their juice can stain the filling. Cold storage helps the custard hold its shape.
Notes
Frequently Asked Questions
Yes, and I actually prefer making them ahead because the filling gets firmer after a full night in the fridge. Bake the cheesecakes the evening before and let them cool for 30 minutes before covering and chilling. Keep the berries separate until about 30 minutes before serving so they don’t release juice onto the creamy tops.
They’ll keep for up to 4 days in an airtight container at 40°F or colder. Arrange them in a single layer and leave off the fresh fruit until you’re ready to serve. If you’ve already added the strawberries and blueberries, aim to eat those portions within 1 to 2 days for the best appearance and texture.
Yes. Replace the 1/4 cup of full-fat sour cream with the same amount of plain full-fat Greek yogurt. The filling will taste slightly tangier and may set a little firmer. Don’t use a thin drinking yogurt because extra liquid can make the centers softer than intended. Keep the baking temperature at 325°F.
Small cracks often come from mixing too much air into the eggs or baking past the point when the edges set. Start checking at 15 minutes in a 325°F oven and remove the pan when the centers still wobble gently. A small dip after cooling is normal because the filling contracts as its temperature drops. Deep cracks usually mean the cheesecakes baked too long.
Absolutely. Double every ingredient and use two 24-cup mini muffin pans to make approximately 48 cheesecakes. If both pans fit on the same oven rack with room for airflow, start checking at 15 minutes. Otherwise, bake separate batches for more even results. Keep the oven at 325°F rather than raising the heat to speed things up.
Arrange the chilled cheesecakes on a large white platter about 15 minutes before guests arrive. Use strawberry pieces and blueberries for a bright finish, then add a little fresh lemon zest. Keep the platter refrigerated until serving and don’t leave the cheesecakes at room temperature for more than 2 hours total. Their small size makes them easy to serve without slicing.
Yes. Freeze the plain cheesecakes without berries on a lined tray for 1 to 2 hours until firm, then wrap them individually and seal them in a freezer-safe container. Store for up to 2 months for the best texture. Thaw overnight in the refrigerator rather than reheating them. Add the fresh fruit after thawing so it stays bright and firm.
Final Thoughts
A little plate of these always takes me back to the first batch I made, when I kept checking the oven because I was sure I’d mess them up. Turns out Mini Cheesecake Bites are much more forgiving than a big cheesecake, especially with that simple crumb crust and gentle bake.
They’re one of my favorite easy mini cheesecake bites to share, and the fresh berries make them feel special without much work. If you’re collecting new years eve mini cheesecake bites ideas, give these a try and tell me how yours turn out.
And if you’d like another creamy dessert, check out our Apple Crisp Mini Cheesecake or Banana Cheesecake Bars. Come back to it whenever you need mini cheesecake bites recipe.
Mini cheesecakes use the same basic cream cheese and egg filling as a full-size cheesecake, but their smaller portions bake much faster. A standard cheesecake can take close to an hour in the oven, while these little bites need only 15 to 18 minutes after the crusts are prebaked. And because each one has its own crumb base, nobody has to fight over the last slice with the extra crust.