Halloween Chocolate Chip Cookies Pillsbury
October nights call for something playful, and Halloween Chocolate Chip Cookies Pillsbury bring soft chocolate chip centers with crisp edges and a bright spooky finish. Press on extra chips and orange sprinkles, then add candy eyes after baking for a treat that looks festive without turning the kitchen into a project. Hi!
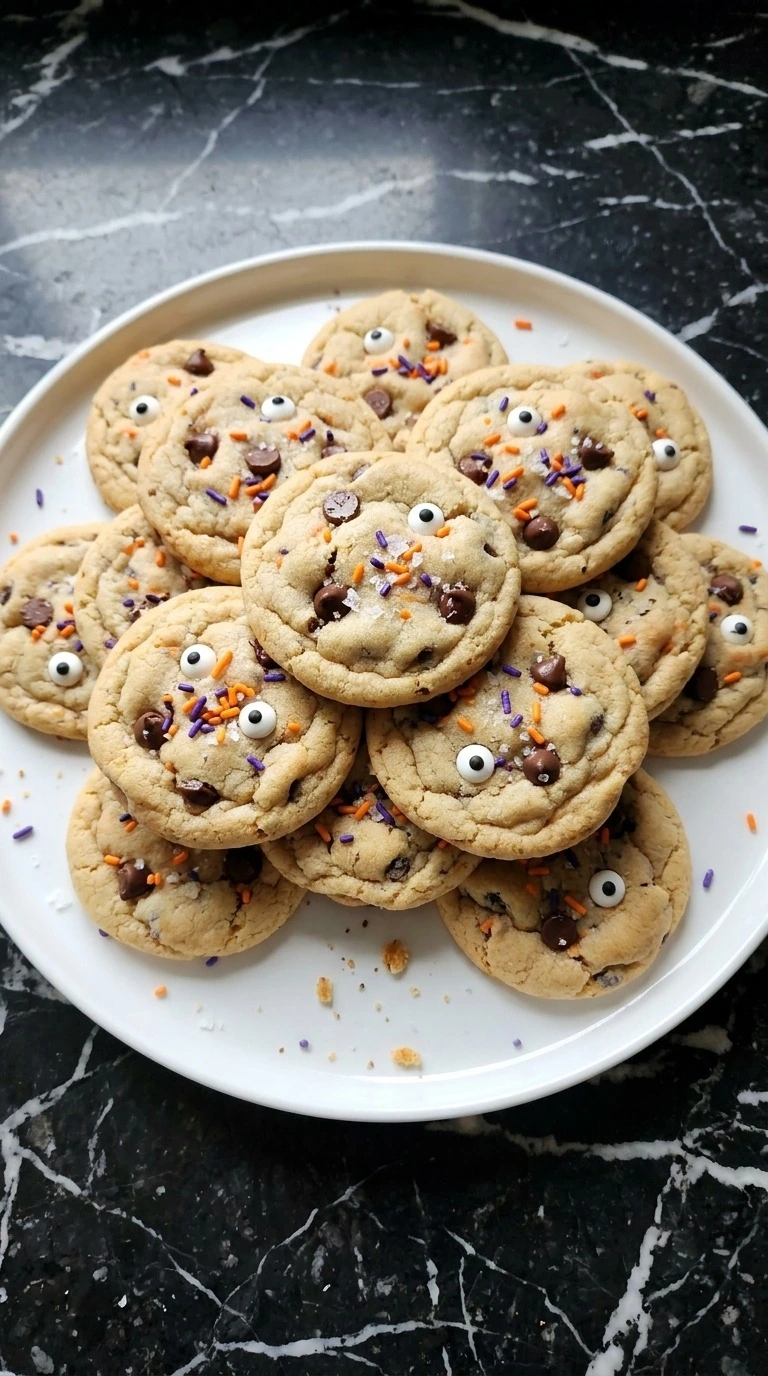
Meet your new friend, the soft-centered Halloween cookie with crisp little edges and silly candy eyes that is so easy, so kid-friendly, so chocolatey and also.. made with refrigerated dough. That shortcut leaves more time for costumes and pumpkin carving, which is exactly what I want on a busy October afternoon.
That’s right. We’re calling on a tube of Pillsbury chocolate chip cookie dough to do most of the work here, and it really does. A short chill keeps the rounds from spreading too far while a few extra toppings make each cookie look a little different.
Why This Recipe Works
A 10 minute chill at about 40 F firms the fat in the dough, so Halloween Chocolate Chip Cookies Pillsbury spread more slowly once they hit the 350 F oven. That short delay gives the centers time to puff while the rims turn lightly crisp instead of thin and hard.
Adding candy eyes after baking also matters because their sugar shells can crack or bleed during a full oven cycle. Pressing them in within 60 seconds gives them enough grip without crushing the still-soft cookie.
Ingredients

- Pillsbury Refrigerated Chocolate Chip Cookie Dough: Use cold pre-portioned dough pieces so the cookies start with equal amounts and bake at a similar pace.
- semi-sweet chocolate chips: Press a few into each dough round for extra visible chocolate and softer melted pockets.
- orange and purple Halloween sprinkles: Scatter lightly over the dough before baking so the colors stay visible without weighing down the tops.
- small candy eyeballs: Keep at room temperature and press two into each cookie just after baking.
- flaky sea salt: Use a very light pinch over the dough to sharpen the chocolate flavor without making the cookies taste salty.
Kitchen Equipment
- 13 by 18 inch light aluminum sheet pan: A light aluminum sheet pan gives 12 cookies room to spread evenly, while a dark thin pan can brown the bottoms before the centers set.
- Parchment paper: Parchment keeps the warm cookies from sticking and protects the bottoms, while wax paper can melt and shouldn’t go in a 350 F oven.
- Cooling rack: A rack lets air move under all 12 cookies so the bottoms stay dry, while a flat plate can trap steam and soften the edges.
- Oven thermometer: An oven thermometer confirms the oven is really at 350 F, which matters because a 25 degree error can change spread and browning.
How to Make It
Step 1: Shape and chill the decorated dough

Set the oven to 350 F. Place 12 cold Pillsbury chocolate chip dough pieces on a lined sheet pan with about 2 inches between them, then press each piece lightly into a thick round. Push a few semi-sweet chocolate chips and a pinch of orange and purple sprinkles into each top, then add a tiny touch of flaky sea salt.
Chill the shaped dough at about 40 F for 10 minutes. Keep the pressure gentle so the rounds stay thick instead of flattening before they bake. The dough should feel firm and cool, and the chips should stay partly exposed instead of sinking.
If the dough turns soft and glossy before baking, the cookies can spread too fast. Chill 10 minutes because cold fat slows spread in the hot oven.
Tip: Use only about 1 teaspoon of added toppings per cookie so the dough can still expand cleanly at 350 F.
Step 2: Bake until the edges turn pale golden

Bake the chilled rounds at 350 F for 10 to 12 minutes. Rotate the sheet pan once at minute 6 so the outer cookies color at the same pace as the center ones. For Halloween Chocolate Chip Cookies Pillsbury, pull the pan when the edges look pale golden but the centers still seem slightly soft and puffed.
(I tried leaving one batch for 14 minutes, and the centers lost that soft bend. Ten to twelve minutes worked much better. ) You’ll smell warm chocolate and butter near minute 9, and the tops should lose their wet shine.
Go past 12 minutes and the centers can dry as they cool. Bake at 350 F so the centers set before the edges turn hard.
Tip: If your oven runs hot, check at minute 9 and look for matte centers with only a faint golden ring at the edge.
Step 3: Press in the candy eyeballs

As soon as the pan comes out of the 350 F oven, wait 30 to 60 seconds and press 2 small candy eyeballs into each warm cookie. Use light fingertip pressure and place the eyes at slightly different angles so the faces don’t look stamped or identical.
Then leave the cookies on the pan for 5 minutes while the centers firm enough to move without breaking. The candy eyes should sit flush with the soft surface, and the cookie edges should feel set while the middle still yields slightly.
Wait longer than 3 minutes to add the eyes and the tops may crack. Press the eyes while warm because the soft surface grips them as it cools.
Tip: Keep the candy eyes near room temperature so a cold candy surface doesn’t make the warm chocolate around it seize or crack.
Step 4: Cool and arrange the cookies for serving

After the first 5 minutes on the pan, transfer all 12 cookies to a cooling rack and let them rest for another 8 to 10 minutes until they reach about 85 F. Then move the Halloween Chocolate Chip Cookies Pillsbury onto one serving plate with some edges overlapping and some gaps between cookies.
Don’t stack them while they’re still very warm because trapped steam can soften the crisp rims. The centers should bend slightly when lifted, while the edges stay firmer and the candy eyes remain secure.
If the bottoms feel damp, give them 3 more minutes before plating. Cool before stacking because trapped steam softens the cookie edges.
Tip: Serve within 2 hours for the strongest contrast between the crisp outer edge and the soft chocolate chip center.
Pro Tips
- Chill the shaped dough for 10 minutes near 40 F so the cookies spread slowly and keep thicker soft centers.
- Bake only one sheet at a time at 350 F because two crowded racks can cause uneven browning and longer bake times.
- Press about 1 teaspoon of extra toppings onto each dough round so chocolate and sprinkles stay visible without weighing down the surface.
- Rotate the pan once at minute 6 if your oven has hot spots and watch for pale golden edges by minute 10.
- Add the candy eyes within 60 seconds after baking because the soft surface grips them before the cookie top firms.
- Choose standard semi-sweet chips around 45 to 55 percent cacao for balanced sweetness and clear melted chocolate pockets.
- Let the cookies rest on the pan for 5 minutes before moving them because the centers are fragile while still very hot.
- Swap the orange and purple sprinkles for green and black sprinkles to give the cookies a witchy Halloween color scheme.
- Press 1 teaspoon of mini peanut butter chips onto each dough round for a chocolate peanut butter version with a richer finish.
- Use white chocolate chips instead of semi-sweet chocolate chips and add orange sprinkles for a sweeter candy corn inspired look.
- Add 1/8 teaspoon ground cinnamon over all 12 dough pieces before baking for a warm fall spice note without changing the bake time.
Substitutions & Variations
- Pillsbury Refrigerated Chocolate Chip Cookie Dough: gluten-free refrigerated chocolate chip cookie dough — Use the same 12-piece portion size and bake at 350 F. Gluten-free dough may spread less and taste slightly more crumbly.
- Pillsbury Refrigerated Chocolate Chip Cookie Dough: dairy-free refrigerated chocolate chip cookie dough — Use an equal amount and keep it cold before baking. Plant-based fats can make the edges softer and may need 1 extra minute.
- small candy eyeballs: dairy-free or vegan candy eyes — Use 24 pieces and press them on within 60 seconds after baking. Check the label because standard candy eyes may contain animal-derived ingredients.
- semi-sweet chocolate chips: dark chocolate chips — Use the same 1/4 cup amount. Dark chocolate gives a deeper cocoa flavor and slightly less sweetness without changing the bake time.
- orange and purple Halloween sprinkles: Halloween colored sanding sugar — Use about 1 tablespoon because sanding sugar is denser. It adds extra crunch and may melt slightly into the warm cookie tops.
Storage Instructions
Store cooled cookies in an airtight container at room temperature for 3 days or refrigerate them for up to 5 days. For freezing, wrap groups tightly and place them in a freezer-safe container for up to 2 months.
To refresh them, warm cookies at 275 F for 3 to 4 minutes and cool for 2 minutes before eating. Discard any cookies with an off smell, unusual moisture or visible mold.
Halloween Chocolate Chip Cookies Pillsbury
Ingredients
- 12 pieces Pillsbury Refrigerated Chocolate Chip Cookie Dough Use cold pre-portioned dough pieces so the cookies start with equal amounts and bake at a similar pace.
- 1/4 cup semi-sweet chocolate chips Press a few into each dough round for extra visible chocolate and softer melted pockets.
- 2 tablespoons orange and purple Halloween sprinkles Scatter lightly over the dough before baking so the colors stay visible without weighing down the tops.
- 24 pieces small candy eyeballs Keep at room temperature and press two into each cookie just after baking.
- 1/4 teaspoon flaky sea salt Use a very light pinch over the dough to sharpen the chocolate flavor without making the cookies taste salty.
Instructions
- Set the oven to 350 F. Place 12 cold Pillsbury chocolate chip dough pieces on a lined sheet pan with about 2 inches between them, then press each piece lightly into a thick round. Push a few semi-sweet chocolate chips and a pinch of orange and purple sprinkles into each top, then add a tiny touch of flaky sea salt. Chill the shaped dough at about 40 F for 10 minutes. Keep the pressure gentle so the rounds stay thick instead of flattening before they bake. The dough should feel firm and cool, and the chips should stay partly exposed instead of sinking. If the dough turns soft and glossy before baking, the cookies can spread too fast. Chill 10 minutes because cold fat slows spread in the hot oven.

- Bake the chilled rounds at 350 F for 10 to 12 minutes. Rotate the sheet pan once at minute 6 so the outer cookies color at the same pace as the center ones. For Halloween Chocolate Chip Cookies Pillsbury, pull the pan when the edges look pale golden but the centers still seem slightly soft and puffed. (I tried leaving one batch for 14 minutes, and the centers lost that soft bend. Ten to twelve minutes worked much better.) You’ll smell warm chocolate and butter near minute 9, and the tops should lose their wet shine. Go past 12 minutes and the centers can dry as they cool. Bake at 350 F so the centers set before the edges turn hard.

- As soon as the pan comes out of the 350 F oven, wait 30 to 60 seconds and press 2 small candy eyeballs into each warm cookie. Use light fingertip pressure and place the eyes at slightly different angles so the faces don’t look stamped or identical. Then leave the cookies on the pan for 5 minutes while the centers firm enough to move without breaking. The candy eyes should sit flush with the soft surface, and the cookie edges should feel set while the middle still yields slightly. Wait longer than 3 minutes to add the eyes and the tops may crack. Press the eyes while warm because the soft surface grips them as it cools.

- After the first 5 minutes on the pan, transfer all 12 cookies to a cooling rack and let them rest for another 8 to 10 minutes until they reach about 85 F. Then move the Halloween Chocolate Chip Cookies Pillsbury onto one serving plate with some edges overlapping and some gaps between cookies. Don’t stack them while they’re still very warm because trapped steam can soften the crisp rims. The centers should bend slightly when lifted, while the edges stay firmer and the candy eyes remain secure. If the bottoms feel damp, give them 3 more minutes before plating. Cool before stacking because trapped steam softens the cookie edges.

Notes
Frequently Asked Questions
Yes. Shape and decorate the dough up to 24 hours ahead and keep it covered near 40 F. Bake straight from the fridge at 350 F for 10 to 12 minutes and add the candy eyes after baking.
Keep them in an airtight container at room temperature for up to 3 days. For longer storage, refrigerate up to 5 days and let them sit out for 15 minutes before serving.
Yes, use an equal amount of refrigerated gluten-free chocolate chip cookie dough. Bake at 350 F and begin checking at minute 10 because some gluten-free doughs spread less and brown faster.
The dough was likely too warm before baking or the pan was still hot from another batch. Chill the shaped rounds for 10 minutes and place them on a cool sheet before baking at 350 F.
Yes, double every ingredient and make 24 cookies. Bake one sheet at a time at 350 F so air can circulate evenly and rotate each pan at minute 6.
Yes. Freeze fully cooled cookies in a sealed container with parchment between layers for up to 2 months. Thaw for 30 minutes and warm at 275 F for 3 to 4 minutes if desired.
Final Thoughts
Make a batch on a weekend afternoon with music playing and candy bowls nearby, and you’ll see why Halloween Chocolate Chip Cookies Pillsbury stay in my October rotation. The little trick about chilling the dough before baking really changes the texture from overly spread to soft-centered and crisp-edged.
Tag me if you try them because I love seeing the crooked monster faces people make. And the funniest cookies are usually the ones with mismatched eyes, which somehow disappear first at every party.
But now that I have it, I make it all the time and I think you will too. If you enjoyed this, check out some of my other popular recipes on the blog.
Candy eyes work best after baking because their sugar coating stays brighter and their shape holds better outside the full oven cycle.