Oatmeal Cookies
I honestly havent really shared many cookie based recipes on my blog, but this Oatmeal Cookies recipe was one I had to share. This recipe is inspired by classic home baking and it’s simple to whip up. It’s a super tasty treat packed full of hearty oats and it’s quite satisfying.
If you love sweet bakes, you should also try our Blueberry Muffins for another breakfast favorite. When people think about oatmeal cookies they sometimes avoid making them since they can turn out dry or cakey. But when they’re prepared in the right way they offer a rich and chewy texture that’s very satisfying.

This recipe is super tasty and quick to bake, so I recommend this treat for those who want to experience true comfort food.
Why This Recipe Works
Using dark brown sugar instead of mostly white sugar adds extra moisture and natural molasses acidity. This reaction softens the gluten bonds and creates an incredibly chewy center.
Baking at 350°F ensures the edges turn golden brown via caramelization while the interior remains dense and soft. If you want a fun twist for your dessert table, check out our Chocolate Cupcakes for another rich option.
The Ingredients

- unsalted butter: Softened to room temperature for a smooth blend.
- dark brown sugar: Packed firmly to add moisture and a deep molasses flavor.
- white granulated sugar: Adds crispness to the outer edges.
- large eggs: Brought to room temperature to ensure proper emulsification.
- pure vanilla extract: Enhances the warm aroma of the grains.
- King Arthur unbleached all-purpose flour: Spoon-measured accurately to build the cookie structure.
- ground cinnamon: Provides a warm background spice note.
- baking soda: Acts as the leavening agent for a slight rise.
- sea salt: Balances the sweetness of the brown sugars.
- Quaker old-fashioned rolled oats: Whole raw flakes that deliver a hearty chewy texture.
Equipment
- large clear glass mixing bowl: A spacious 4-quart glass bowl provides ample room to fold heavy oats without spilling flour over the sides — a small plastic bowl will flex and cause uneven mixing.
- large aluminum sheet pan: A heavy-gauge rimmed baking sheet distributes oven heat evenly across the bottom surface so cookie edges brown without burning — thin steel trays warp and scorch the sugar.
Directions
Step 1: Cream the butter and sugars

Place the softened unsalted butter, dark brown sugar, and white granulated sugar into a large clear glass mixing bowl. Use a handheld electric mixer at medium speed (about level 5 on a standard dial) to blend the ingredients for exactly 3 minutes. Scrape the bowl down with a rubber spatula halfway through the process to integrate all the stray sugar crystals.
(I tried melting the butter completely the first time but the cookies spread into thin oily puddles on the tray. Creaming room-temperature butter is the real secret. ) You will see the dark grainy mixture transform into a fluffy pale-tan paste that smells deeply of rich molasses.
Stop mixing immediately once the fluffiness peaks. Going past 4 minutes beats too much air into the fat and causes the cookies to puff up and then deflate into dense disks. Cream at medium speed for 3 minutes, the aerated sugar crystals create the ideal base for a thick cookie texture.
Tip: Make sure your butter sits out for 45 minutes before baking so it yields gently when pressed.
Step 2: Beat in the eggs and vanilla

Add 2 large eggs and pure vanilla extract directly into the creamed butter paste at a comfortable room temperature. Turn the electric mixer to medium-low heat (around level 3) and beat the wet mixture steadily for 90 seconds. Guide the beaters in wide concentric circles to draw the liquids completely into the dense sugar base.
You will hear the wet slapping sound turn into a smooth whir as the eggs emulsify. The grainy batter turns into a glossy pale-caramel liquid that coats the sides of the glass evenly. Watch the clock closely because overwaking at this stage separates the fats and yields a greasy dough.
Beat for 90 seconds until fully smooth, the emulsified eggs stabilize the structure so the fat doesn’t separate during baking.
Tip: Crack your eggs into a separate small dish first to ensure no stray shells slip into your batter.
Step 3: Fold the flour and oats

Pour the King Arthur unbleached all-purpose flour, ground cinnamon, baking soda, sea salt, and Quaker old-fashioned rolled oats into the wet base. Put away the electric mixer and use a heavy silicone spatula to fold the dry ingredients in a gentle J-shaped motion. Turn the glass bowl 90 degrees after each stroke to ensure you clear the flour pockets from the bottom.
Stop folding the second the white flour streaks completely vanish and the oats are distributed. The dough turns into a thick tacky mass where individual oat flakes are heavily coated in a beige spiced paste. Overworking the dough at this point develops tough gluten that ruins the texture completely.
Fold gently by hand just until mixed, minimal handling keeps the cookie tender and prevents a tough bake.
Tip: Avoid instant oats for this recipe because they absorb moisture too fast and leave the cookies dry.
Step 4: Shape dough balls on sheet

Use a metal spring-loaded scoop to portion the thick dough into 12 identical rounded mounds. Arrange them across a large aluminum sheet pan lined with brown parchment paper, leaving exactly 2 inches of space between each ball. Ensure the mounds remain rough and asymmetrical rather than rolling them into perfect geometric spheres.
(My first batch crowded the pan and baked into one massive single sheet cookie. Giving them space is critical. ) Each mound shows an uneven craggy surface with protruding oat flakes that look beautifully rustic.
If you crowd the tray the cookies merge and create thin crisp edges instead of thick centers. Leave 2 inches of space between mounds, proper spacing allows heat to circulate evenly for uniform thickness.
Tip: Chill the loaded sheet pan for 15 minutes before baking to minimize spreading in the oven.
Step 5: Bake until golden brown

Slide the sheet pan onto the center rack of a 350°F preheated oven and bake for 11 minutes. Do not open the oven door during the first 8 minutes to prevent a sudden drop in ambient temperature. Remove the pan immediately when the timer dings and set it on a wire cooling rack.
You’ll smell a deep toasted oat aroma and see the edges turn a distinct golden brown while the center stays pale and slightly soft. The cookies will look slightly underbaked in the middle but they will firm up as they rest. Leaving them in the oven until the center looks hard dries out the interior completely.
Bake at 350°F for exactly 11 minutes, removing them while soft keeps the center dense and delightfully chewy.
Tip: Leave the cookies on the hot baking sheet for 5 minutes after pulling them from the oven to finish setting.
Tips and Tricks
- Measure your flour by spooning it into the cup and leveling it off with a knife because scooping directly packs the flour and makes cookies dry.
- Bake a single test cookie first to see how much it spreads in your specific oven before committing the entire tray.
- Use old-fashioned rolled oats rather than instant oats because the thicker whole flakes provide a superior toothsome chew.
- Pull the cookies out when the center looks soft and underbaked since they continue cooking on the hot pan.
- Line your sheet pan with parchment paper instead of greasing it with oil spray to prevent the bottom from spreading too thin.
- Store a single slice of white sandwich bread inside the cookie jar to keep the baked treats soft for days.
- Add 1 cup of semi-sweet chocolate chips and 0.5 cup of chopped walnuts for a rich nutty twist that satisfies chocolate lovers.
- Mix in 0.75 cup of dried cranberries and 1 tablespoon of fresh orange zest for a holiday .
- Incorporate 0.5 cup of sweet shredded coconut and a pinch of ground nutmeg to add an earthy tropical aroma to the dough.
Substitutions & Variations
- dark brown sugar: light brown sugar — Use the same amount but expect a slightly milder caramel flavor and a lighter golden hue.
- unsalted butter: refined coconut oil — Use solid coconut oil at a one-to-one ratio but the cookies will spread slightly more and taste subtly of coconut.
- King Arthur unbleached all-purpose flour: Bob’s Red Mill 1-to-1 Gluten-Free Baking Flour — Works beautifully at an exact swap but you must let the dough rest for 10 minutes to absorb liquids or they become crumbly. If you prefer a completely different flourless treats try our sweet Oreo Dirt Cups.
Keeping Leftovers
Store the cooled oatmeal cookies inside an airtight plastic container at room temperature for up to 5 days. Do not refrigerate them because the cold air strips away the essential moisture and leaves the texture stale.
You can freeze the baked treats for up to 3 months by stacking them in heavy freezer bags with sheets of parchment paper between the layers. To reheat a frozen cookie simply place it on a microwave-safe plate and heat it on high power for exactly 12 seconds.
This quick burst melts the sugars slightly and restores that fresh out of the oven chewiness. Watch out for a stiff texture or an off smell because those are clear signs the butter fats have spoiled over time.
Oatmeal Cookies
Ingredients
- 0.5 cup unsalted butter Softened to room temperature for a smooth blend.
- 0.75 cup dark brown sugar Packed firmly to add moisture and a deep molasses flavor.
- 0.25 cup white granulated sugar Adds crispness to the outer edges.
- 2 large eggs Brought to room temperature to ensure proper emulsification.
- 1 teaspoon pure vanilla extract Enhances the warm aroma of the grains.
- 1 cup King Arthur unbleached all-purpose flour Spoon-measured accurately to build the cookie structure.
- 1 teaspoon ground cinnamon Provides a warm background spice note.
- 0.5 teaspoon baking soda Acts as the leavening agent for a slight rise.
- 0.5 teaspoon sea salt Balances the sweetness of the brown sugars.
- 3 cups Quaker old-fashioned rolled oats Whole raw flakes that deliver a hearty chewy texture.
Instructions
- Place the softened unsalted butter, dark brown sugar, and white granulated sugar into a large clear glass mixing bowl. Use a handheld electric mixer at medium speed (about level 5 on a standard dial) to blend the ingredients for exactly 3 minutes. Scrape the bowl down with a rubber spatula halfway through the process to integrate all the stray sugar crystals. (I tried melting the butter completely the first time but the cookies spread into thin oily puddles on the tray. Creaming room-temperature butter is the real secret.) You will see the dark grainy mixture transform into a fluffy pale-tan paste that smells deeply of rich molasses. Stop mixing immediately once the fluffiness peaks. Going past 4 minutes beats too much air into the fat and causes the cookies to puff up and then deflate into dense disks. Cream at medium speed for 3 minutes, the aerated sugar crystals create the ideal base for a thick cookie texture.
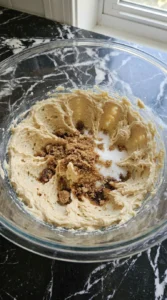
- Add 2 large eggs and pure vanilla extract directly into the creamed butter paste at a comfortable room temperature. Turn the electric mixer to medium-low heat (around level 3) and beat the wet mixture steadily for 90 seconds. Guide the beaters in wide concentric circles to draw the liquids completely into the dense sugar base. You will hear the wet slapping sound turn into a smooth whir as the eggs emulsify. The grainy batter turns into a glossy pale-caramel liquid that coats the sides of the glass evenly. Watch the clock closely because overwaking at this stage separates the fats and yields a greasy dough. Beat for 90 seconds until fully smooth, the emulsified eggs stabilize the structure so the fat doesn’t separate during baking.

- Pour the King Arthur unbleached all-purpose flour, ground cinnamon, baking soda, sea salt, and Quaker old-fashioned rolled oats into the wet base. Put away the electric mixer and use a heavy silicone spatula to fold the dry ingredients in a gentle J-shaped motion. Turn the glass bowl 90 degrees after each stroke to ensure you clear the flour pockets from the bottom. Stop folding the second the white flour streaks completely vanish and the oats are distributed. The dough turns into a thick tacky mass where individual oat flakes are heavily coated in a beige spiced paste. Overworking the dough at this point develops tough gluten that ruins the texture completely. Fold gently by hand just until mixed, minimal handling keeps the cookie tender and prevents a tough bake.
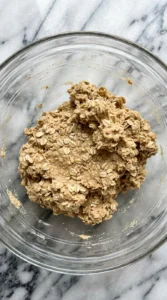
- Use a metal spring-loaded scoop to portion the thick dough into 12 identical rounded mounds. Arrange them across a large aluminum sheet pan lined with brown parchment paper, leaving exactly 2 inches of space between each ball. Ensure the mounds remain rough and asymmetrical rather than rolling them into perfect geometric spheres. (My first batch crowded the pan and baked into one massive single sheet cookie. Giving them space is critical.) Each mound shows an uneven craggy surface with protruding oat flakes that look beautifully rustic. If you crowd the tray the cookies merge and create thin crisp edges instead of thick centers. Leave 2 inches of space between mounds, proper spacing allows heat to circulate evenly for uniform thickness.

- Slide the sheet pan onto the center rack of a 350°F preheated oven and bake for 11 minutes. Do not open the oven door during the first 8 minutes to prevent a sudden drop in ambient temperature. Remove the pan immediately when the timer dings and set it on a wire cooling rack. You’ll smell a deep toasted oat aroma and see the edges turn a distinct golden brown while the center stays pale and slightly soft. The cookies will look slightly underbaked in the middle but they will firm up as they rest. Leaving them in the oven until the center looks hard dries out the interior completely. Bake at 350°F for exactly 11 minutes, removing them while soft keeps the center dense and delightfully chewy.

Notes
Nutrition
Reader Questions
Yes you can absolutely prep it early. Wrap the cookie dough tightly in plastic wrap and keep it in the fridge for up to 3 days before baking. When you are ready to bake just scoop the cold dough directly onto the pan and add 1 extra minute to the total oven time.
This common mistake happens if your butter was completely melted or too warm when you started mixing. Warm fat cannot trap air during the creaming stage so the dough melts instantly in a 350°F oven. Chill your next batch of shaped dough balls for 20 minutes before baking to fix this issue.
These baked treats will remain thick and chewy for about 5 days when stored at room temperature. You must keep them inside an airtight plastic container to prevent air from drying out the moisture. Tossing a slice of plain white bread into the container keeps them soft because the cookies absorb its moisture.
Yes you can freeze the finished bakes for up to 3 months with great success. Let the cookies cool completely on a wire rack then arrange them in a heavy-duty freezer bag separated by sheets of parchment paper. Thaw them on the kitchen counter for 20 minutes before serving or warm them up in the microwave for 10 seconds.
You can easily double all the ingredient quantities to make a large batch for a school party or holiday potluck. Make sure to mix the larger volume in a spacious 6-quart bowl so the oats distribute evenly. Bake the sheets one at a time on the center rack rather than crowding the oven to ensure even browning.
A Final Note
One of my signature recipes! This is an oatmeal cookie made the traditional home way, with old-fashioned oats and plenty of rich dark brown sugar. No raisins, that’s a controversial addition.
Though it requires patience to cool, it is worth every minute. The center is melt-in-your-mouth tender and the texture is thick and chewy. Makes 12 large servings.
This batch has plenty of fiber from the grains and it’s finished with a touch of cinnamon warming spice. You could stretch it to 15 smaller cookies. If making a double batch, scale up the recipe by 100% (click on servings and slide) and use a very large mixing bowl!
Did you know oatmeal cookies actually started out as traditional Scottish oatcakes? They were just savory flatbreads back then. People baked them right on hot griddles because they needed quick energy to get through the day.