Oreo Cookies Decorated for Halloween
A tray of Oreo Cookies Decorated for Halloween can turn a regular October afternoon into something worth remembering. I first made these for a small Halloween get-together and thought the candy coating would be the tricky part. A few cookies came out with uneven edges. One ghost even had a crooked face. But they were the first treats to vanish from the plate.
That’s when I learned that Halloween cookies don’t need neat lines to make people smile. Since then I’ve made these little chocolate treats for school parties and weekend baking sessions with friends. They’re crisp inside and sweet on the outside. Best of all, there’s no oven involved. If you’re putting together a bigger dessert spread, our Halloween Peanut Butter Spider Cookies make a fun match.

The spiders and ghosts look great together. And here’s what I love most. You can make three different designs with just one pack of cookies and a few colorful toppings. Some become bright orange pumpkins while others turn into white ghosts or striped mummies. These decorated Halloween Oreos don’t need much skill or fancy supplies, so even beginners can make a batch they’re proud to share.
Why This Recipe Works
Oreo Cookies Decorated for Halloween work because the crisp chocolate sandwich cookies stay firm beneath a thin candy shell. Melting the wafers at 50% microwave power and stirring between short bursts limits hot spots that can turn the coating thick.
The candy shell sets without baking and helps the dark chocolate details stay in place. For another cookie idea with a different finish, try our Halloween Pumpkin Cookies Royal Icing. Royal icing dries with a firmer sugar crust while candy wafers give these Oreos a smooth snap.
Ingredients

- Original Oreo chocolate sandwich cookies: Use 24 intact round sandwich cookies with classic chocolate wafers and vanilla cream filling to form the crisp base.
- Orange candy melting wafers: Melt into a smooth pumpkin-orange shell for coating 8 cookies without needing extra food coloring.
- Bright white vanilla candy melting wafers: Melt for coating 16 cookies and reserve some for the mummy stripes and attaching candy eyes.
- Dark chocolate melting wafers: Melt into a pipeable coating for drawing pumpkin faces and ghost expressions.
- Small candy eyeballs: Use 2 small edible candy eyes on each of the 8 mummy cookies for playful facial details.
- Green candy-coated sunflower seeds: Press one small green candy piece into the soft coating of each pumpkin cookie to create a tiny stem.
Kitchen Equipment
- Two medium microwave-safe mixing bowls: Choose bowls at least 4 inches wide and 3 inches deep for melting each candy color and dipping cookies without spilling.
- Microwave: Use a microwave with a 50% power setting for gentle candy melting and avoid full power because it can scorch the wafers.
- Silicone spatula: A small heat-safe silicone spatula stirs the melting wafers and scrapes the bowl clean without leaving lumps along the sides.
- Two dipping forks: Choose narrow forks with thin tines so excess candy coating can drain away without leaving thick ridges beneath each cookie.
- Two rectangular baking trays: Use two 13 by 18 inch trays to hold all 24 cookies in a single layer without crowding while their coating sets.
- Parchment paper: Use two sheets of nonstick parchment cut to fit the baking trays so the candy coated cookies release without breaking.
- Small disposable piping bag: Choose a small food-safe piping bag with a fine cut tip for drawing chocolate eyes and mouths without oversized lines.
- Instant-read kitchen thermometer: Choose a digital thermometer that reads around 90°F to 100°F accurately so the melted coating stays fluid without overheating.
- Large round white serving plate: A plate at least 14 inches wide holds the finished Halloween cookies in a loose arrangement without forcing them into a tall stack.
How to Make It
Step 1: Melt the orange candy wafers for pumpkin cookies

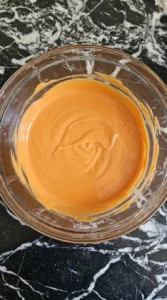
Put 12 ounces of orange candy melting wafers into a dry microwave-safe bowl. Heat at 50% power for 30 seconds and then stir slowly from the bottom with a silicone spatula. Repeat in 20-second bursts for about 1 to 2 minutes total. Stop when only a few soft pieces remain.
Keep stirring until the heat melts them. Aim for a smooth coating near 95°F. Don’t let water touch the bowl because even a few drops can make the candy coating turn thick and grainy. The mixture should fall from the spatula in a steady ribbon.
Next, check the color and texture. You’ll see a bright orange pool with no hard lumps and a soft sheen across the top. Stop heating once it’s smooth because extra heat makes the coating too thick for dipping. Gentle heat keeps the candy wafers fluid without scorching.
Tip: Use a bowl at least 4 inches wide so a whole Oreo fits easily without scraping against the sides.
Step 2: Dip eight Oreo cookies and add pumpkin stems

Take 8 original Oreo chocolate sandwich cookies and lower them one at a time into the melted orange coating. Turn each cookie with a fork and lift it out so the extra candy can drip back into the bowl. Then slide the coated cookies onto a parchment-lined baking tray. Keep about 1 inch between them.
While the coating is soft, press 1 green candy-coated sunflower seed against the upper edge of each cookie to make a small pumpkin stem. Work for 3 to 4 minutes before the candy starts to set. You’ll notice that the orange shell begins to lose its wet shine after about 5 minutes at 68°F to 72°F. Some edges will look thicker than others.
That’s normal. Don’t press the stems in after the coating hardens or they may fall off. Adding the stems early lets them bond to the soft shell.
Tip: Choose intact Oreo cookies from the center of the package because cracked wafers can separate when dipped into warm coating.
Step 3: Coat sixteen more cookies with white candy

Place 16 ounces of bright white vanilla candy melting wafers in a second microwave-safe bowl. Melt them at 50% power in 30-second bursts and stir after each burst for about 2 minutes total. Stop near 95°F when the last small bits melt through stirring. Then dip the remaining 16 Oreo cookies one by one.
Turn each cookie once and let the thick white coating drip back into the bowl. Place them on a second parchment-lined tray with at least 1 inch between the cookies. Leave them for 5 minutes at 68°F to 72°F. Half of these white cookies will become ghosts and the other half will become mummies.
Their pale shells should look smooth with a few natural bumps. Avoid touching the tops while they’re soft or you’ll leave deep marks. A brief rest firms the coating for the next details.
Tip: Keep the 8 ghost cookies on one side and the 8 mummy cookies on the other so you can decorate each group without confusion.
Step 4: Pipe chocolate faces and create mummy stripes

Melt 4 ounces of dark chocolate melting wafers at 50% microwave power in 20-second bursts for about 60 to 90 seconds. Stir until smooth and then let the chocolate cool near 90°F before adding it to a small piping bag. Snip a tiny opening. Pipe triangle eyes and crooked smiles on the 8 orange pumpkin cookies.
Next, add two oval eyes and a small mouth to each of the 8 white ghost cookies. Keep the lines thin so the faces stay clear. Melted chocolate should hold its shape instead of spreading into a puddle. For the 8 white mummy cookies, attach 2 candy eyeballs to each cookie with tiny dots of melted white coating.
Then drizzle the remaining white coating in loose diagonal bands across their fronts. (I once made the stripes too thick and hid every little eye. ) Keep the lines uneven and leave parts of the faces showing. Thin layers set faster and preserve the mummy details.
Tip: Cut only a 1/16-inch opening in the piping bag for small eyes and sharp pumpkin smiles without heavy chocolate blobs.
Step 5: Let the decorations set and arrange the Halloween cookies

Leave all 24 decorated cookies on their parchment-lined trays at 68°F to 72°F for 15 to 20 minutes. Check one pumpkin by gently touching a plain coated edge. It should feel firm and dry without leaving candy on your fingertip. Don’t stack the cookies while the chocolate details still feel tacky.
Once the coating is set, lift each cookie by its sides and place it on a large round white serving plate. Mix the three designs so pumpkins and ghosts and mummies appear throughout the plate. Finally, tilt a few cookies and let some edges overlap by about 1/4 inch. You’ll see a mix of orange and white shells with small handmade ridges and glossy chocolate faces.
If you rush the setting time, the faces can smudge against the other cookies. A full set protects the chocolate details during serving.
Tip: For a party tray, place the cookies in a single layer and use a second plate for extras instead of building a tall stack.
Pro Tips
- Use fresh Original Oreo cookies from a newly opened package because their crisp wafers hold together better during the 2-minute dipping process.
- Keep melted candy coating near 95°F and stir every 20 to 30 seconds while dipping. If it thickens, reheat briefly at 50% power.
- Slide a fork beneath each coated cookie and tap it gently against the bowl twice to remove excess candy without stripping the coating.
- Line two 13 by 18 inch baking trays with parchment before melting the wafers. You’ll have space to arrange 24 cookies without crowding.
- Let the orange and white coatings stand for about 5 minutes before drawing faces. The surface should lose its wet shine.
- Reserve roughly 2 ounces of the melted white coating for mummy stripes. Drizzle narrow diagonal lines so the two candy eyes stay visible.
- Choose small candy eyeballs about 1/4 inch wide because oversized decorations can hide the mummy stripes on a standard Oreo cookie.
- Make these Halloween Oreo treats one day before your party and keep them in a cool dry spot. The shells will hold their shape.
- Make monster Oreos by coating 8 cookies with 12 ounces of green candy melting wafers and adding uneven dark chocolate mouths and candy eyeballs.
- Create purple bat cookies by dipping 8 Oreos in 12 ounces of purple candy wafers and attaching two small chocolate wafer triangles as wings.
- Try a cookies and cream version by scattering 2 tablespoons of finely crushed Oreo wafers over the white coating before it sets.
- Make black cat cookies with 12 ounces of dark chocolate melting wafers for 8 Oreos and add candy eyes plus small chocolate triangle ears.
Substitutions & Variations
- Original Oreo chocolate sandwich cookies: 24 gluten-free Oreo chocolate sandwich cookies. Use the same number of cookies and follow the original dipping method. Gluten-free Oreos have a slightly more delicate crunch, so lift them gently from the coating. Check every topping label if you’re preparing treats for someone with celiac disease.
- Bright white vanilla candy melting wafers: 16 ounces of dairy-free white chocolate. Use an equal weight of dairy-free white chocolate and melt it in 15-second bursts at 50% microwave power. The coating may set softer than candy wafers. Check that the cookies and decorations are dairy-free too. For another Halloween baking option, explore our Halloween Cake Mix Cookies.
- Orange candy melting wafers: 12 ounces of bright white vanilla candy melting wafers with oil-based orange candy coloring. Use the same weight of candy wafers and add 2 to 4 drops of oil-based orange coloring after melting. The finish stays smooth but the shade may look softer. Don’t use water-based food coloring because it can make the coating seize.
- Small candy eyeballs: 16 small dots of melted dark chocolate. Pipe two small dark chocolate dots onto each of the 8 mummy cookies instead of using candy eyes. The faces will look simpler and less raised. This is also an option when you can’t find egg-free candy eyes, but check the chocolate label for allergens.
- Green candy-coated sunflower seeds: 8 small pieces of green fondant. Use one pea-sized piece of green fondant for each pumpkin cookie. Shape each piece into a tiny stem and press it onto the soft orange coating. Fondant creates a softer bite than crunchy candy-coated sunflower seeds.
Storage Instructions
Store Oreo Cookies Decorated for Halloween in an airtight container for 5 to 7 days in a cool dry spot near 68°F to 72°F. If your kitchen is warm, refrigerate them for up to 7 days with parchment between layers. Keep the container closed as the cookies return to room temperature to reduce moisture on the coating.
You can freeze them for up to 1 month in a freezer-safe container with parchment between layers, but freezing may affect the texture and appearance. These cookies don’t need reheating. If chilled, leave the sealed container on the counter for 20 to 30 minutes before serving.
If frozen, thaw the closed container in the refrigerator overnight before bringing it to room temperature. Don’t microwave the finished cookies because the candy faces will melt. Discard any cookies with mold or an unusual smell, and don’t serve cookies with damp or spoiled fillings.
Oreo Cookies Decorated for Halloween
Ingredients
Method
- Put 12 ounces of orange candy melting wafers into a dry microwave-safe bowl. Heat at 50% power for 30 seconds and then stir slowly from the bottom with a silicone spatula. Repeat in 20-second bursts for about 1 to 2 minutes total. Stop when only a few soft pieces remain. Keep stirring until the heat melts them. Aim for a smooth coating near 95°F. Don’t let water touch the bowl because even a few drops can make the candy coating turn thick and grainy. The mixture should fall from the spatula in a steady ribbon. Next, check the color and texture. You’ll see a bright orange pool with no hard lumps and a soft sheen across the top. Stop heating once it’s smooth because extra heat makes the coating too thick for dipping. Gentle heat keeps the candy wafers fluid without scorching.
- Take 8 original Oreo chocolate sandwich cookies and lower them one at a time into the melted orange coating. Turn each cookie with a fork and lift it out so the extra candy can drip back into the bowl. Then slide the coated cookies onto a parchment-lined baking tray. Keep about 1 inch between them. While the coating is soft, press 1 green candy-coated sunflower seed against the upper edge of each cookie to make a small pumpkin stem. Work for 3 to 4 minutes before the candy starts to set. You’ll notice that the orange shell begins to lose its wet shine after about 5 minutes at 68°F to 72°F. Some edges will look thicker than others. That’s normal. Don’t press the stems in after the coating hardens or they may fall off. Adding the stems early lets them bond to the soft shell.

- Place 16 ounces of bright white vanilla candy melting wafers in a second microwave-safe bowl. Melt them at 50% power in 30-second bursts and stir after each burst for about 2 minutes total. Stop near 95°F when the last small bits melt through stirring. Then dip the remaining 16 Oreo cookies one by one. Turn each cookie once and let the thick white coating drip back into the bowl. Place them on a second parchment-lined tray with at least 1 inch between the cookies. Leave them for 5 minutes at 68°F to 72°F. Half of these white cookies will become ghosts and the other half will become mummies. Their pale shells should look smooth with a few natural bumps. Avoid touching the tops while they’re soft or you’ll leave deep marks. A brief rest firms the coating for the next details.

- Melt 4 ounces of dark chocolate melting wafers at 50% microwave power in 20-second bursts for about 60 to 90 seconds. Stir until smooth and then let the chocolate cool near 90°F before adding it to a small piping bag. Snip a tiny opening. Pipe triangle eyes and crooked smiles on the 8 orange pumpkin cookies. Next, add two oval eyes and a small mouth to each of the 8 white ghost cookies. Keep the lines thin so the faces stay clear. Melted chocolate should hold its shape instead of spreading into a puddle. For the 8 white mummy cookies, attach 2 candy eyeballs to each cookie with tiny dots of melted white coating. Then drizzle the remaining white coating in loose diagonal bands across their fronts. (I once made the stripes too thick and hid every little eye.) Keep the lines uneven and leave parts of the faces showing. Thin layers set faster and preserve the mummy details.

- Leave all 24 decorated cookies on their parchment-lined trays at 68°F to 72°F for 15 to 20 minutes. Check one pumpkin by gently touching a plain coated edge. It should feel firm and dry without leaving candy on your fingertip. Don’t stack the cookies while the chocolate details still feel tacky. Once the coating is set, lift each cookie by its sides and place it on a large round white serving plate. Mix the three designs so pumpkins and ghosts and mummies appear throughout the plate. Finally, tilt a few cookies and let some edges overlap by about 1/4 inch. You’ll see a mix of orange and white shells with small handmade ridges and glossy chocolate faces. If you rush the setting time, the faces can smudge against the other cookies. A full set protects the chocolate details during serving.

Notes
Frequently Asked Questions
Yes, you can prepare the whole batch 2 to 3 days before your Halloween party. Let the candy shells firm up for at least 20 minutes at 68°F to 72°F before packing the cookies. Place parchment between layers and keep the container away from heat so the faces stay neat.
These decorated cookies taste best within 5 to 7 days when stored in an airtight container in a cool dry room. Keep them near 68°F to 72°F and away from direct sunlight. The coating may last longer, but the cookie filling and wafers gradually lose their fresh texture.
Yes, you can replace the candy wafers with an equal weight of good-quality melting chocolate. Milk chocolate creates a sweeter and softer coating while dark chocolate gives a stronger cocoa flavor. Chocolate that isn’t tempered may stay soft or develop pale streaks, so use melting chocolate made for dipping.
Candy wafers can turn thick when they get too hot or come into contact with moisture. Melt them at 50% microwave power in 20 to 30-second bursts and stir well between each round. If the coating smells scorched or has hard grainy lumps, replace it instead of coating your cookies.
Absolutely. Use 48 Oreo cookies and double every candy coating and decoration quantity to make 16 pumpkins and 16 ghosts and 16 mummies. Melt the coatings in separate batches so they don’t become thick while you’re working. Allow about 35 to 40 minutes for decorating before the final 20-minute setting period.
Arrange 3 or 4 cookies per guest alongside fresh strawberries and orange slices for a colorful dessert spread. You can also pair them with Halloween Peanut Butter Spider Cookies for different textures. Put the treats out about 15 minutes before guests arrive and keep them away from direct heat.
You can refrigerate the cookies for up to 7 days in a tightly sealed container, although moisture may leave marks on the coating. Freezing isn’t my first choice because thawing can cause condensation and soften the wafers. If necessary, freeze for up to 1 month and thaw inside the closed container before opening it.
Final Thoughts
These little Halloween cookies have become one of my favorite treats to make! Oreo Cookies Decorated for Halloween use classic chocolate sandwich cookies with a crisp candy shell and three playful designs. No baking required.
The funny ghost faces always remind me of the first batch I made, when the crooked decorations got the biggest smiles. This recipe makes 24 cookies with 8 pumpkins and 8 ghosts and 8 mummies. You can stretch the batch to 48 by doubling the ingredients.
For a bigger dessert table, add our Halloween Cake Mix Cookies or Halloween Party Food Rice Krispies. Give these a try and share your favorite spooky design!
The classic Oreo sandwich cookie first appeared in 1912. More than a century later, its round chocolate wafers still make a handy base for creative treats. That dark cookie color also makes white ghosts and bright orange pumpkins stand out.