Pink and Orange Halloween Cookies
A little swirl of pink and orange makes an ordinary sugar cookie feel like a Halloween party. These Pink and Orange Halloween Cookies have soft buttery centers and lightly golden edges with bright patches of color running through every bite. They’re sweet and playful and just messy enough to look homemade. And the best part? You don’t need fancy cookie cutters or hours of decorating. Hi!
Meet your new favorite Halloween baking project. We’re talking soft sugar cookies with bright pink and orange swirls and little pops of festive sprinkles that make the whole batch look like it belongs at a party. So fun. So buttery. And so much easier than those cookies that need five piping bags and a steady hand. If you’re filling a Halloween dessert tray, our Halloween Peanut Butter Spider Cookies make a cute spooky addition.

That’s right. We’re calling on a simple homemade sugar cookie dough and two cheerful colors to do all the decorating work for us. And they really pull it off. A short chill helps those bold swirls stay distinct while the cookies bake. You get pretty little treats without turning your kitchen into a frosting workshop.
Why This Recipe Works
The color stays bold because concentrated gel dye adds less moisture than liquid coloring. And a 30-minute chill keeps the butter firm so Pink and Orange Halloween Cookies hold their swirls instead of spreading into thin circles.
Baking at 350°F also sets the edges without drying out the soft centers. For another colorful decorating project, try our Halloween Pumpkin Cookies Royal Icing. They use a different finishing method that gives you more room to play with designs.
Ingredients
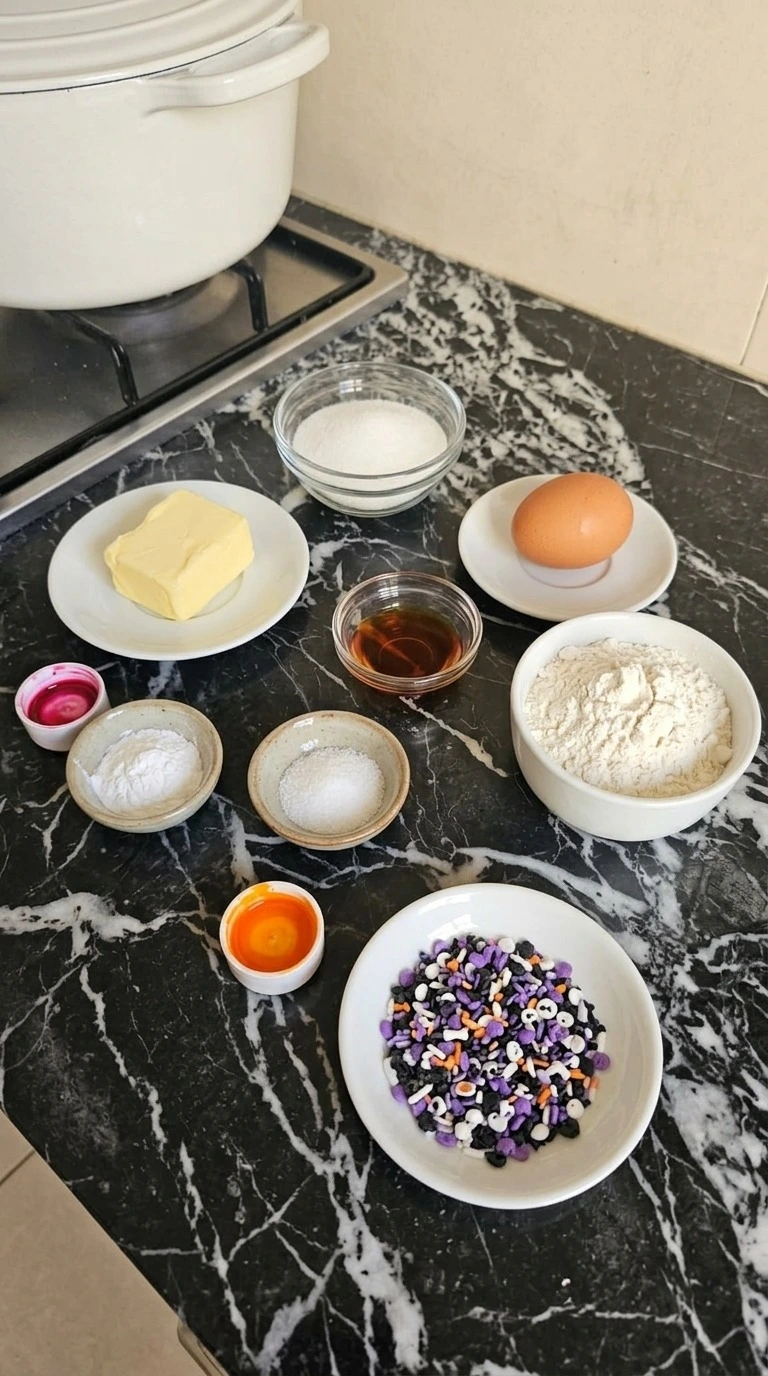
- Unsalted butter: Softened to about 65°F for creaming, adding buttery flavor and a tender crumb.
- Granulated white sugar: Adds sweetness and helps the creamed butter form a light base.
- Large chicken egg: Brings moisture and binds the dough so the cookies hold together.
- Pure vanilla extract: Adds a gentle vanilla aroma that complements the buttery sugar cookie base.
- All-purpose wheat flour: About 270 grams, measured without packing, to provide structure while keeping the centers soft.
- Baking powder: Provides a little lift so the cookies bake with gently puffed centers.
- Fine sea salt: Balances the sweetness and brings out the butter and vanilla flavors.
- Concentrated pink gel food coloring: Folded into half the dough for vivid pink color without adding much moisture.
- Concentrated orange gel food coloring: Folded into the remaining dough for bright pumpkin orange streaks.
- Purple black and white Halloween sprinkles: Pressed lightly into the unbaked tops for small festive pops of color.
Kitchen Equipment
- Electric hand mixer: A mixer with at least three speeds creams the butter evenly, while a whisk takes longer and may leave the sugar mixture too dense.
- Large clear glass mixing bowl: A 4-quart bowl gives the dough room to mix without spilling, while a smaller bowl makes it harder to fold in the flour evenly.
- Medium mixing bowls: Two bowls holding at least 2 quarts each keep the pink and orange dough portions separate, while shallow dishes make coloring messy.
- Rubber spatula: A flexible silicone spatula scrapes the bowl clean and folds in color without overworking the dough, while a stiff spoon can be less effective.
- Measuring cups and spoons: Use level measuring tools with clear markings for accurate flour and coloring quantities because extra flour can make these cookies dry.
- Digital kitchen scale: A scale accurate to 1 gram helps divide the dough into even 24-gram portions so the cookies bake at a similar rate.
- Baking sheets: Two light-colored 13-by-18-inch rimmed baking sheets provide room for 12 cookies each, while dark pans can brown the bottoms too fast.
- Parchment paper: Two sheets cut to fit the baking pans prevent sticking and make cleanup easier, while wax paper isn’t suitable for oven baking.
- Wire cooling rack: A rack at least 12 inches wide allows air to pass under the cookies, while a flat plate can trap moisture under warm bottoms.
- Oven thermometer: An oven-safe thermometer reading from 100°F to 600°F helps confirm the 350°F baking temperature so the colorful dough doesn’t overbrown.
How to Make It
Step 1: Cream the butter and sugar into a fluffy base

Place 3/4 cup softened unsalted butter and 3/4 cup granulated white sugar in a large mixing bowl. Beat them on medium speed for 2 to 3 minutes until the mixture turns pale and fluffy. Next add 1 large egg and 2 teaspoons pure vanilla extract.
Beat for another 30 to 45 seconds and scrape the sides halfway through so everything blends. Keep the butter near 65°F before mixing because overly warm butter makes the dough spread too much. You should see a smooth mixture with no slick patches of butter.
The base should look creamy and a little airy. Stop once the egg blends in because extra beating can make the dough loose. This short mixing window traps small air pockets that give the cookies a tender bite.
Tip: Use unsalted butter that’s soft enough to dent with one finger but still holds its shape. Melted butter will make the dough much harder to swirl.
Step 2: Mix the dry ingredients into a soft cookie dough
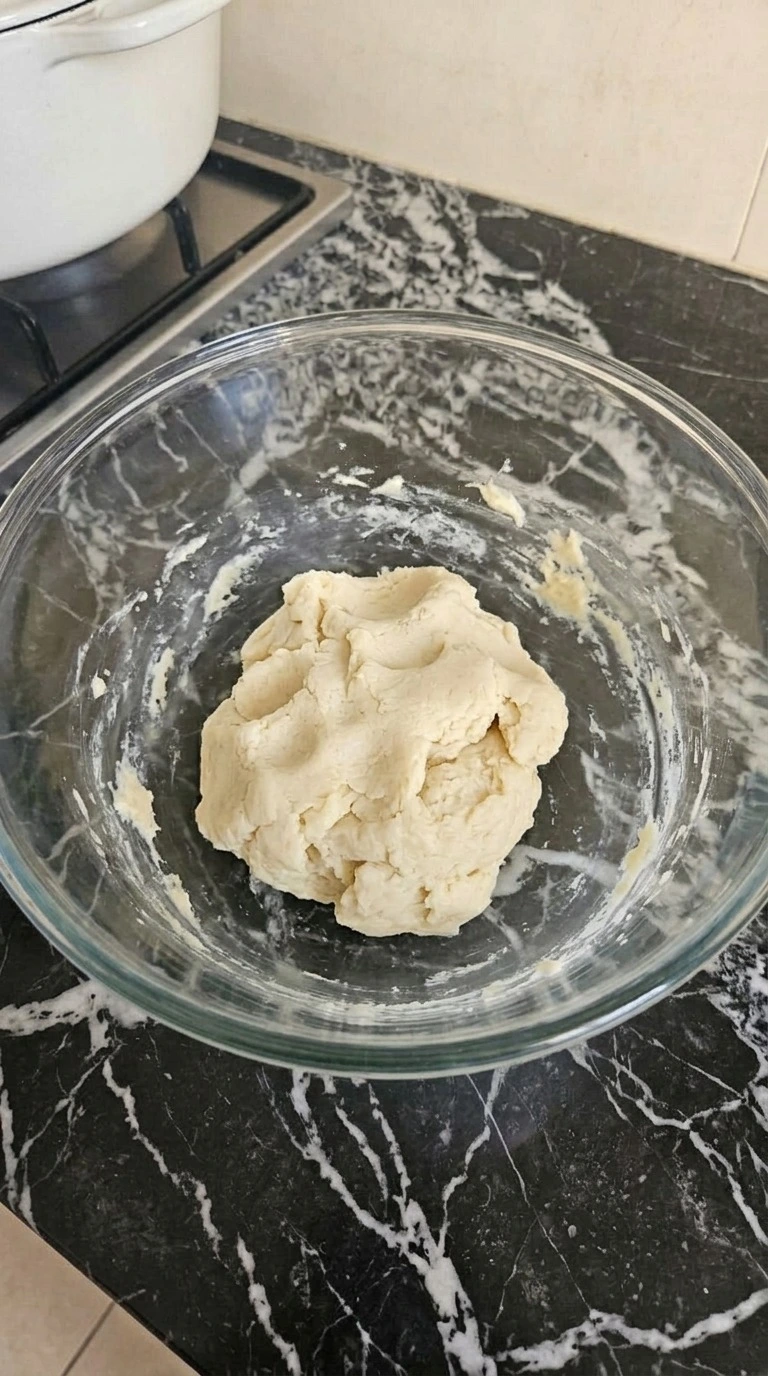
In a separate bowl combine 2 1/4 cups all-purpose wheat flour with 1 teaspoon baking powder and 1/2 teaspoon fine sea salt. Stir for 20 to 30 seconds so the leavener spreads evenly through the flour. Then add the dry mixture to the creamed butter in two batches.
Mix on low speed for about 30 seconds after each addition and stop once the last dry streak fades. The dough should hold together when pressed but still feel soft. Don’t keep mixing once it’s smooth because that can make the cookies tough.
Look for thick pale dough with a slightly matte finish and a few soft folds. It shouldn’t run or cling like cake batter. Gentle mixing limits gluten buildup so the baked cookies stay tender.
Tip: For the most reliable texture, weigh 270 grams of all-purpose wheat flour instead of packing flour tightly into the measuring cup.
Step 3: Color and swirl the pink and orange dough

Divide the dough into two equal portions of about 295 grams each and place them in separate bowls. Add 1/4 teaspoon concentrated pink gel food coloring to one portion and 1/4 teaspoon concentrated orange gel food coloring to the other. Fold each color through its dough for 45 to 60 seconds until the shade looks bold but still slightly uneven.
Next pinch small pieces from both colors and press them together without fully blending. Chill the combined dough for 30 minutes at about 38°F before shaping. This keeps the butter firm enough to hold the swirl.
You’ll see clear pink and orange streaks running through each rough mound. (I found that mixing the colors too long left the dough looking like one muddy shade. ) Stop while the colors still stand apart because distinct streaks create the marbled finish.
Tip: Start with concentrated gel coloring rather than liquid dye. A quarter teaspoon adds strong color without extra moisture that could soften the dough.
Step 4: Shape the colorful dough and add Halloween sprinkles

Line two baking sheets with parchment paper and divide the chilled dough into 24 portions of about 24 to 25 grams each. Roll each piece once between your palms to form a rough ball while keeping the pink and orange streaks visible. Then place 12 portions on each sheet with about 2 inches between them.
Flatten each ball gently to about 1/2 inch thick and press a share of the 1/4 cup purple black and white Halloween sprinkles onto the tops. Work for about 8 to 10 minutes so the dough stays cool. The shaped cookies should show uneven bands of pink and orange with a few sprinkles pressed into each top.
Don’t press them paper thin. Keeping the centers thick helps the cookies bake with soft middles instead of dry edges.
Tip: If the dough starts sticking to your hands during shaping, chill the portions for another 10 minutes rather than adding extra flour.
Step 5: Bake the cookies until the edges are lightly golden

Heat the oven to 350°F and place one sheet on the center rack. Bake the 12 shaped cookies for 10 to 12 minutes until their edges look set and show the first hint of golden color. The centers should look slightly puffed and matte rather than wet.
Bake the second sheet the same way. Next leave the cookies on their sheets for 5 minutes before moving them to a cooling rack. The pink and orange shades should stay bright while the outer edges become gently firm.
Watch closely after minute 10. If you wait for the whole top to turn golden, the cookies can dry out. The brief rest lets the soft centers finish setting without extra oven heat.
Tip: Check your oven with a separate thermometer. A 25°F difference can make a big change to the color and texture of these cookies.
Step 6: Cool and serve the colorful Halloween cookies

Let the baked cookies finish cooling on the rack for 15 to 20 minutes until their centers feel firm enough to lift without bending. Once cool, transfer a few onto a clean white serving plate. Break one cookie in half and place the pieces slightly apart so the soft pink and orange crumb shows.
The cookies should reach about 70°F before you seal any leftovers because trapped warmth can create moisture in the storage container. Handle them gently as the centers stay tender. You’ll see small golden patches along the edges and uneven pink and orange swirls across the tops.
The inside should look soft rather than wet. Cooling fully allows the crumb to set without trapping extra moisture.
Tip: For a party tray, arrange the cookies in two loose layers with parchment between them so the sprinkles stay intact.
Pro Tips
- Keep the unsalted butter near 65°F before creaming. It should dent under your finger but still hold its shape for a light cookie dough.
- Weigh 270 grams of all-purpose wheat flour if you have a kitchen scale. Too much flour creates dry cookies with crumbly edges.
- Choose concentrated gel colors and start with 1/4 teaspoon per dough portion. Liquid dyes add moisture and can blur the pink and orange swirls.
- Chill the colored dough for 30 minutes before shaping. If it warms up during rolling, return it to the fridge for another 10 minutes.
- Use light-colored baking sheets with parchment paper and leave 2 inches between dough portions. Dark sheets can brown the cookie bottoms too fast.
- Check the cookies after 10 minutes at 350°F. Remove them when the edges look set and the centers still have a soft puff.
- Press about 1/2 teaspoon Halloween sprinkles into each shaped cookie before baking. This helps the decorations stay attached without crushing the dough.
- For the prettiest swirls, twist one pink piece with one orange piece just once or twice. Too much rolling blends the shades together.
- Make a citrus version by mixing 1 teaspoon finely grated orange zest into the orange dough and 1/2 teaspoon lemon zest into the pink dough for a fresh flavor.
- For a chocolate twist, replace 2 tablespoons of the all-purpose wheat flour with 2 tablespoons unsweetened cocoa powder in the pink portion. The color will turn darker and the cookies will taste mildly chocolaty.
- Create pastel Halloween cookies by using just 2 drops of concentrated gel coloring in each dough portion and replacing the dark sprinkles with 1/4 cup pastel jimmies.
- For a winter holiday version, swap the orange gel coloring for green gel coloring and use 1/4 cup red and white holiday sprinkles instead of Halloween decorations.
Substitutions & Variations
- Unsalted butter: Use 3/4 cup plant-based baking butter in a firm stick form. Choose a dairy-free baking butter with at least 75% fat for the closest texture. Softer spreads contain more water and can make the cookies spread too much. Chill the dough for an extra 15 minutes if it feels sticky.
- All-purpose wheat flour: Use 2 1/4 cups gluten-free 1-to-1 baking flour blend containing xanthan gum. Choose a blend designed for cookies and let the mixed dough rest for 15 minutes before coloring. Gluten-free cookies may have a slightly more crumbly texture. For another Halloween baking option, explore our Halloween Cake Mix Cookies, though you’ll need to check the cake mix ingredients for dietary suitability.
- Large chicken egg: Use 1 tablespoon finely ground golden flaxseed mixed with 3 tablespoons warm water. Let the mixture thicken for 10 minutes before adding it to the creamed butter. The cookies will be slightly denser and less golden around the edges. Their centers may also feel softer after cooling.
- Concentrated pink and orange gel food coloring: Use 1/2 teaspoon freeze-dried raspberry powder for the pink dough and 1/2 teaspoon pumpkin powder for the orange dough. These powders give softer natural shades rather than bright candy colors. Raspberry adds a mild tart flavor while pumpkin powder gives a muted orange tint. Add another 1/4 teaspoon of either powder if needed, but avoid large amounts that could dry the dough.
- Purple black and white Halloween sprinkles: Use 1/4 cup pastel-colored jimmies or naturally colored sugar sprinkles. Jimmies usually hold their shape better in the oven while colored sugar can partially melt into the tops. Check the package if you need dairy-free or gluten-free decorations. Keep the amount at 1/4 cup to avoid overwhelming the soft cookies.
Storage Instructions
Pink and Orange Halloween Cookies stay soft for up to 4 days in an airtight container at room temperature. If your kitchen runs warm, refrigerate them at 40°F or below for up to 7 days and separate the layers with parchment paper. You can also freeze the fully cooled cookies for up to 3 months. First freeze them in a single layer for 1 hour and then transfer them to a freezer-safe container with parchment between layers.
Keep the lid tightly closed to protect the buttery flavor and prevent freezer odors. For serving, thaw frozen cookies in their closed container for 45 to 60 minutes. Then warm them at 275°F for 3 to 4 minutes if you’d like a softer center. Don’t add water or milk because extra moisture can make the tops sticky.
Discard cookies that show mold or develop an unusual smell. If they feel damp or have an unpleasant flavor, it’s best to throw them away.
Pink and Orange Halloween Cookies
Ingredients
Method
- Place 3/4 cup softened unsalted butter and 3/4 cup granulated white sugar in a large mixing bowl. Beat them on medium speed for 2 to 3 minutes until the mixture turns pale and fluffy. Next add 1 large egg and 2 teaspoons pure vanilla extract. Beat for another 30 to 45 seconds and scrape the sides halfway through so everything blends. Keep the butter near 65°F before mixing because overly warm butter makes the dough spread too much. You should see a smooth mixture with no slick patches of butter. The base should look creamy and a little airy. Stop once the egg blends in because extra beating can make the dough loose. This short mixing window traps small air pockets that give the cookies a tender bite.

- In a separate bowl combine 2 1/4 cups all-purpose wheat flour with 1 teaspoon baking powder and 1/2 teaspoon fine sea salt. Stir for 20 to 30 seconds so the leavener spreads evenly through the flour. Then add the dry mixture to the creamed butter in two batches. Mix on low speed for about 30 seconds after each addition and stop once the last dry streak fades. The dough should hold together when pressed but still feel soft. Don’t keep mixing once it’s smooth because that can make the cookies tough. Look for thick pale dough with a slightly matte finish and a few soft folds. It shouldn’t run or cling like cake batter. Gentle mixing limits gluten buildup so the baked cookies stay tender.

- Divide the dough into two equal portions of about 295 grams each and place them in separate bowls. Add 1/4 teaspoon concentrated pink gel food coloring to one portion and 1/4 teaspoon concentrated orange gel food coloring to the other. Fold each color through its dough for 45 to 60 seconds until the shade looks bold but still slightly uneven. Next pinch small pieces from both colors and press them together without fully blending. Chill the combined dough for 30 minutes at about 38°F before shaping. This keeps the butter firm enough to hold the swirl. You’ll see clear pink and orange streaks running through each rough mound. (I found that mixing the colors too long left the dough looking like one muddy shade.) Stop while the colors still stand apart because distinct streaks create the marbled finish.

- Line two baking sheets with parchment paper and divide the chilled dough into 24 portions of about 24 to 25 grams each. Roll each piece once between your palms to form a rough ball while keeping the pink and orange streaks visible. Then place 12 portions on each sheet with about 2 inches between them. Flatten each ball gently to about 1/2 inch thick and press a share of the 1/4 cup purple black and white Halloween sprinkles onto the tops. Work for about 8 to 10 minutes so the dough stays cool. The shaped cookies should show uneven bands of pink and orange with a few sprinkles pressed into each top. Don’t press them paper thin. Keeping the centers thick helps the cookies bake with soft middles instead of dry edges.

- Heat the oven to 350°F and place one sheet on the center rack. Bake the 12 shaped cookies for 10 to 12 minutes until their edges look set and show the first hint of golden color. The centers should look slightly puffed and matte rather than wet. Bake the second sheet the same way. Next leave the cookies on their sheets for 5 minutes before moving them to a cooling rack. The pink and orange shades should stay bright while the outer edges become gently firm. Watch closely after minute 10. If you wait for the whole top to turn golden, the cookies can dry out. The brief rest lets the soft centers finish setting without extra oven heat.

- Let the baked cookies finish cooling on the rack for 15 to 20 minutes until their centers feel firm enough to lift without bending. Once cool, transfer a few onto a clean white serving plate. Break one cookie in half and place the pieces slightly apart so the soft pink and orange crumb shows. The cookies should reach about 70°F before you seal any leftovers because trapped warmth can create moisture in the storage container. Handle them gently as the centers stay tender. You’ll see small golden patches along the edges and uneven pink and orange swirls across the tops. The inside should look soft rather than wet. Cooling fully allows the crumb to set without trapping extra moisture.

Notes
Frequently Asked Questions
Yes! You can make the colored dough up to 48 hours before baking and keep it tightly wrapped in the fridge at 40°F or below. When you’re ready, let the dough sit for 5 to 10 minutes if it’s too firm to shape. Then form the cookies and bake at 350°F for 10 to 12 minutes.
Store fully cooled cookies in an airtight container for up to 4 days at room temperature or 7 days in the refrigerator. Keep them away from direct sunlight because bright food coloring can fade with time. For the softest texture, let chilled cookies sit out for about 15 minutes before serving.
Yes, but the texture will change slightly. Replace the egg with 1 tablespoon ground golden flaxseed mixed with 3 tablespoons warm water and let it thicken for 10 minutes. For dairy-free cookies, use 3/4 cup firm plant-based baking butter instead of unsalted butter. Expect a slightly denser center and a little less golden color.
This usually happens when the dough becomes too warm or gets rolled too many times. Keep the dough chilled for 30 minutes at about 38°F and combine the colors with only a few gentle presses. Also use concentrated gel coloring instead of liquid dye because extra moisture makes the marbled pattern less defined.
The butter may have been too warm or the flour measurement may have been too low. Measure 270 grams of all-purpose wheat flour and chill the shaped cookies for 15 minutes if they feel soft. Bake at 350°F on a cool baking sheet because placing dough on a warm sheet can encourage early spreading.
Absolutely! Double every ingredient to make about 48 cookies and divide the dough into four manageable portions before coloring. Bake 12 cookies per sheet at 350°F for 10 to 12 minutes. Use the center rack for consistent results and let each baking sheet cool before adding another batch of chilled dough.
Yes! Freeze the fully cooled cookies in a freezer-safe container with parchment between layers for up to 3 months. Thaw them in the closed container at room temperature for about 45 to 60 minutes. If you want a freshly baked feel, warm them at 275°F for 3 to 4 minutes after thawing.
Final Thoughts
Some afternoons just call for music in the kitchen and a tray of Pink and Orange Halloween Cookies cooling nearby. That’s usually when I end up reaching for one before the rest have even made it onto the plate.
The little trick with keeping the two dough colors separate and giving them that full 30-minute chill really does make the difference between muddy swirls and bright little patches of Halloween fun. Tag me on Instagram if you make a batch because I love seeing how everyone’s colors turn out.
And if you’re filling a Halloween dessert table, try our Halloween Oreo Cookies and Brown Butter Halloween Candy Cookies too.
Traditional Halloween baking often leans on orange and black, but pink gives these cookies a playful candy-shop look. The bright swirls aren’t made with icing. They’re formed right in the dough before baking, which keeps decorating simple and makes every cookie a little different.